
Mastering Lock Screen Settings How to Enable and Disable on Vivo X Fold 2
Mastering Lock Screen Settings: How to Enable and Disable on Vivo X Fold 2
In the modern world, the use of smartphones has become such a common trend that everyone would feel abnormal if they don’t have a smartphone of their own. So big the demand is that all IT companies are trying their best to introduce as well as innovate several excellent brands of smartphones. To support the function of smartphones, by far there have been numerous operating systems existed. Among them, Android is one of the most popular as well as trustworthy OS.
Just like any other smartphone, all Android devices have their ways to protect the data stored inside a smartphone from being corrupted or leaked. One of the simplest and most easy-to-use ways is to make use of the lock screen.
The lock screen has proved to be a traditional yet efficient way to help you protect your Android phones. In this article, we will provide you with an informative piece of writing about everything you need to know when it comes to the Android lock screen, and ways to enable and disable it.
If you have spent time searching and looking for features of your Android devices, you will find the process of enabling a lock screen is a piece of cake.
· Step 1: On the main screen of your Android devices, tap on the gear icon - which is the icon representing the Settings menu. Once you have chosen it, you will see a drop-down menu on the screen. In the options provided, tap on the Security bar.

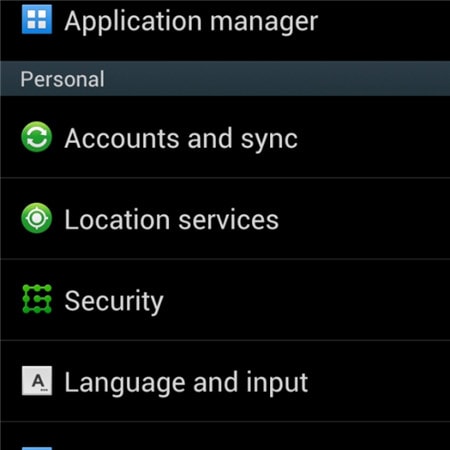
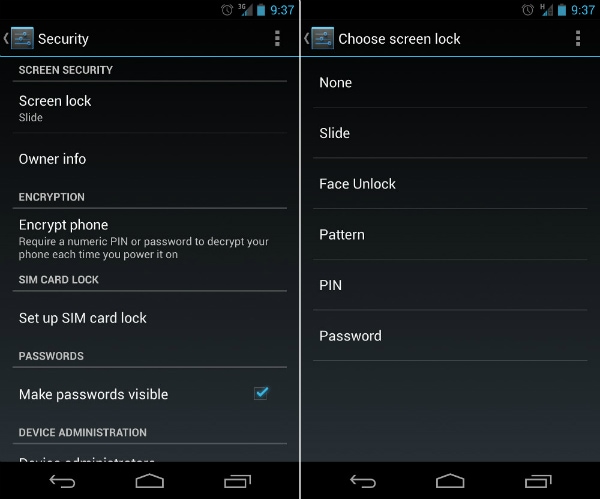
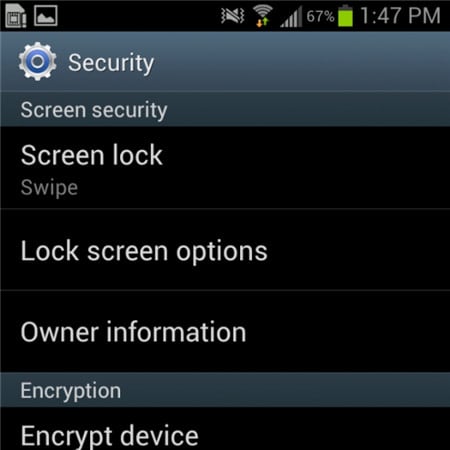
· Step 2: Under the tab whose heading is entitled Screen Security, tap on the first bar in the list called Screen lock.

· Step 3: Once the step is done successfully, Android will give you plenty of choices about ways to lock your Android devices’ screens. Among these ways, select one particular type which you feel is most convenient as well as free-risk. After that, type in your PIN code to confirm the choice and finally activate your lock screen feature as you wish.

Part 2: How to Disable Android Lock Screen
To certain customers, the lock screen can do more harm than good, and they would prefer to disable the screen lock on their Android devices. This process is also an easy one to follow, as long as you still hold good memory of the security code.
· Step 1: On the main screen of your Android devices, tap on the gear icon. It will directly lead you to the Settings menu of the phone. After that, a drop-down menu will appear with several choices and bars. Among them, tap on the Security option to begin your work.
· Step 2: Under the heading called Screen Security heading, you will be shown 3 choices. Tap on the first one, which is entitled Screen lock.
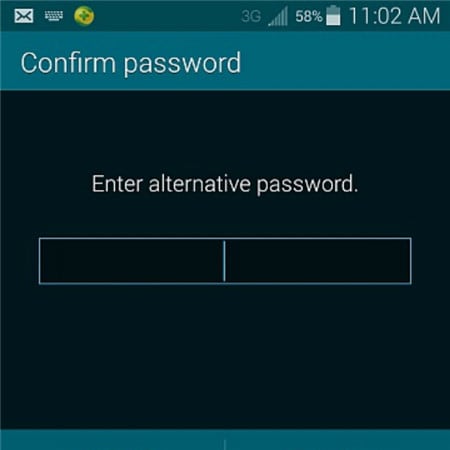
· Step 3: Once you have done the previous step, a brand new screen will appear and then you will be asked to fill in your PIN code. This is a step that helps guarantee that you are the true owner of the Android device.

Step 4: As soon as you have confirmed the right PIN code in the bar provided, you will then be presented to the next drop-down menu. A similar screen will appear which shows you plenty of choices. Tap on the top of that list, which is a bar called None.


Step 5: In the end, you have successfully disabled the screen lock on your Android devices. You are now capable of using it without any hesitation about the screen lock.
Part 3: Common Problems of Disabling Lock Screen
The process to disable the screen lock on Android may seem easy to handle as well as straightforward to several customers, but there are still some annoying problems that users have to deal with while trying to disable the lock screen.
What are the top 2 common problems?
Below are the two most common problems faced by Android users during their efforts to disable the feature of screen lock.
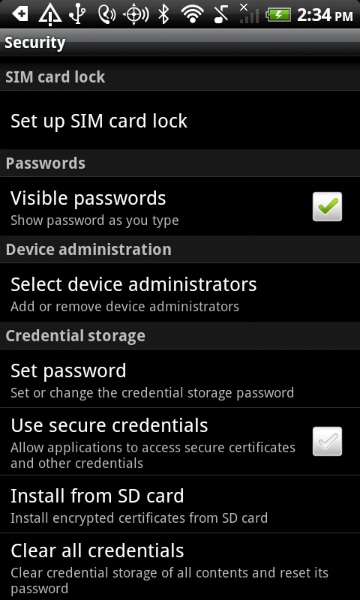
1. In the Screen Security choice, the None bar can not be chosen.
Description of the problem: There is a sentence below it stated: “Disabled by administrators, encryption policy or credential storage”. All the space of the None option is in white and grey.
The solution to this problem is quite simple. Once you have made sure you are suffering from this nasty one, try to follow these below pieces of advice to see if it is capable of giving you a hand.
Step 1: Open the Settings menu from the main screen. Then tap on the Credential Storage. You will see a drop-down menu like the screenshot below.
Step 2: Continue to tap on the Clear Credentials (Remove all certificates) option. Then next click on the OK button. Wait for some seconds until your Android device has finished the process.
Step 3: To make sure that the previous step has been performed successfully, try looking at the bottom of the drop-down menu. If the Clear Credentials (Remove all certificates) are grey out and can not be selected, then you have managed to do it.

Step 4: Now that the problem is solved, you can feel free to turn back to your Screen lock option in the beginning and disable the feature of locking screen Android as usual.
2. You have mistakenly encrypted your SD card. You want to disable the encryption, only to realize that it requires you to set a new screen lock code. But when you come to the Screen lock menu, all the options but Password have been greyed out.
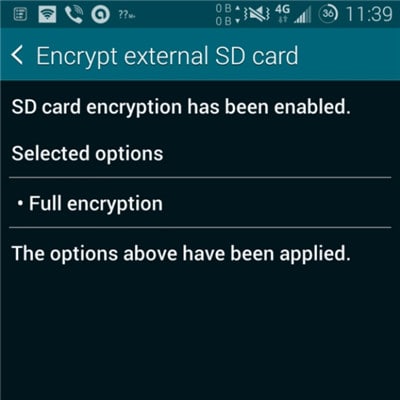
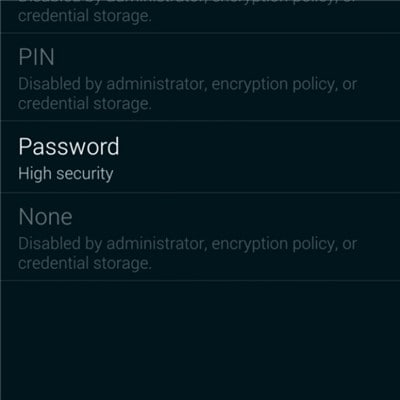
This is pretty weird, but actually, it is one of the most common troubles that many users have complained about. But to your surprise, the solution is very simple and easy. All you have to do is to reset your password, but with a little change. Your password MUST include at least ONE NUMBER in it. Confirm your new password then you will be able to disable the lock screen Android as usual.
Bonus Tip: Remove Android Screen Lock If Forgotten Password/Pattern
As much as the lock screen can protect the personal information on the phone, it can also cause much trouble if you forget the lock screen password or enter the wrong password too many times. So here comes the need for phone unlocking software . One of the best is Dr.Fone - Screen Unlock (Android), which can help us bypass forgotten Android screen locks without any data loss(limited to Samsung and LG series phones). Other Android brand phones will be wiped out all the data once starting to unlock with Dr.Fone
Dr.Fone - Screen Unlock (Android)
Remove 4 Types of Android Screen Lock without Data Loss
- It can remove 4 screen lock types - pattern, PIN, password & fingerprints.
- One-time payment for unlimited use of multiple devices within a specified time period.
- Work for Samsung Galaxy S/Note/Tab series, LG G2/G3/G4, etc.
- Besides, unlocking the screen lock, it also works best to unlock the Samsung FRP lock in devices with Android 5.0 and higher.
3981454 people have downloaded it
Steps on How to Unlock Forgotten Password in Android Phones
Step 1: Launch Dr.Fone and click on Screen Unlock from the primary window.
Step 2: Connect your Android device to the computer via USB cable. The program will recognize the phone directly. Select the phone model or “I can’t find my device model from the list above” to continue.

Step 3: Follow the instruction on the program exactly to set the phone to Download Mode. First, you will need to Power off your Phone. Secondly, Press on Volume Down, Home button, and Power button simultaneously. Thirdly press the Volume up button to navigate until the phone enters Download mode.

Step 4: After you set the phone to Download mode, it will begin to download the recovery package. When the recovery package is downloaded successfully, the lock screen on your Vivo X Fold 2 devicewill be removed. You won’t lose any data during the whole process.

How to Remove a Previously Synced Google Account from Your Vivo X Fold 2
The setting up process of a new Android phone requires you to add a Google account that saves all activities and data of the phone like search history, details of online shipping, play store purchases, and more. Once the account is set, it cannot be changed till you delete everything from your phone. Moreover, with the introduction of FRP lock, even a factory reset will not remove the synced Google account.
So, now what if you want to sell your phone or have purchased a second-hand device that is still associated with the previous owner’s Google account? No, worries as there are workarounds available that will help you remove your previously synced google account from your Android device.
Keep reading to know more in detail about how to bypass previously synced google accounts.
Heres a full guide on how to remove google account from android, click to know more!
Part 1: Remove Previously Synced Google Account from Android Phone Without Phone Reset
In this part, we will discuss the methods that can be used for removing the previously synced account from your Android phone without a phone reset.
Method 1: Removing Google Account using the Android Settings Menu
If you just plan to reset your phone, maybe because of the lag caused by the phone cache, and you know the inconvenience of Google FRP as a protection mechanism, then you can remove Google FRP through the Settings menu.
The steps for this method are listed below.
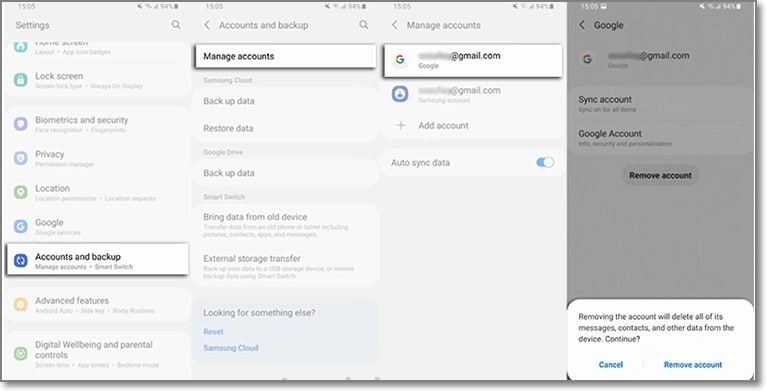
- Step 1: On your Android phone go to the Settings option and choose Accounts & Backup.
- Step 2: Select the Manage Accounts option now and the list of the associated Google Devices will appear.
- Step 3: Choose and click on the Google Account that you want to remove and a pop-up message will appear to inform you that all the account data will be deleted with this action.
To confirm the removal of the account, click on the Remove account button.

Method 2: Remove the Google account from the Android phone using the computer
There is another method using which you can remotely remove the Google account associated with your phone. The steps for the method are listed below.
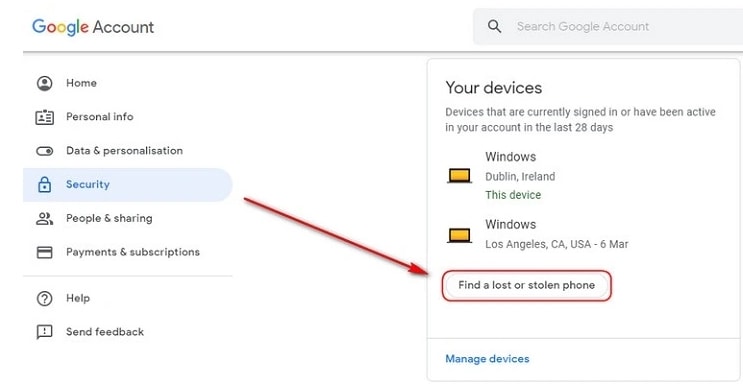
- Step 1: Using another device or a PC, sign in to your Google account that was previously synced on this device and choose the Security option.
- Step 2: Next scroll down and then tap on the Your devices option and choose to Manage devices.
- Step 3: You will now see the list of devices linked to your Google account. Next, tap on Find a lost or stolen phone and then select the Remove option present next to Account access.
- Step 4: You will be again asked if you want to delete the account. Select the Remove option.
- Step 5: The account will be removed successfully and the confirmation message will appear.
Note: This method will actually sign out you from the Google account and will not delete it permanently. To again get access to the account, a notification will appear on your phone to enter the password.
Part 2: How to Disable Factory Reset Protection to Bypass Google Account Verification After Factory Reset
The Factory Reset Protection (FRP) is a security feature for the Android device that allows factory reset only after the associated Google ID and password are entered correctly. With multiple accounts and passwords to remember there is quite a possibility that you may forget your Android phone Google account details and here the need to bypass Google account verification arises.
Though there are multiple tools available we recommend Dr. Fone - Screen Unlock (Android) as the best and the most reliable option. Using this excellent Windows and Mac-based software, FRP lock on all popular Android devices including Samsung, LG, HTC, and others. The tool is simple to use and requires no technology. There is also an option where you can unlock your device if you do not know the OS version.
![]()
Dr.Fone - Screen Unlock (Android)
Get into Locked Phones within Minutes
- 4 screen lock types are available: pattern, PIN, password & fingerprints.
- Easily remove the lock screen; No need to root your device.
- Everybody can handle it without any technical background.
- Provide specific removal solutions to promise good success rate
4,008,669 people have downloaded it
Steps to remove FRP lock using Dr. Fone-Screen Unlock (Android)
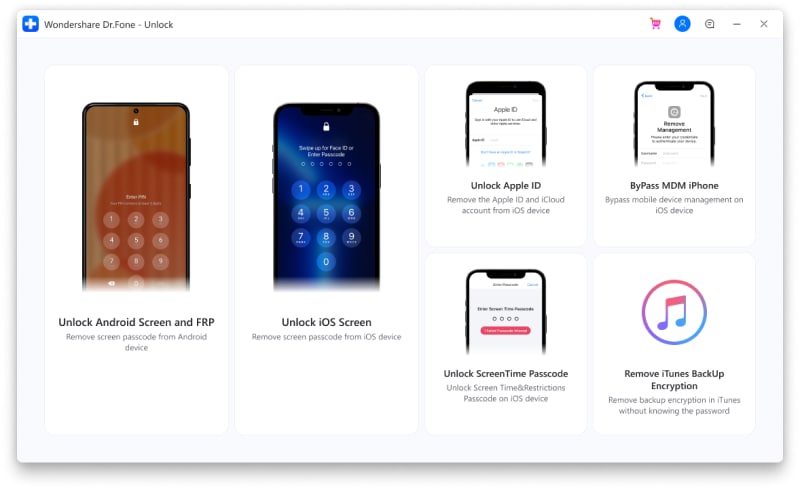
Step 1: Download, install and run the software on your system, and from the main interface choose the Screen Unlock option. Make sure that your phone is connected to WiFi.

Step 2: Next, choose Unlock Android Screen/FRP and then select the Remove Google FRP Lock option.
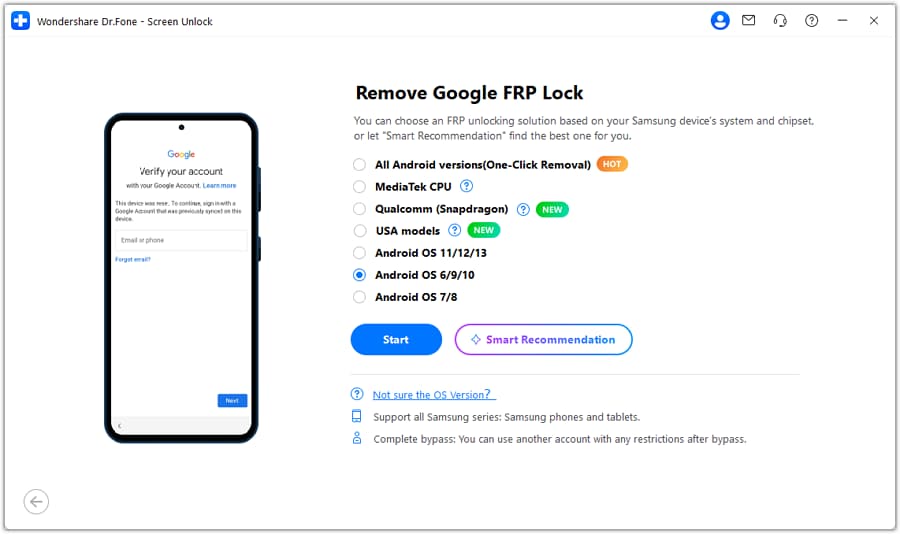
Step 3: Next, choose the OS version of your device from the given options, and then using a USB cable, connect your phone to your system.
Step 4: After the Vivo X Fold 2 device is connected, the Vivo X Fold 2 device information will appear on the software for you to confirm and the notification for the same will be sent to your Android phone.
Step 5: Now follow the notifications for removing the FRP lock and in the browser enter drfonetoolkit.com.
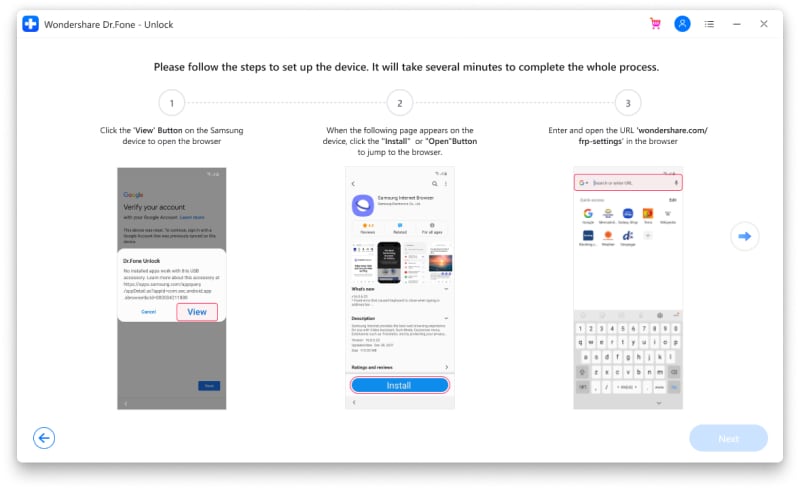
Step 6: Next, click on the Android 6/9/10 button, choose Open Settings and select the PIN option to set a PIN to be used in the further steps.
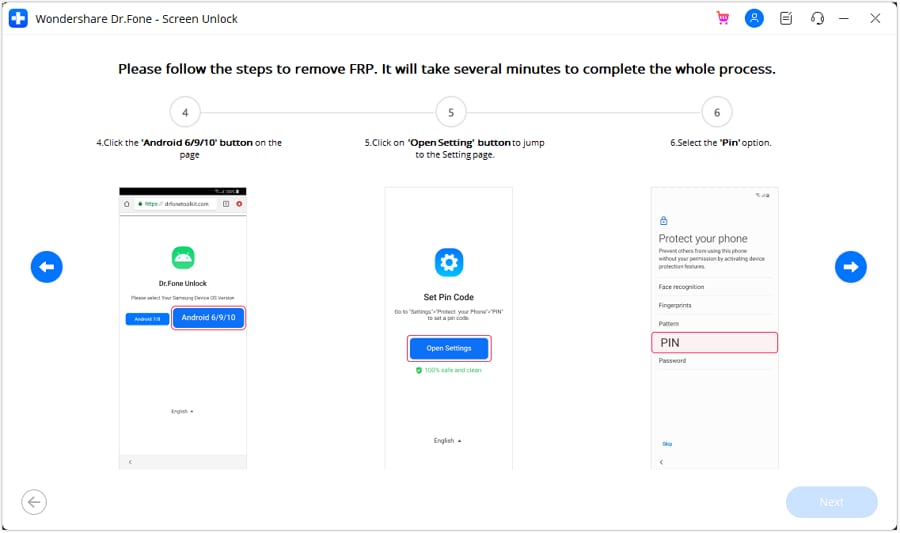
Step 7: Keep following the steps as they appear till you reach the Google Account Sign-In page. Here click on the Skip option that will successfully remove and bypass the Google Account.

The above given are the brief steps for the FRP bypass process. To learn about the entire process in detail, check Dr.Fone-Screen Unlock (Android) guide .
Part 3: Hire a Remote FRP Removal Service to Bypass ZTE/Motorola After Factory Reset
To bypass the FRP lock on your ZTE, Motorola, and Samsung device, there is also an online service called UnlockJunky.com that claims to remove the FRP lock and previously linked account on your Android device within 5-15 minutes. This is a paid service that also claims that if they are unable to remove the lock, they will refund the amount to their customers.
So, if you cannot sign in with a Google account that was previously synced, you can give this, method a try.
Step 1: Open the official service page Unlockjunky on your browser.
Step 2: Next, choose the Vivo X Fold 2 device’s brand, model, and unlock type from their respective drop-down menus. Click on Unlock Now button after entering the details.
Step 3: Now you need to initiate the order by providing the details asked and completing the payment.
Step 4: Next, the software needs to be downloaded and installed on your system, and using a USB cable, connect your phone to your computer.
Step 5: Connect with one of the support provider members through the live chat and they will help you remove the FRP lock on your Android phone.
With the steps above, you can remove the account previously synced on this device.

Limitations of using the Unlockjunky method:
- This is a paid service.
- Works only with Motorola, ZTE, and Samsung devices.
- There is no surety that the service will work for removing the FRP lock on your devices.
- If you have to remove the FRP lock from multiple devices, a separate payment for each device has to be done.
Conclusion
Above we have listed several ways to remove a previously synced Google account on your Android device. The best of all the listed solutions is Dr. Fone - Screen Unlock (Android) as it supports bypassing FRP lock on multiple Android devices in a hassle-free manner. Once the license is purchased, you can unlock as many numbers of devices as you want without any worries.
Best Vivo X Fold 2 Pattern Lock Removal Tools: Remove Android Pattern Lock Without Losing Data
In the digital age, our smartphones have become an integral part of our lives. They contain a wealth of personal information, from contacts and messages to photos and sensitive financial data. But what happens when you forget your phone’s lock screen password or pattern? It’s really irritating, right?
Yes, the locked pattern is such a problem that can’t let you access to your phone. You may worry about losing all your data or having to perform a factory reset. However, there are several pattern lock removal tools available that can help you regain access to your device without losing any of your valuable data. Two popular options are Dr.Fone - Screen Unlock (Android) and Android Multi Tool. In this article, we will compare these two tools to help you decide which one is right for you.
Part 1: Remove Pattern lock with Dr.Fone - Screen Unlock
Note that you can unlock your android lock screen by a hard reset, but it will cost all the data on the phone. You won’t have any data on your phone after a hard reset. So you can avoid this problem with pattern lock remover tools. Now we have picked up a great android pattern lock remover named Dr.Fone - Screen Unlock (Android) by Wondershare.
Dr.Fone - Screen Unlock (Android) is a comprehensive software developed by Wondershare that specializes in unlocking Android devices. It offers a user-friendly interface and a wide range of features to help you bypass lock screens on various Android devices. With Dr.Fone - Screen Unlock (Android), you can remove passwords, patterns, PINs, and even fingerprints from your Android device in just a few simple steps. The software supports a wide range of Android brands, including Samsung, LG, HTC, Motorola, and more. Additionally, Dr.Fone - Screen Unlock (Android) ensures the safety of your data throughout the process, so you don’t have to worry about any data loss or privacy breaches.
![]()
Dr.Fone - Screen Unlock (Android)
The Best Android Pattern Lock Remover for Your Locked Android Phones
- 5 screen lock types are available: pattern, PIN, password, fingerprints & Face ID.
- Except for screen locks, it also supports bypassing Google FRP on Samsung, Xiaomi, Redmi, Oppo, Realme, Vivo.
- Save you from ending up with a locked phone after too many pattern attempts.
- Provide specific removal solutions to promise good success rate.
Now we will look at the functionalities that are needed in order to unlock your Android pattern lock.
4,008,669 people have downloaded it
How To Unlock Android Patterns with Dr.Fone - Screen Unlock (Android)?
- Step 1. Start Dr.Fone on your PC and then click on “Screen Unlock”. This feature will remove your password from the pattern screen and let you access your phone. After you have accessed Screen Unlock > Android, continue to select the Unlock Android Screen option.

- Step 2. Select Your Device’s Brand to Remove Lock. This tool can remove the Android lock screen without data loss for select Samsung devices, such as S5, Note 4, etc. Actually, you can also use this tool to unlock other Android phones including Huawei, Lenovo, Xiaomi, etc., the only sacrifice is that you will lose all the data after unlocking.
- Step 3. Now you have to take your Android phone to download mode. To do that, you have to follow the guidelines given below: Make sure that your phone is switched off. You will have to press and hold 3 buttons at the same time. They are – Volume down, home, and power buttons. You could go into download mode by pressing the volume up button.
- Step 4. Just after getting onto the download mode, your phone will start getting the recovery package. You will have to wait until the completion of the downloading.
- Step 5. After the downloading is complete, you will now notice that Android Pattern Lock removal process has been started automatically. Don’t worry about your data on your phone, as the pattern lock screen removal will not erase any data from your phone. After the removal process, you can access your phone as per your desire.
Part 2: Remove Pattern Lock with Android Multi Tool
Now we have another pattern lock remover named Android multi-tool. Android Multi Tool is an open-source software that provides similar functionality to Dr.Fone - Screen Unlock (Android). It allows you to bypass lock screens on Android devices and offers additional features such as resetting Gmail accounts and wiping data on your device. It supports devices from various manufacturers, including Samsung, Sony, HTC, and more. Take a look at its features:
- It can unlock different types of lock screens such as pattern, password, PIN, face lock, etc.
- The tool can reset your set without losing data.
- It can run on PC and work on Android devices smoothly.
How to Unlock Pattern lock with Android Multi Tool?
Here are the step-by-step guidelines for unlocking a locked screen.
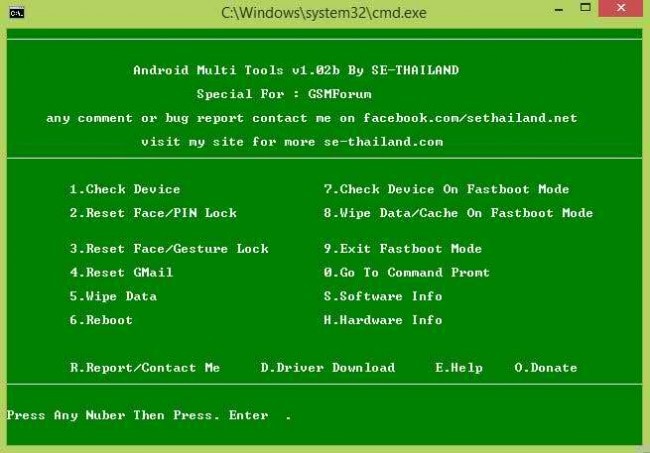
- Step 1. Download the latest version of the tool on your PC and run it there.
- Step 2. SConnect your Android phone to your PC via USB cable. Make sure that your Android device is connected to your PC properly. Otherwise, it will not work.
- Step 3. SAfter running the Android Multi tool on your PC, you will see onscreen instructions like different numbers for different functions. Press on a number for which action you want to perform. For unlocking patterns, there is a numbering button so you will go for that.
- Step 4. SYou will see that your phone has started rebooting after pressing a specific button. Wait until you see it starts automatically. When the phone will start, you could use it without any problem. Good thing is that this tool also does not delete data while unlocking your pattern lock.
Part 3: A Comprehensive Comparison: Dr.Fone - Screen Unlock (Android) vs. Android Multi Tool
Well, you have come to know great things about the two pattern lock remover tools: Dr.Fone - Screen Unlock and Android Multi Tool.
Now, take a look at these tools’ comparison.
| Features | Dr.Fone - Screen Unlock (Android)  |
Android Multi Tool |
|---|---|---|
| Unlock pattern locks without deleting data | Yes | Yes |
| Easy to use | Yes | Technical skills required. |
| High-success Rate | Yes | This tool may sometimes not work. |
One of the standout features of Dr.Fone - Screen Unlock (Android) is its simplicity. The software is designed to be easy to use, even for those with little technical knowledge. It offers step-by-step instructions and clear on-screen prompts to guide you through the unlocking process. Compared to Dr.Fone - Screen Unlock (Android), Android Multi Tool is more suitable for tech-savvy users who have experience with command-line tools and are comfortable working with complex software.
One key advantage of Android Multi Tool is its compatibility with a wide range of Android devices. However, it’s worth noting that due to its open-source nature, Android Multi Tool may not receive regular updates and bug fixes, which could potentially lead to compatibility issues with newer Android versions.
In terms of customer support, Dr.Fone - Screen Unlock (Android) excels. It offers 24/7 customer support through email, live chat, and phone, ensuring that you receive prompt assistance whenever you encounter any issues. Android Multi Tool, being an open-source software, relies on community forums and user-generated content for support, which may not be as reliable or timely.
When it comes to pricing, both Dr.Fone - Screen Unlock (Android) and Android Multi Tool offer free trials, allowing you to test their features before making a purchase. Dr.Fone - Screen Unlock (Android) offers flexible pricing plans, including a one-time payment option and a yearly subscription.
Conclusion
In conclusion, forgetting the pattern lock on your Android device can be a stressful situation, but with the help of these pattern lock removal tools, you can easily regain access without losing any data. If you are looking for a user-friendly and reliable tool to unlock your Android device, Dr.Fone - Screen Unlock (Android) is the recommended choice. Its intuitive interface, comprehensive features, and excellent customer support make it a standout option. However, if you are a tech enthusiast who is comfortable working with complex software and prefer an open-source solution, Android Multi Tool can also be a viable option. Ultimately, the choice depends on your technical expertise and personal preferences
Whether you prefer user-friendly software like Dr.Fone – Screen Unlock (Android) or advanced command-line tools like Android Multi Tools, there is a solution available for every user. Remember to always choose a reputable tool and follow the instructions carefully to ensure a smooth and successful unlocking process.
- Title: Mastering Lock Screen Settings How to Enable and Disable on Vivo X Fold 2
- Author: Peter
- Created at : 2024-07-16 11:17:08
- Updated at : 2024-07-17 11:17:08
- Link: https://android-unlock.techidaily.com/mastering-lock-screen-settings-how-to-enable-and-disable-on-vivo-x-fold-2-by-drfone-android/
- License: This work is licensed under CC BY-NC-SA 4.0.