
Mastering Android Device Manager The Ultimate Guide to Unlocking Your Vivo Y17s Device
Mastering Android Device Manager: The Ultimate Guide to Unlocking Your Vivo Y17s Device
So, what is Android Device Manager? Android has this amazing native tool to help you locate and remote wipe your lost or stolen phone. We lock our phones via passwords or patterns or fingerprints to maintain the security but what if someone dares to meddle with your phone or unfortunately, it gets stolen? Don’t worry, all you need to do is let Android Device Manager unlock your Android phone. For this, it just needs to be enabled on your phone (before you unluckily locked yourself out of it). Android Device Manager unlocks your phone in a small amount of time, saving you from all the troubles.
In addition to this, the Android Device Manager also unlocks your password/pin-encrypted phone if you have forgotten the passcode by chance. The procedure is quite simple; all you need is a Google account to set this up onyour phone and then you can make use of any other online device to track down your lost or stolen phone or to even wipe all data in it. Phew!
Using the Android Device Manager to track a lost phone
Part 1: What is Android Device Manager lock?
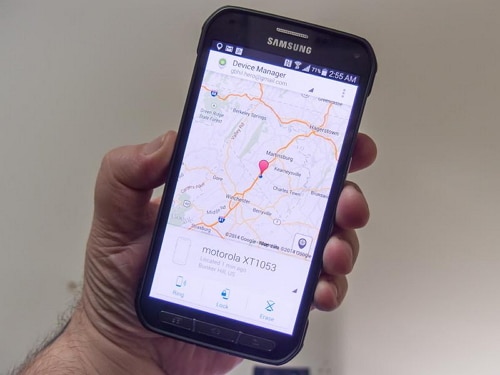
Android Device Manager is Google’s take on Apple’s Find My iPhone. Enabling the ADM is quite easy; just go to google.com/android/devicemanager on your computer and search through your list of devices that are already connected to your Google account. Once you are there, you can easily send a notification to the phone you want to enable remote password application and wiping upon.
ADM comes with a set of features that helps you to unlock your Android phone as well. It not only helps you to find your device, but also Ring it, lock it, and wipe and erase all the data as well, if your phone is lost or stolen. Once you’re logged into the ADM website from your computer, you can avail all these options once your phone is located. It is a wise option to get your device locked by Android Device Manager in case it is lost or stolen, so that your phone is secured.
Android Device Manager can unlock your phone under a specific set of circumstances only.
- • First of all, Android Device Manager needs to be enabled on your phone before it is lost, stolen, etc.
- • Secondly, your phone can only be tracked by ADM if the GPS option is switched on.
- • Thirdly, the Vivo Y17s device you are using for ADM, must be connected to Wi-Fi or internet, to login to your Google account.
- • Lastly, Android Device Manager is not compatible for all Android versions. For now, it is only compatible with devices running Android 4.4 and above, so your phone must be in this category for ADM to work.
Part 2: How to unlock Android phone with Android Device Manager?
Just act according to the following steps, and the Android Device Manager will unlock your phone.
1. On your computer or any other mobile phone, visit: google.com/android/devicemanager
2. Then, sign in with the help of your Google login details that you had used in your locked phone as well.
3. In the ADM interface, choose the Vivo Y17s device you want to unlock. Now, select “Lock”.
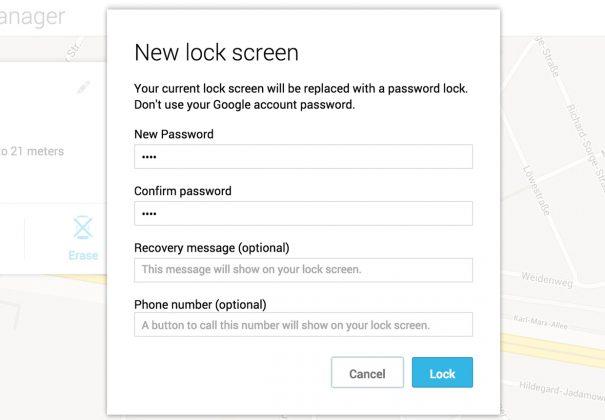
4. Enter a temporary password. Now go ahead and click on “Lock” again.
5. If the previous step was successful, you should be seeing a confirmation below the box with the buttons – Ring, Lock and Erase.
6. Now, you should see a password field on your phone screen. Enter a temporary password to unlock your phone.
7. Visit your phone’s lock screen settings and disable the temporary password.
The Android Device Manager has successfully unlocked your phone!
A downside to this process, is an error message faced by some users while using ADM. Many users have reported the issue, that when they have tried using ADM to unlock their locked device, an error message has occurred, saying, “since Google has verified that a screen lock is already set”. Basically, this error message conveys that you will not be able to unlock your phone using Android Device Manager, and this is a flaw on Google’s part, not your phone’s.
Part 3: What to do if phone is locked by Android Device Manager
There are 2 situations where you would want to know how to unlock the Android Device Manager lock – one, when you have unfortunately forgotten the screen lock passcode and the other is when your phone is locked by Android Device Manager.
ADM is built to completely lock your device so that unknown people cannot access it. So, if your phone is locked by Android Device Manager, you might be in a problem.While ADM is a wonderful tool to lock your phone or erase and wipe data if its stolen or lost, most of the users have reported the issue that they cannot unlock their phones that are locked by Android Device Manager. A possible solution to this is adding a temporary password via Google login and bypassing the ADM lock. Or, you can try resetting the password again by entering a new password via ADM. If that does not work, you can make use of several third-party applications which can be found in the internet, that will help to completely erase the Android Device Manager lock.
So, now you know how to unlock the Android Device Manager lock. Do keep in mind, your device must be connected to internet or Wi-Fi, to login to your Google account.
Part 4: Unlock Android devices with Dr.Fone - Screen Unlock (Android)
As mentioned before, many were unable to unlock their phones with ADM. This is why we use the Dr.Fone - Screen Unlock (Android) . It is hassle-free and easy-to-use; the Dr.Fone toolkit needs to be downloaded on your computer and with a few easy steps, it erases any kind of lock-screen passcode and avoids any kind of data loss as well!
Dr.Fone - Android Lock Screen Removal
Remove 4 Types of Android Screen Lock without Data Loss
- It can remove 4 screen lock types - pattern, PIN, password & fingerprints.
- Only remove the lock screen, no data loss at all.
- No tech knowledge asked, everybody can handle it.
- Work for Samsung Galaxy S/Note/Tab series, and LG G2, G3, G4, etc.
3,224,627 people have downloaded it
This tool works on removing all four types of lock-screen passcodes – PINs, Patterns, Fingerprints, and Passwords. Anyone can use this tool following these easy steps:
You can also use this tool to bypass the locked screen beyond Samsung and LG.Things you should pay attention is that it will remove all the data after finishing unloking on other brand android phone.
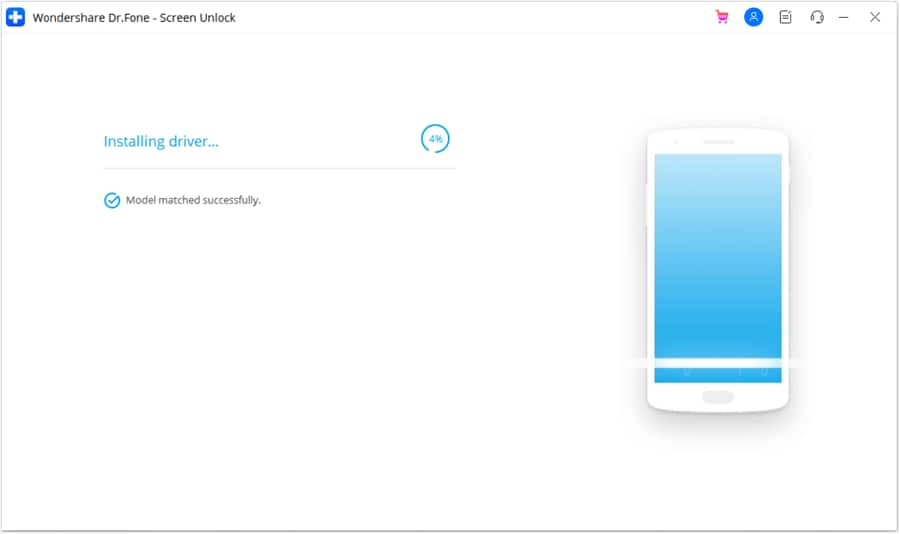
1. Fire up the Dr.Fone toolkit for Android on your computer and select the Screen Unlock among all the other tools.

2. Now, connect your Android device to the computer and select phone model in the list on the program.

3. Boot your phone into Download mode:
- • Power off your Android phone.
- • Press and hold the volume down+the home button + the power button at the same time.
- • Press the volume up button to enter Download Mode.

4. After you get your phone into the Download mode, it will start downloading a recovery package. Wait for this to be completed.
5. When the recovery package download is completed, Dr.Fone toolkit will begin removing the screen lock. This process will not cause any data loss on your Android device, so do not worry. Once the whole procedure is over, you can easily access your Android phone without entering any kind of password. Hurrah!

The Dr.Fone software is currently compatible with Samsung Galaxy S/Note/Tab series, and LG G2/G3/G4 series. For windows, it is compatible with 10/8.1/8/7/XP/Vista.
The Android Device Manager is an excellent initiative taken by Google to give people the chance to not lose any data and regain access to their phones. This also teaches us to take precautions before such unfortunate incidents take place. Phones are probably one of the most important belongings of ours, in which we confide all our private and confidential documents that we wouldn’t want to be meddled with.
So, make use of this guide and get back command over your Android phone.
How To Unlock Vivo Y17s Phone Without Password?
Has your Android smartphone been locked, and are you having trouble unlocking it now because you have forgotten phone password? Looking for methods to remove the password from your Android phone without doing a factory reset?
If the answer is “YES,” you’ve come to the correct spot.
Many people, including you, have had similar issues and wish to know how to unlock an Android phone without a password.
As a result, we have created some of the greatest guidelines or, you might say, top ways that may assist you in unlocking Android phones today, simply for you and countless other Android users.
Part 1: Unlock Your Locked Screen Without Password By 6 Efficient Ways
1. By your Google account
You can use your Google Account to unlock the Android phone password if, after several tries, you are still unable to do so without doing a factory reset.
You need to log into the Google account that is associated with the Vivo Y17s device, then do the following:
- The unlock pattern may only be used five times before a notification telling you to try again in 30 seconds appears.
- “Forgot pattern” will show up at the bottom of the screen.
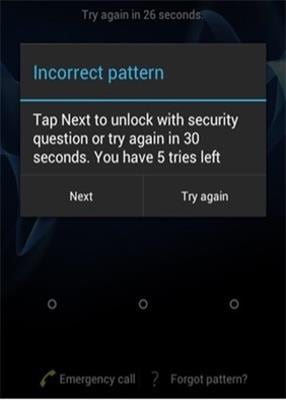
- You must enter the Gmail account that is associated with the Vivo Y17s device here before selecting “Next.”
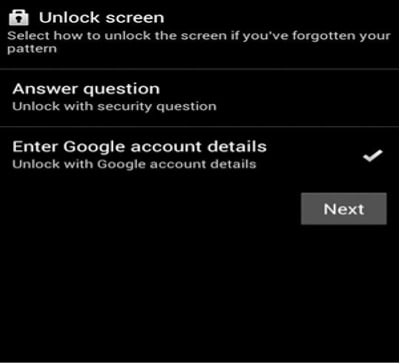
- That’s it; from this point forward, you may enter any new PIN or pattern that you can recall to unlock your smartphone.
2. Google Find My Device
Using your Google account is a superb method for finding the Vivo Y17s device when lost or stolen.
In addition, it may be used to lock or ring your smartphone. You may have noticed that there are three options available when using this feature: “Ring,” “Lock,” and “Erase.”
To bypass the Android lock screen, all you need to do is sign into the Vivo Y17s device’s associated Google account and then follow these steps:
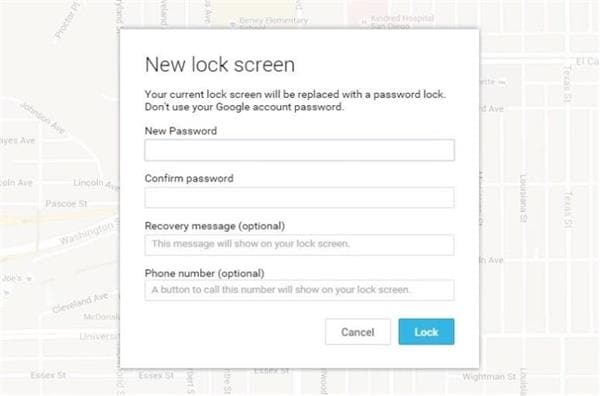
- On any Android device or a computer, go to <www.google.com/android/find> and sign in using your Google account. Choose the Android smartphone you wish to unlock after that.
- After choosing the Vivo Y17s device, select one of the three options, “lock,” from the list.
- There will be a new pop-up window that you can use to change the Vivo Y17s device password. Additionally, you can choose to add a phone number or recovery email.
- Confirm it immediately, then input the password you just established on your locked device.
Many Samsung customers have this issue, which prevents them from using their devices. Try using the “Find My Mobile” feature on your mobile if you wish to unlock it if you’re a Samsung user. It would be helpful if you had a Samsung or Android model account.
After that, use Find My Device to unlock your Android phone without losing any data by following the instructions below:
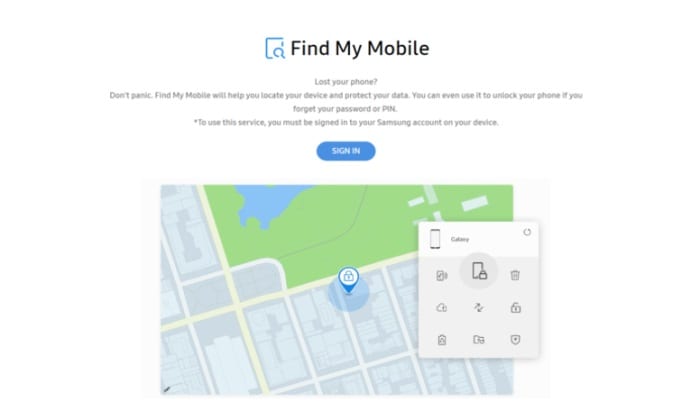
- Sign in with your Samsung account at findmymobile.samsung.com.
- Choose “Lock my screen” from the menu on the left, type a new PIN in the box given, and then click “LOCK.”
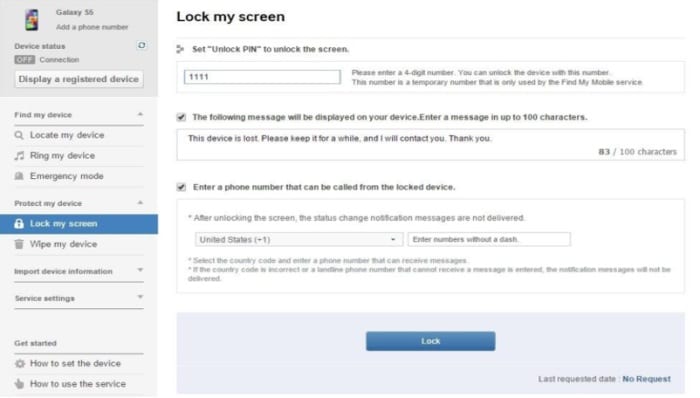
Your smartphone will be unlocked, and the password will be changed to the new one after a brief delay.
3. Use ADB (Android Debug Bridge)
Without a factory reset, Android phone passwords may also be unlocked using the Android Debug Bridge (ADB).
- You must first download ADB to your computer. Visit the Android developer’s website at https://developer.android.com/studio/command-line/adb.html to do this.
- Launch the installer after that to begin downloading crucial software for your machine.
- Here, you must use a USB cable to connect your Vivo Y17s to the computer
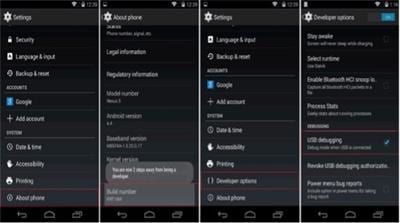
- This will activate the developer option on your smartphone if you navigate to Settings > About Phone > and choose the “Build Number” option seven times.
- After that, activate USB debugging by going to Settings > Developer Options.
- Launch the command prompt in the ADB installation directory after your device is connected to the system.
- Press enter after typing “ADB shell rm /data/system/gesture.key” into the command line.
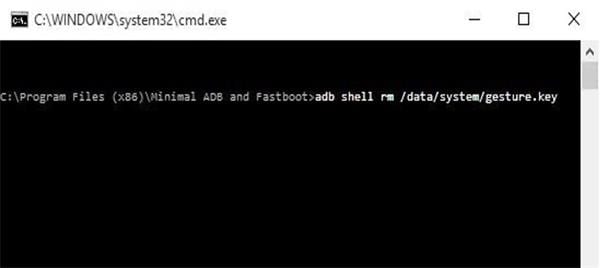
- Finally, just restart your smartphone and use it as normal.
4. Hard reset (data loss)
Each brand has a unique method for hard resetting a locked Android device. The methods to factory reset locked Android devices from Samsung, LG, HTC, Sony, and Huawei are compiled here.
When your phone is locked, you may access the recovery menu of your phone using its physical keys and choose to hard reset the Vivo Y17s device. Here’s how to restore a locked phone to factory settings.
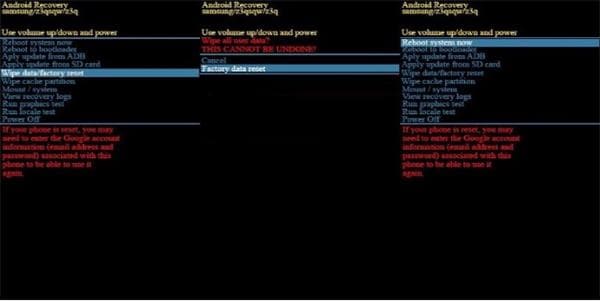
- Use the buttons to see the recovery menu.
- Press and hold the Volume Up and Side buttons simultaneously until you see the brand logo on the screen for Android devices without a Power/Bixby/Home button.
- Press and hold the Volume Up, Bixby, and Power buttons all at once if your smartphone has a Power button. Releasing them before a logo arises is advised.
- Use the Volume Down key to highlight Wipe data/factory reset when the Android system recovery option displays, then hit the Power/Bixby key to choose it.
- Allow a few seconds for the factory reset procedure to finish after selecting Yes, or Factory data reset. The phone will reboot once you pick the Reboot system. Now you may configure it as if it were a brand-new gadget.
5. Unlock from Forgot Pattern (android 4.4 or lower)
This is another choice that might assist you in unlocking your phone without a factory reset or password. You may have observed that when pattern lock was enabled on your device, a security PIN question was also prompted at that time.
Therefore, you have the choice to Backup PIN, which might assist you in unlocking your smartphone, if you are unable to unlock it. To do it, take the following actions:
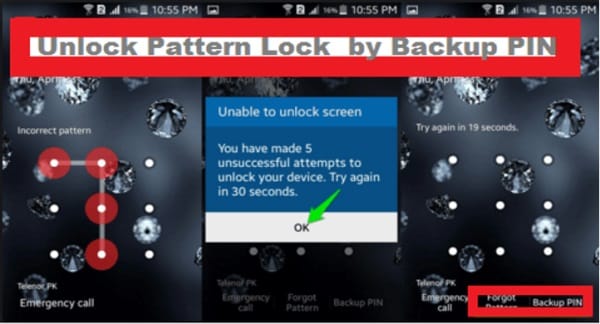
- Click on Android pattern lock.
- You’ll see a notification telling you to try again in 30 seconds after failing many times.
- The “Backup PIN” option will be there; choose it.
- Put the backup PIN and OK here.
- At last, you may unlock your cellphone by entering the backup PIN.
6. Boot into safe mode
Here’s how you can boot into safe mode.
- Hit the power button on your phone.
- Press and hold the volume down button on your phone as the animation begins. Hold it down until the animation is finished and your phone enters safe mode.
- “Safe mode” will be shown at the bottom of your screen.
- Out of safe mode
- Switch off your phone.
- Press the Power button on your phone for around 30 seconds, or until the Vivo Y17s device restarts.
- You will see that after entering and booting into the safe mode, the lock option will not be visible.
- Then you will also see the option to turn off boot.
- You can get rid of the locked phone by proceeding with that option.
Part 2: Easy Tool To Unlock Android Phone Without Password
If you forget the lock code, you can simply unlock your Android phone using Dr.Fone - Screen Unlock.
Have you encountered the same situation? Do not fret. You may use Dr.Fone - Screen Unlock to unlock the screen lock on Android smartphones. It enables you to erase an Android phone’s password, PIN, pattern, and fingerprint.
Let’s learn how to safely remove the Android lock screen.
Step 1: Connect your phone
Open Dr.Fone on your PC, then select “Screen Unlock” from the list of tools.
The Dr.Fone functionality is still usable with the old UI of the Dr.Fone Mac version, but we will update it as soon as we can.

Connect your Android phone to the PC via a USB cable. then click the “Unlock Android Screen” button on the software.
Step 2. Choose a device model
Nearly all Android devices feature locked displays, including Android. Because the recovery kits for different phone models vary, it’s important to pick the correct device brand to unlock the lock. Every model of supporting hardware is included in the list.
Step 3. Switch to download mode
If you then adhere to the instructions on the software, the phone will enter Download Mode.

- Offset your phone.
- Hold down the Power, Home, and Volume Down keys all at once.
- Use the Volume Up button to start Download Mode.
- Remove the Android lock screen starting now..
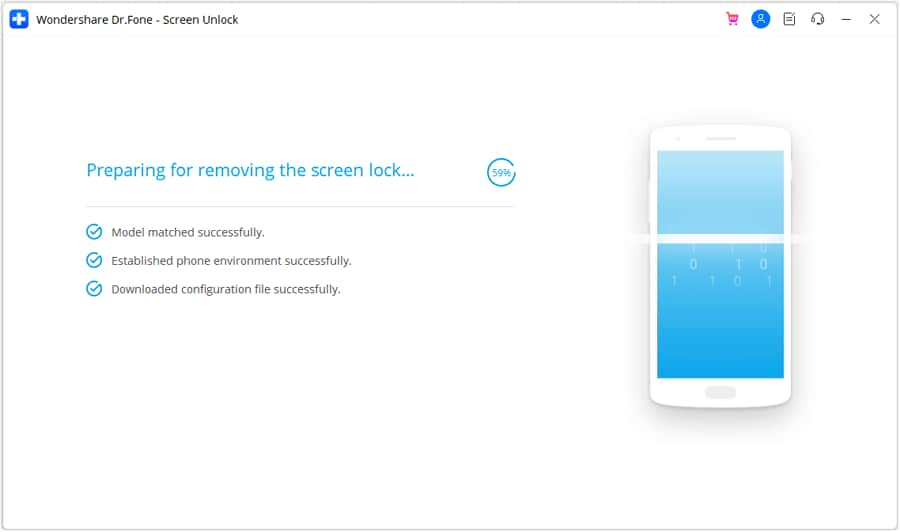
Step 4. Download a package for recovery
The recovery package will begin downloading once you set your device in download mode. Wait only till it is completed.
Step 5: Unlock Android without erasing data
After the recovery package download is finished, click “Remove Now.” This operation won’t harm any data on your Android device.
When everything is done, you won’t need to enter a password to access your Android smartphone, allowing you to see all of your data without any limitations.
Bonus Tips: How To Keep Our Data Safe?
Dr.Fone - Phone Backup is an excellent solution to keeping data safe and secure and baking it up before resetting your device, even if you have forgotten your password. You may quickly and conveniently back up practically all forms of Android phone data with Dr.Fone - Phone Backup (Android). Additionally, you may examine and export only certain types of data.
Here’s how you can use Dr.Fone - Phone Backup to keep data safe.
Step 1: Connect your Android phone to your PC.
Open Dr.Fone on your PC, then select “Phone Backup” from the menu.
Next, join your Android phone to the computer with a USB cable. The phone must be in USB debugging mode, please. You will be prompted to approve USB Debugging in a pop-up window on the Android phone if your version of Android is higher. Press the OK button if you would.

Click Backup to start backing up the data on your Android device.
If you have previously used this programme to back up your device, you may review your backup history by clicking on “View backup history.”
Step 2: Choose which file types to backup.
Once the Android phone is connected, select the file types you want to backup. Dr. Fone has previously examined all the file types for you. After that, click Backup to start the backup process.
It will cost some time for the backup. Do not disconnect your Android phone from the computer, use it, or delete any data while making a backup.

When the backup is complete, you may click the View the backup button to see what’s in the backup file.
The Bottom Line
It would be best if you had been able to answer the question, “How to unlock an Android phone without password,” using the techniques we have demonstrated here. The most effective way for resetting an Android phone is Wondershare Dr.Fone - Screen Unlock for Android. You may quickly reset a locked Android phone without a password with only a few clicks.
Everything You Need to Know about Lock Screen Settings on your Vivo Y17s
Everybody of you is well familiar with Android lock screen and it can be undoubtedly said that lock screen does a great job for an Android user. It really works as the main gate of your Android device. It also works as a safeguard of your device from unauthorized access if you enable some sort of protection. By the way, activating the lock screen is optional as you can customize or deactivate it from android lock screen settings.
Here’s a charm that’s you can unlock your lock screen by many ways and you’ve to set the ways from android lock screen settings. Now you’ll come to know how to set different types of screen lock, customize Android lock screen, and even unlock your android phone without resetting it as all the ways of unlocking is related to the Vivo Y17s device when it’s switched on.
Different Ways of Unlocking Your Vivo Y17s
First look at the procedures on how you can enable the lock screen functionality from android lock screen settings. To reach the lock screen settings android, you’ve to follow the path:
Options – Security – Screen Lock – Choose Screen Lock.
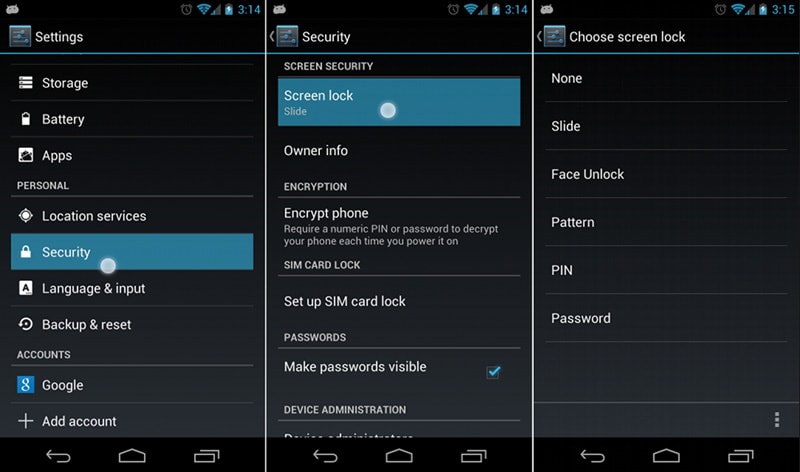
Now see how to unlock your lock screen in different ways.
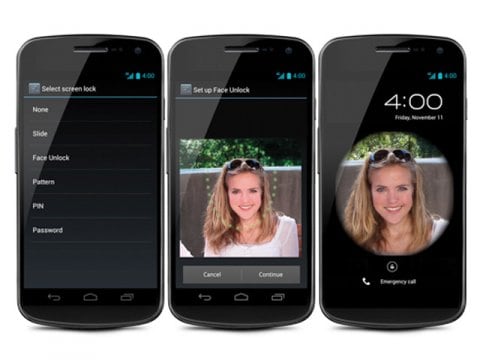
1.Slide
This is the most common method of unlocking an android lock screen. On all most all the android device, you’ll notice a lock mostly on the right side (sometimes on top) of a round charm. You just have to direct towards the lock and then the lock screen will be unlocked in no time. This method doesn’t provide any security (it just protects your device from sudden access by tapping on screen or any of the button) to your device as no password or PIN is required to set the “Slide” unlock.
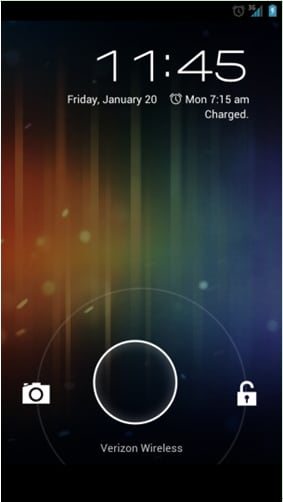
Keep your any finger on the middle of the round charm and by keeping your finger pressed, reach on the lock icon. The lock screen will be unlocked just after reaching your finger to the lock icon.
2.Face Unlock
This method of unlocking your lock screen needs your Android device to snap a photo of your with its camera. After you set the snapped photo as the unlocking recognition, you could unlock your device through showing your face on the screen.
Capture a picture of your face with your Android device’s camera and then set it for logging in into your device. From the lock screen, by just by holding your face, you can log in. It’s very interesting, but you should never rely on this method for strong security as this method of unlocking is prone to break easily as an intruder can unlock your device by putting a photo of you in front of your device. Moreover, this method sometimes doesn’t work properly. So it’s better to go for some other highly secured options for locking your screen.
3.Pattern
This is a way of setting pattern for lock screen from a grid of nine dots. You can select the pattern like some letter like Z, L or C etc, but nothing guarantees high security as the set pattern can be easily guessed or be seen while you are unlocking your device. Another problem is that by unlocking with the same pattern, your finger leaves some marks for the pattern’s path. By following the path, a stranger can unlock your device. So for little security, you can use pattern unlock method on your Android device.
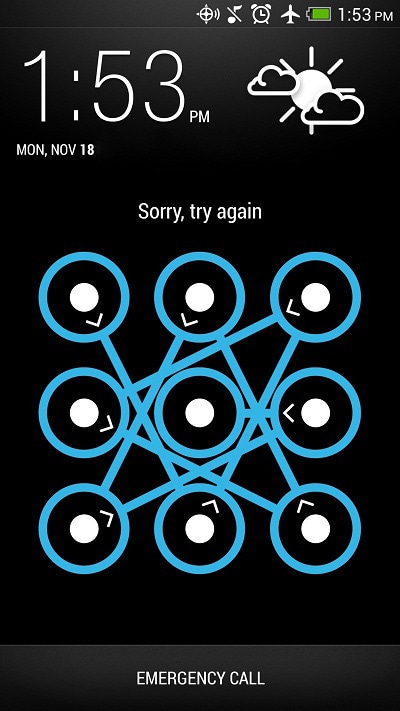
Go to the lock screen setting for Pattern and then set the pattern by sliding your finger from one dot to another, then another and like that way. Remember which pattern you’ve set in order to unlock your device in the next time.
4.PIN
You might be troubled by thinking about the difference between PIN and Password. A little distinction is there for a PIN and that is it consists of numbers only whereas for password, you can associate some alphabetical letters or signs along with numbers.
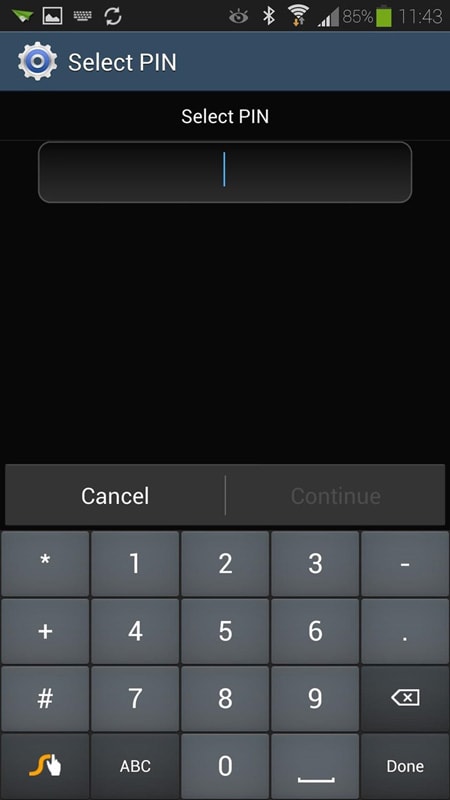
Go to the lock screen setting for PIN and then set a PIN that consists of minimum 4 digits. It’s your choice to use 4 or more digit PIN. After setting the PIN, you can access your Android device by putting the PIN in a box from the lock screen. PIN protected lock screen is highly protected if the PIN is set strongly.
5.Password
In addition to PIN protection, you can consider it as password by adding some letters, special characters with the previously selected PIN codes. It’s also very much highly protected method of locking screen though you might be bored with tapping for the password again and again. But never ignore the value of your device’s files, so a password can be a well-sought lock screen protection for many users.
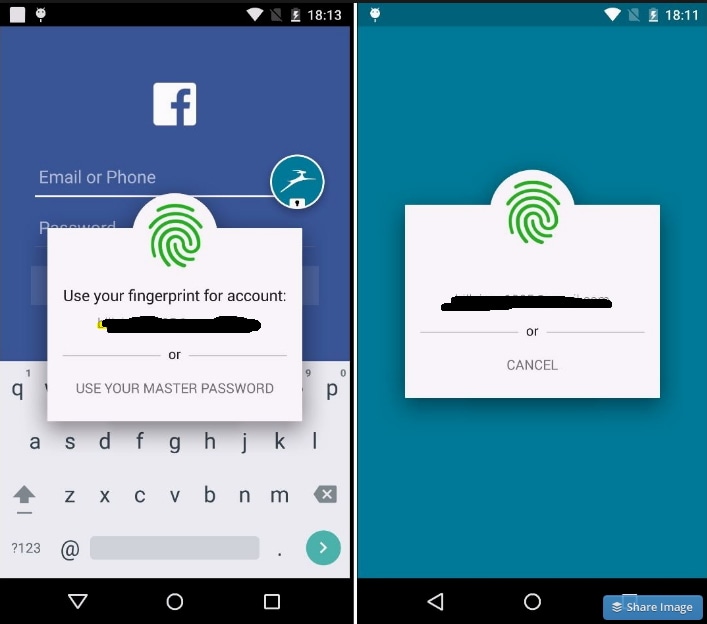
6.Fingerprint
In some of the modern Android device, you’ll find the feature of fingerprint unlocking. You can find the option through the screen or any dedicated button. By setting your fingerprint, you can unlock your device by tapping your finger on the Vivo Y17s device’s screen or the dedicated button.
7.Voice
This is also a fun way of unlocking Android lock screen as you can unlock by saying the same voice that you’ve saved as the unlocking recognition.
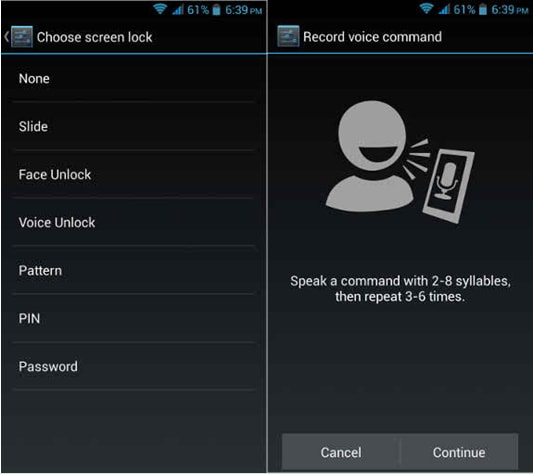
Go to the setting from “Voice Unlock” button and record your voice such as “Open My Vivo Y17s” or as per your choice with clear sound. Repeat the voice a few more times as to match well. Then set and unlock your device from the lock screen by using the same voice command.
Customize Android Lock Screen
Lock Screen Widgets
Widgets can be used from Android lock screen without unlocking the Vivo Y17s device first. Also, because of this, any one who can access your phone can see your information from widgets. But since Lollipop update, widgets has been changed to Notifications on Android. Here, let’s see how to set customize widgets on Android running OS before lollipop. You can also find some useful alternatives to lock screen widgets here.
For devices running Android 4.2 or 4.3, lock screen widgets are enabled by default. So you can use them directly. For users of KitKat, you can go to Settings, select Security, and find Enable Widgets option. To add a new widget to the lock screen, swipe the screen from left to right until there is a plus on the screen. Tap the plus and select the widget you would like to add. You can also drag the widgets to repalce it.
Smart Lock on Android
Smart Lock is a new feature introduced in Lollipop. It helps you keep your device unlocked when it’ safe with you, by recognizing locations, bluetooth system, or smartwatch etc. To know more about Smart lock settings , just follow the information here.
Customize Lock Screen Wallpaper
Except all the different types lock method to protect your phone, there are also many wallpapers to make your lock screen lool beautiful or cool. Click here to check out how to change lock screen wallpapers and download more beatiful wallpapers from different sites.
Bypass your Samsung Phone’s Lock Screen using Dr.Fone - Screen Unlock (Android)
This is an easy way to unlock your Samsung device if you forgot your Samsung’s lock screen pattern, PIN or password.It’s named Dr.Fone - Screen Unlock (Android) ,which is the best tool to solve your problems with simple steps.
Note: If your are using Samsung or Lg, then this tool can perfectly remove the locked screen while keeping all the data. As for thoes users who are using Andriod phone, this tool still can help you unlock the screen while you will lose all your data after unlocking.
Dr.Fone - Android Lock Screen Removal
Remove 4 Types of Android Screen Lock without Data Loss
- It can remove 4 screen lock types - pattern, PIN, password & fingerprints.
- Only remove the lock screen, no data loss at all.
- No tech knowledge asked, everybody can handle it.
- Work for Samsung Galaxy S/Note/Tab series, and LG G2/G3/G4, etc .
3,587,277 people have downloaded it
Follow the steps on how to bypass your Samsung Phone’s lock screen by Dr.Fone - Screen Unlock (Android)
Step 1. Run Dr.Fone and choose “Screen Unlock”.
Step 2. Connect your Samsung with USB on computer,then you will see the windows as follow,and select phone model in the list.
Step 3. Enter the download mode on your Samsung device. Follow the guide of the windows.
- 1.Power off the phone.
- 2.Press and hold volume down + home button + power button at the same time.
- 3.Press the volume up to enter download mode.
Step 4. Download the recovery package after your device model matched successfully.
Step 5. When the recovery package is downloaded completed,you can start the process of unlock,the whole process won’t lose any data on your device.You can access your device without entering any password or PIN after the process is finished.
Video on How To Remove Android Lock Screen
- Title: Mastering Android Device Manager The Ultimate Guide to Unlocking Your Vivo Y17s Device
- Author: Peter
- Created at : 2024-09-13 20:30:59
- Updated at : 2024-09-19 20:08:08
- Link: https://android-unlock.techidaily.com/mastering-android-device-manager-the-ultimate-guide-to-unlocking-your-vivo-y17s-device-by-drfone-android/
- License: This work is licensed under CC BY-NC-SA 4.0.