
In 2024, Mastering Lock Screen Settings How to Enable and Disable on Motorola Razr 40 Ultra
Mastering Lock Screen Settings: How to Enable and Disable on Motorola Razr 40 Ultra
In the modern world, the use of smartphones has become such a common trend that everyone would feel abnormal if they don’t have a smartphone of their own. So big the demand is that all IT companies are trying their best to introduce as well as innovate several excellent brands of smartphones. To support the function of smartphones, by far there have been numerous operating systems existed. Among them, Android is one of the most popular as well as trustworthy OS.
Just like any other smartphone, all Android devices have their ways to protect the data stored inside a smartphone from being corrupted or leaked. One of the simplest and most easy-to-use ways is to make use of the lock screen.
The lock screen has proved to be a traditional yet efficient way to help you protect your Android phones. In this article, we will provide you with an informative piece of writing about everything you need to know when it comes to the Android lock screen, and ways to enable and disable it.
If you have spent time searching and looking for features of your Android devices, you will find the process of enabling a lock screen is a piece of cake.
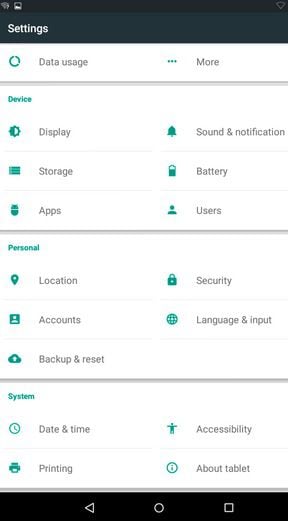
· Step 1: On the main screen of your Android devices, tap on the gear icon - which is the icon representing the Settings menu. Once you have chosen it, you will see a drop-down menu on the screen. In the options provided, tap on the Security bar.
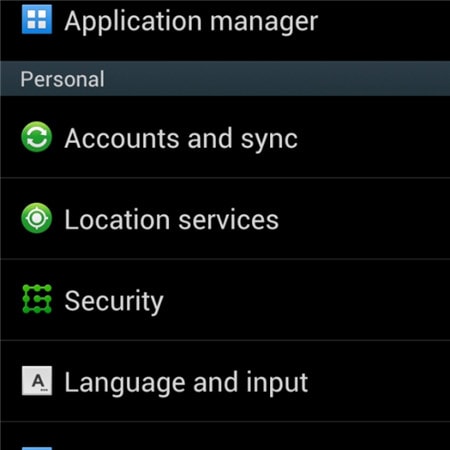
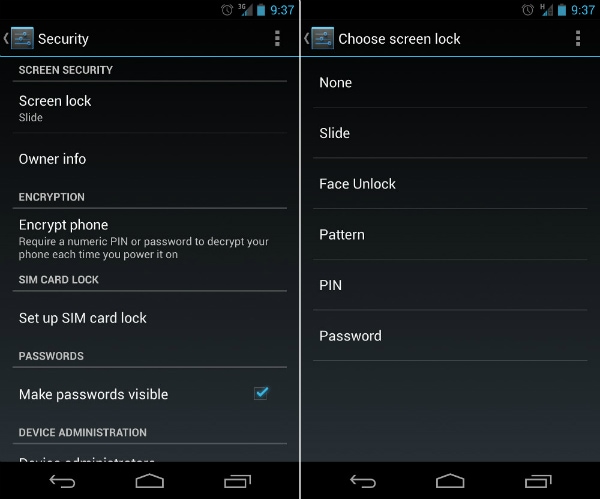
· Step 2: Under the tab whose heading is entitled Screen Security, tap on the first bar in the list called Screen lock.

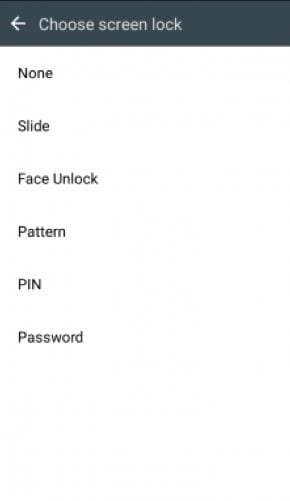
· Step 3: Once the step is done successfully, Android will give you plenty of choices about ways to lock your Android devices’ screens. Among these ways, select one particular type which you feel is most convenient as well as free-risk. After that, type in your PIN code to confirm the choice and finally activate your lock screen feature as you wish.
Part 2: How to Disable Android Lock Screen
To certain customers, the lock screen can do more harm than good, and they would prefer to disable the screen lock on their Android devices. This process is also an easy one to follow, as long as you still hold good memory of the security code.
· Step 1: On the main screen of your Android devices, tap on the gear icon. It will directly lead you to the Settings menu of the phone. After that, a drop-down menu will appear with several choices and bars. Among them, tap on the Security option to begin your work.
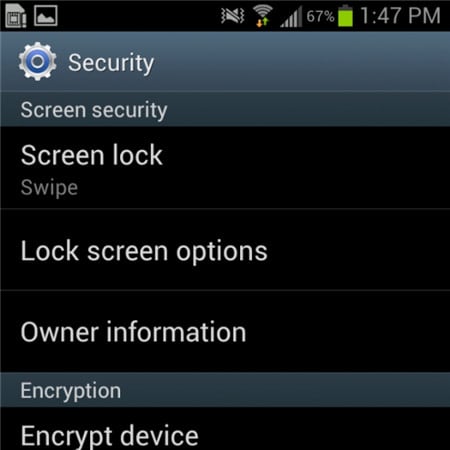
· Step 2: Under the heading called Screen Security heading, you will be shown 3 choices. Tap on the first one, which is entitled Screen lock.
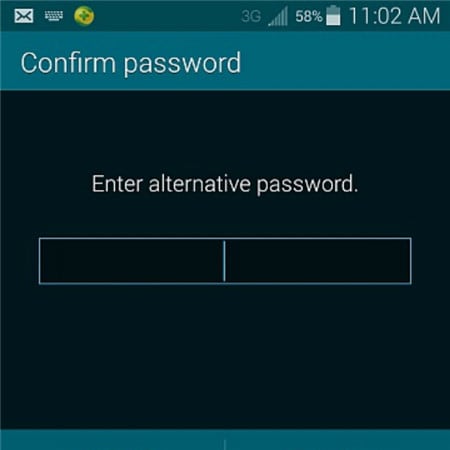
· Step 3: Once you have done the previous step, a brand new screen will appear and then you will be asked to fill in your PIN code. This is a step that helps guarantee that you are the true owner of the Android device.

Step 4: As soon as you have confirmed the right PIN code in the bar provided, you will then be presented to the next drop-down menu. A similar screen will appear which shows you plenty of choices. Tap on the top of that list, which is a bar called None.

Step 5: In the end, you have successfully disabled the screen lock on your Android devices. You are now capable of using it without any hesitation about the screen lock.
Part 3: Common Problems of Disabling Lock Screen
The process to disable the screen lock on Android may seem easy to handle as well as straightforward to several customers, but there are still some annoying problems that users have to deal with while trying to disable the lock screen.
What are the top 2 common problems?
Below are the two most common problems faced by Android users during their efforts to disable the feature of screen lock.
1. In the Screen Security choice, the None bar can not be chosen.
Description of the problem: There is a sentence below it stated: “Disabled by administrators, encryption policy or credential storage”. All the space of the None option is in white and grey.
The solution to this problem is quite simple. Once you have made sure you are suffering from this nasty one, try to follow these below pieces of advice to see if it is capable of giving you a hand.
Step 1: Open the Settings menu from the main screen. Then tap on the Credential Storage. You will see a drop-down menu like the screenshot below.
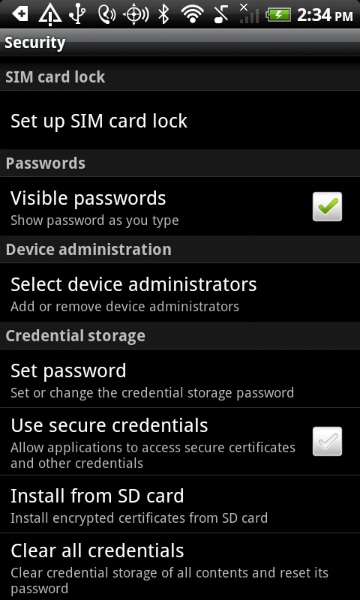
Step 2: Continue to tap on the Clear Credentials (Remove all certificates) option. Then next click on the OK button. Wait for some seconds until your Android device has finished the process.
Step 3: To make sure that the previous step has been performed successfully, try looking at the bottom of the drop-down menu. If the Clear Credentials (Remove all certificates) are grey out and can not be selected, then you have managed to do it.

Step 4: Now that the problem is solved, you can feel free to turn back to your Screen lock option in the beginning and disable the feature of locking screen Android as usual.
2. You have mistakenly encrypted your SD card. You want to disable the encryption, only to realize that it requires you to set a new screen lock code. But when you come to the Screen lock menu, all the options but Password have been greyed out.
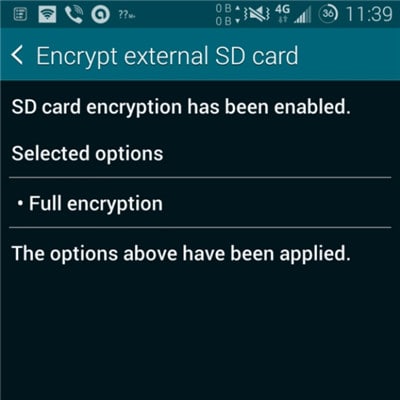
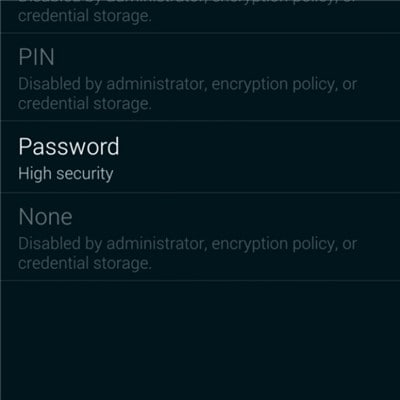
This is pretty weird, but actually, it is one of the most common troubles that many users have complained about. But to your surprise, the solution is very simple and easy. All you have to do is to reset your password, but with a little change. Your password MUST include at least ONE NUMBER in it. Confirm your new password then you will be able to disable the lock screen Android as usual.
Bonus Tip: Remove Android Screen Lock If Forgotten Password/Pattern
As much as the lock screen can protect the personal information on the phone, it can also cause much trouble if you forget the lock screen password or enter the wrong password too many times. So here comes the need for phone unlocking software . One of the best is Dr.Fone - Screen Unlock (Android), which can help us bypass forgotten Android screen locks without any data loss(limited to Samsung and LG series phones). Other Android brand phones will be wiped out all the data once starting to unlock with Dr.Fone
Dr.Fone - Screen Unlock (Android)
Remove 4 Types of Android Screen Lock without Data Loss
- It can remove 4 screen lock types - pattern, PIN, password & fingerprints.
- One-time payment for unlimited use of multiple devices within a specified time period.
- Work for Samsung Galaxy S/Note/Tab series, LG G2/G3/G4, etc.
- Besides, unlocking the screen lock, it also works best to unlock the Samsung FRP lock in devices with Android 5.0 and higher.
3981454 people have downloaded it
Steps on How to Unlock Forgotten Password in Android Phones
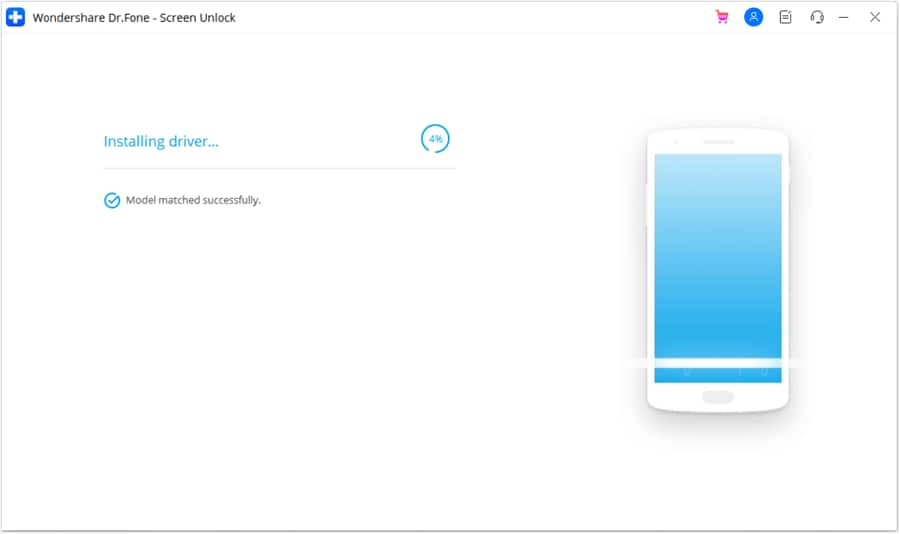
Step 1: Launch Dr.Fone and click on Screen Unlock from the primary window.

Step 2: Connect your Android device to the computer via USB cable. The program will recognize the phone directly. Select the phone model or “I can’t find my device model from the list above” to continue.

Step 3: Follow the instruction on the program exactly to set the phone to Download Mode. First, you will need to Power off your Phone. Secondly, Press on Volume Down, Home button, and Power button simultaneously. Thirdly press the Volume up button to navigate until the phone enters Download mode.

Step 4: After you set the phone to Download mode, it will begin to download the recovery package. When the recovery package is downloaded successfully, the lock screen on your Motorola Razr 40 Ultra devicewill be removed. You won’t lose any data during the whole process.

How To Track IMEI Number Of Motorola Razr 40 Ultra Through Google Earth?
When losing your phone, having a reliable tool at your fingertips can make all the difference. That tool is IMEI tracking, your secret weapon for locating your lost or stolen device. IMEI is a unique number that every mobile device possesses. It’s like a fingerprint for your phone.
Now, the question is, is it possible to track an IMEI number through Google Earth? This question has sparked much debate on the internet, so this article aims to find it out. Keep reading and learn the secrets of Google Earth IMEI trackers.
Part 1: How To Track Your Motorola Razr 40 Ultra on Google Earth
This Google Maps IMEI number tracking issue has caused quite a buzz and controversy on the internet. It has raised many concerns regarding the safety and privacy of every smartphone user. To tell you the truth, Google Earth lacks IMEI location data and does not provide such capabilities. Thus, there is no truth in tracking IMEI numbers through Google Earth.
However, if you have access to a cell phone’s GPS coordinates or the location of a cell tower to which it is linked, you can use Google Earth to follow its location.
How To Locate a Smartphone Using Google Earth
Many current smartphones include GPS receivers that allow them to pinpoint their exact location. If you know the phone’s GPS coordinates, you can plug them into Google Earth to see where it is on the map.
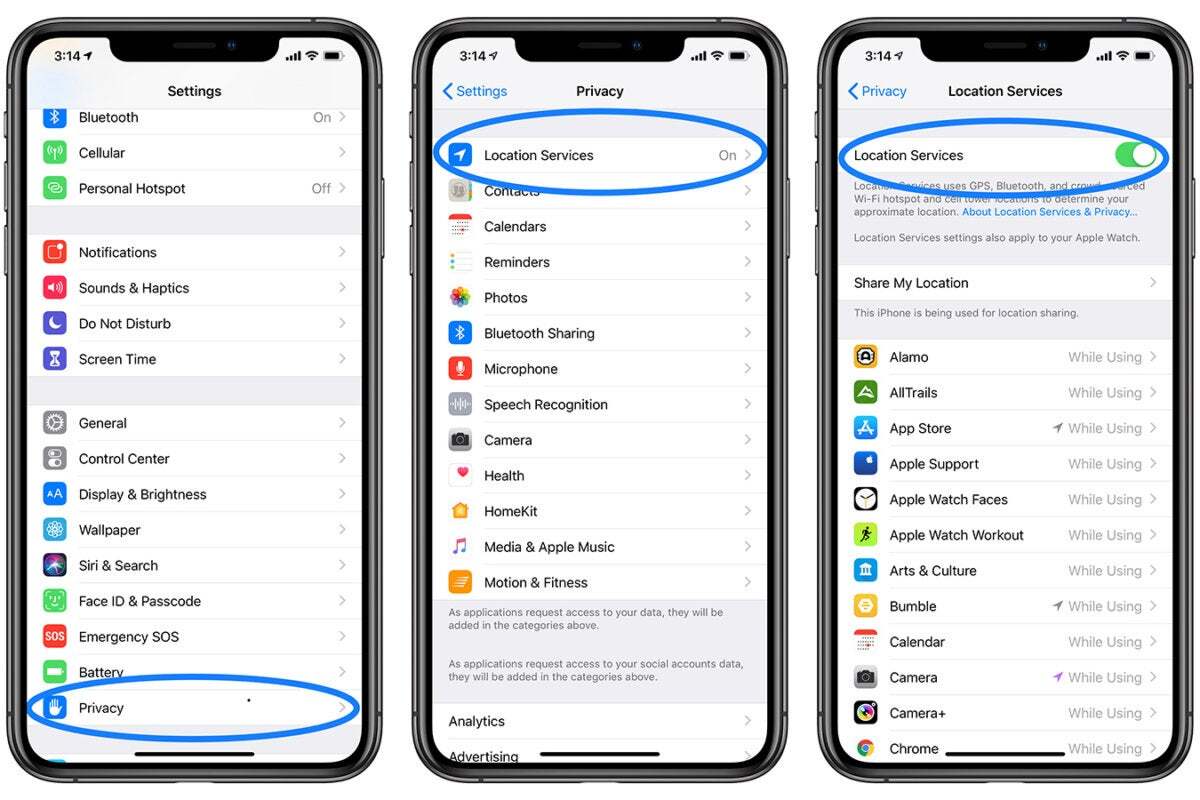
- Step 1: This process won’t be possible if your location services are not enabled on your phone. To do this, navigate to Settings, then Location on Android, and Settings > Privacy > Location Services on iOS.
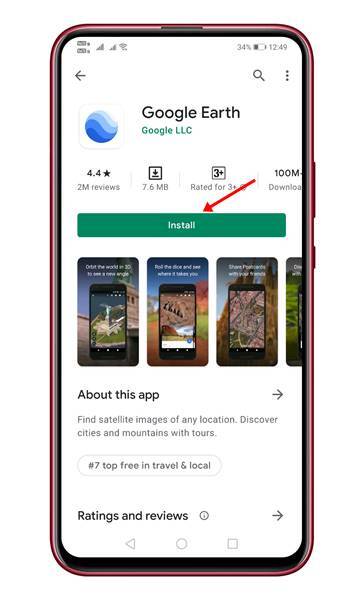
- Step 2: Google Earth can be downloaded and installed on your computer or mobile device. It works with Windows, macOS, Android, and iOS. Download it from your device’s Google Earth website or the app store.
- Step 3: Sign in to Google Earth using the Google Account linked to the phone you want to track. This step is required to acquire location data and monitor IMEI numbers using Google Earth.
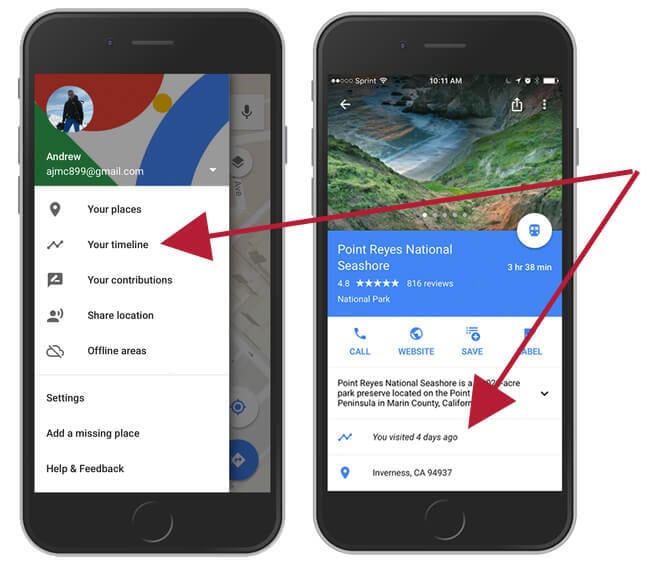
- Step 4: Launch Google Earth on your computer or mobile device, then select Your timeline from the Google Maps menu. The operation will take you to the Google Maps Timeline page.
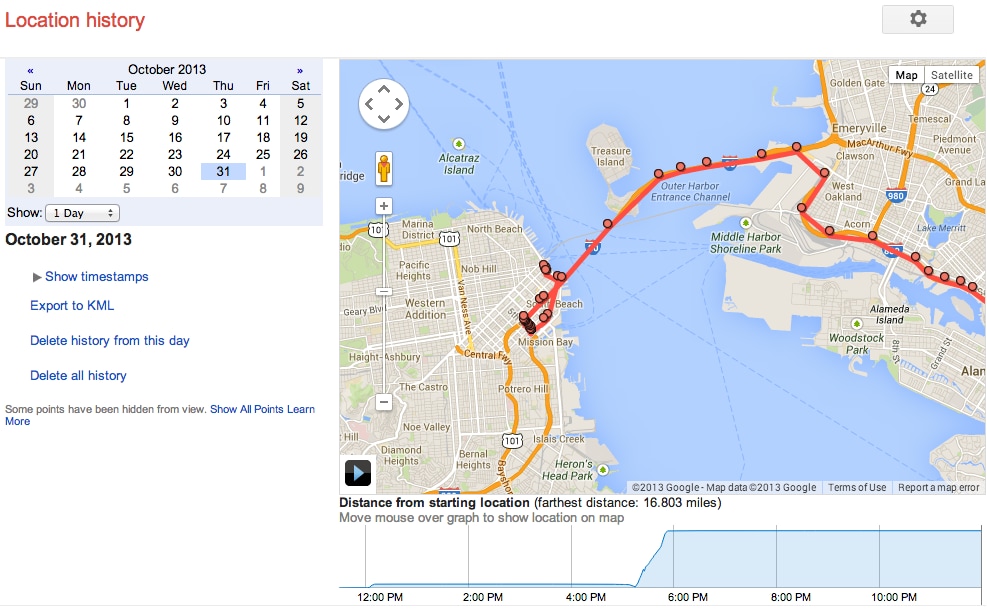
- Step 5: Select the day you wish to see the phone’s location history. Choose the Motorola Razr 40 Ultra device you want to track from the dropdown menu if you have numerous devices linked to the same account. The timeline displays the selected device’s location history for the set date. Examine the locations visited, the routes taken, and the time spent at each spot. For further information, select a certain location or time.
Note: Google Earth does not support real-time location tracking by default. You can use the Find My Device function on Android or Find My on iOS instead if you want to track your phone’s real-time location.
Part 2: Google Earth Alternatives: Track Phone Using IMEI Number
Now that you know the truth behind tracking an IMEI number through Google Earth, let’s talk about other ways to track your phone using your IMEI number. This section will discuss some of your other options when it comes to IMEI number location tracking.
Method 1: Using a Third-Party App
If you have the IMEI number of the stolen device, you can track the phone using IMEI for free utilizing various tools available online.
- Step 1: In the app store, search for “IMEI tracker” and download the IMEI tracking app you wish to install on your phone.
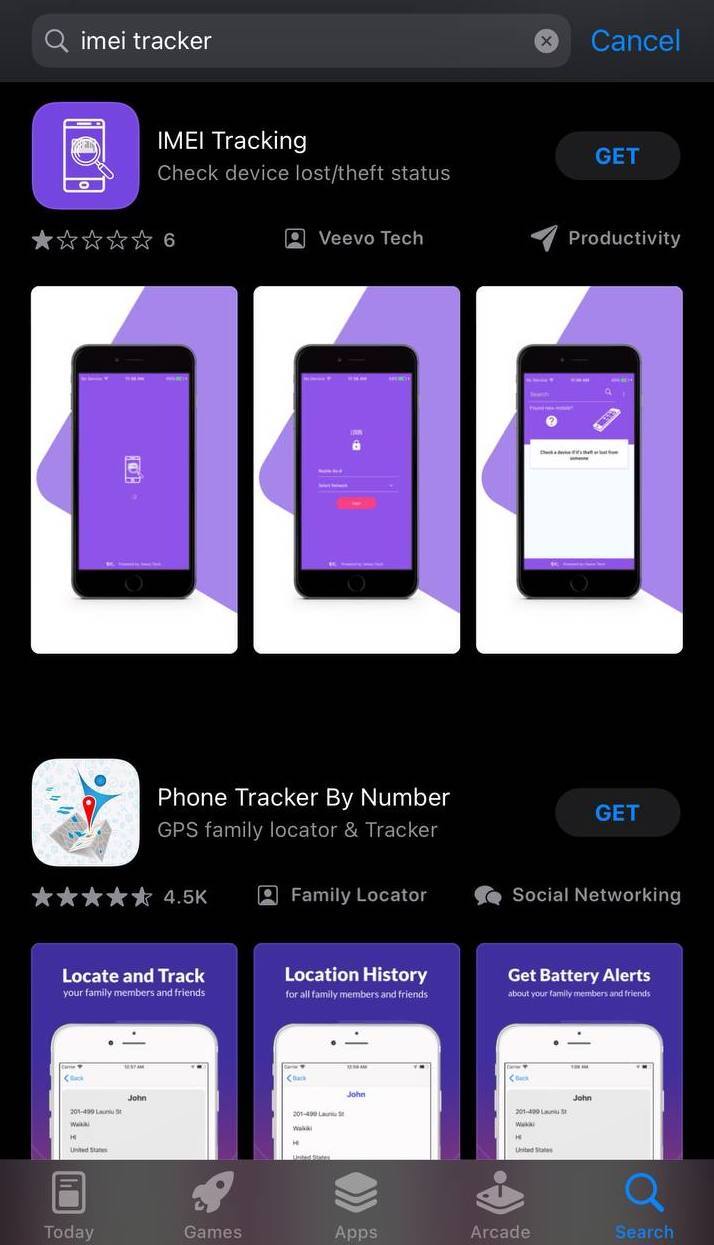
- Step 2: Open the app and follow the in-app guide on how to use it.
Note: Most of the apps require authorization access to your phone. Some also provide a feature where you may send an SMS or a command to get the lost phone’s location.
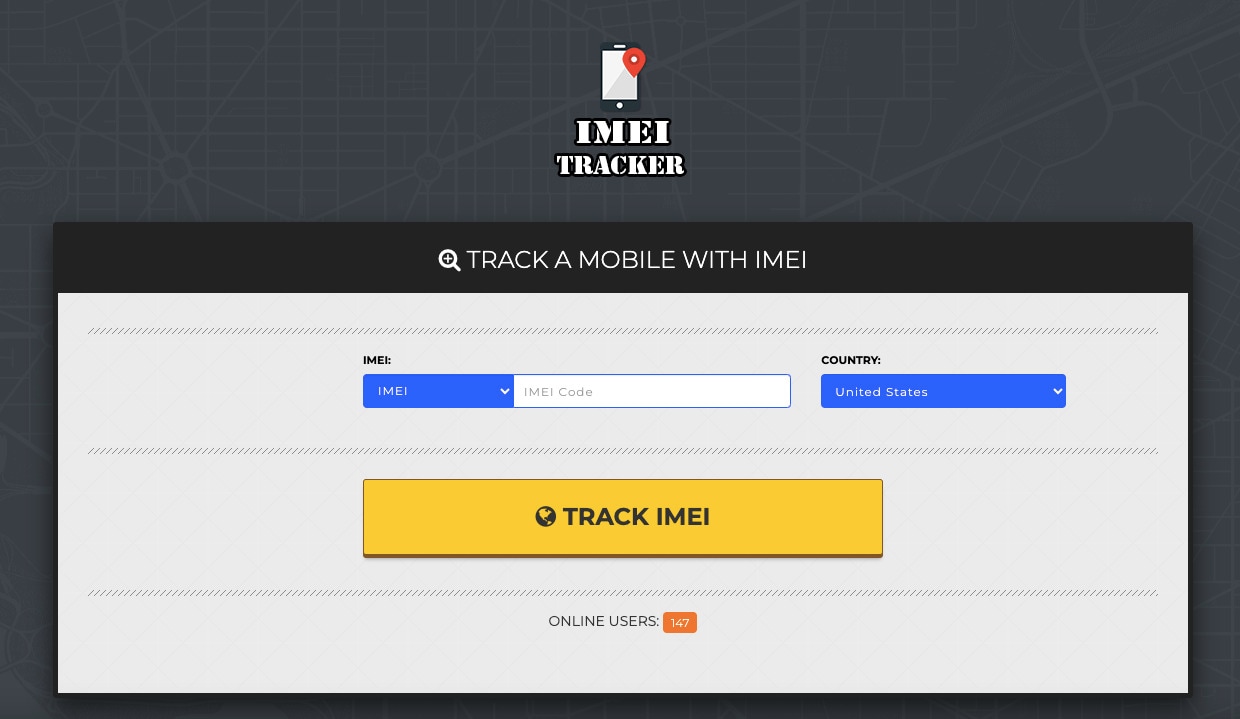
Method 2: Online IMEI Tracking
In certain situations, an online platform is preferable to a mobile app. For your convenience, a free online platform for tracking a phone using its IMEI number is featured below:
IMEI TRACKER
The online IMEI TRACKER is simple to use. After searching an IMEI tracker in Google and opening its website, please enter a valid IMEI code in its search bar and specify the country where your cell phone was first registered. After that, you have to wait for a few moments, and then you may view the phone’s location status and determine whether it is lost or stolen.

Pros and Cons of IMEI Trackers: Apps and Online Platforms
Now that you know there are still methods to track a phone using an IMEI number, it’s also important to weigh their pros and cons. See the list presented below:
Pros
Check out the advantages of using IMEI trackers below:
- **Lost or Stolen Device Recovery.**The primary benefit of an IMEI tracker is its ability to help locate a lost or stolen mobile device. That can be crucial for recovering your valuable device.
- **No Need for Special Apps.**Unlike many other tracking methods, IMEI tracking doesn’t require any special apps or software to be installed on the Motorola Razr 40 Ultra device you want to track. It relies on the unique IMEI number of the Motorola Razr 40 Ultra device.
- IMEI Tracker is compatible with many mobile devices, including smartphones and feature phones. It’s not limited to a specific operating system or brand.
Cons
Below are the drawbacks of using IMEI trackers:
- **Privacy Concerns.**IMEI tracking can raise privacy concerns, as it involves tracking the location of a mobile device. It’s essential to use this technology responsibly and only for legitimate purposes.
- **Internet and Network Dependency.**IMEI tracking depends on the Motorola Razr 40 Ultra device being connected to the internet or a mobile network. If the Motorola Razr 40 Ultra device is turned off, in airplane mode, or disconnected, tracking may be impossible.
- **Inaccuracies in Remote Areas.**IMEI tracking can be less accurate or even unavailable in remote or rural areas with poor network coverage.
In summary, an IMEI tracker can be a valuable tool for locating lost or stolen mobile devices with its location accuracy and compatibility with various devices. However, it comes with limitations related to privacy and network dependency.
Bonus: An Effective Method for Other iPhone Issues Like Locked Screens
In the previous sections, this article delved into IMEI tracking, which helps you accurately locate your lost or stolen phone. However, imagine this scenario: you’ve found your long-lost iPhone, but there’s a problem. You can’t remember the password, PIN, or pattern to unlock it. So this time, let’s go over one of the most common issues smartphone owners encounter: being locked out of their devices.
Introducing Wondershare Dr.Fone – Screen Unlock (iOS): Your iPhone Savior
There are numerous scenarios where one may forget the passcode on their iOS device. While many people dismiss their phones as useless, there are ways to unlock iPhones correctly. And that’s where Dr.Fone - Screen Unlock (iOS) comes to the rescue. It’s like the locksmith for your phone’s digital lock.
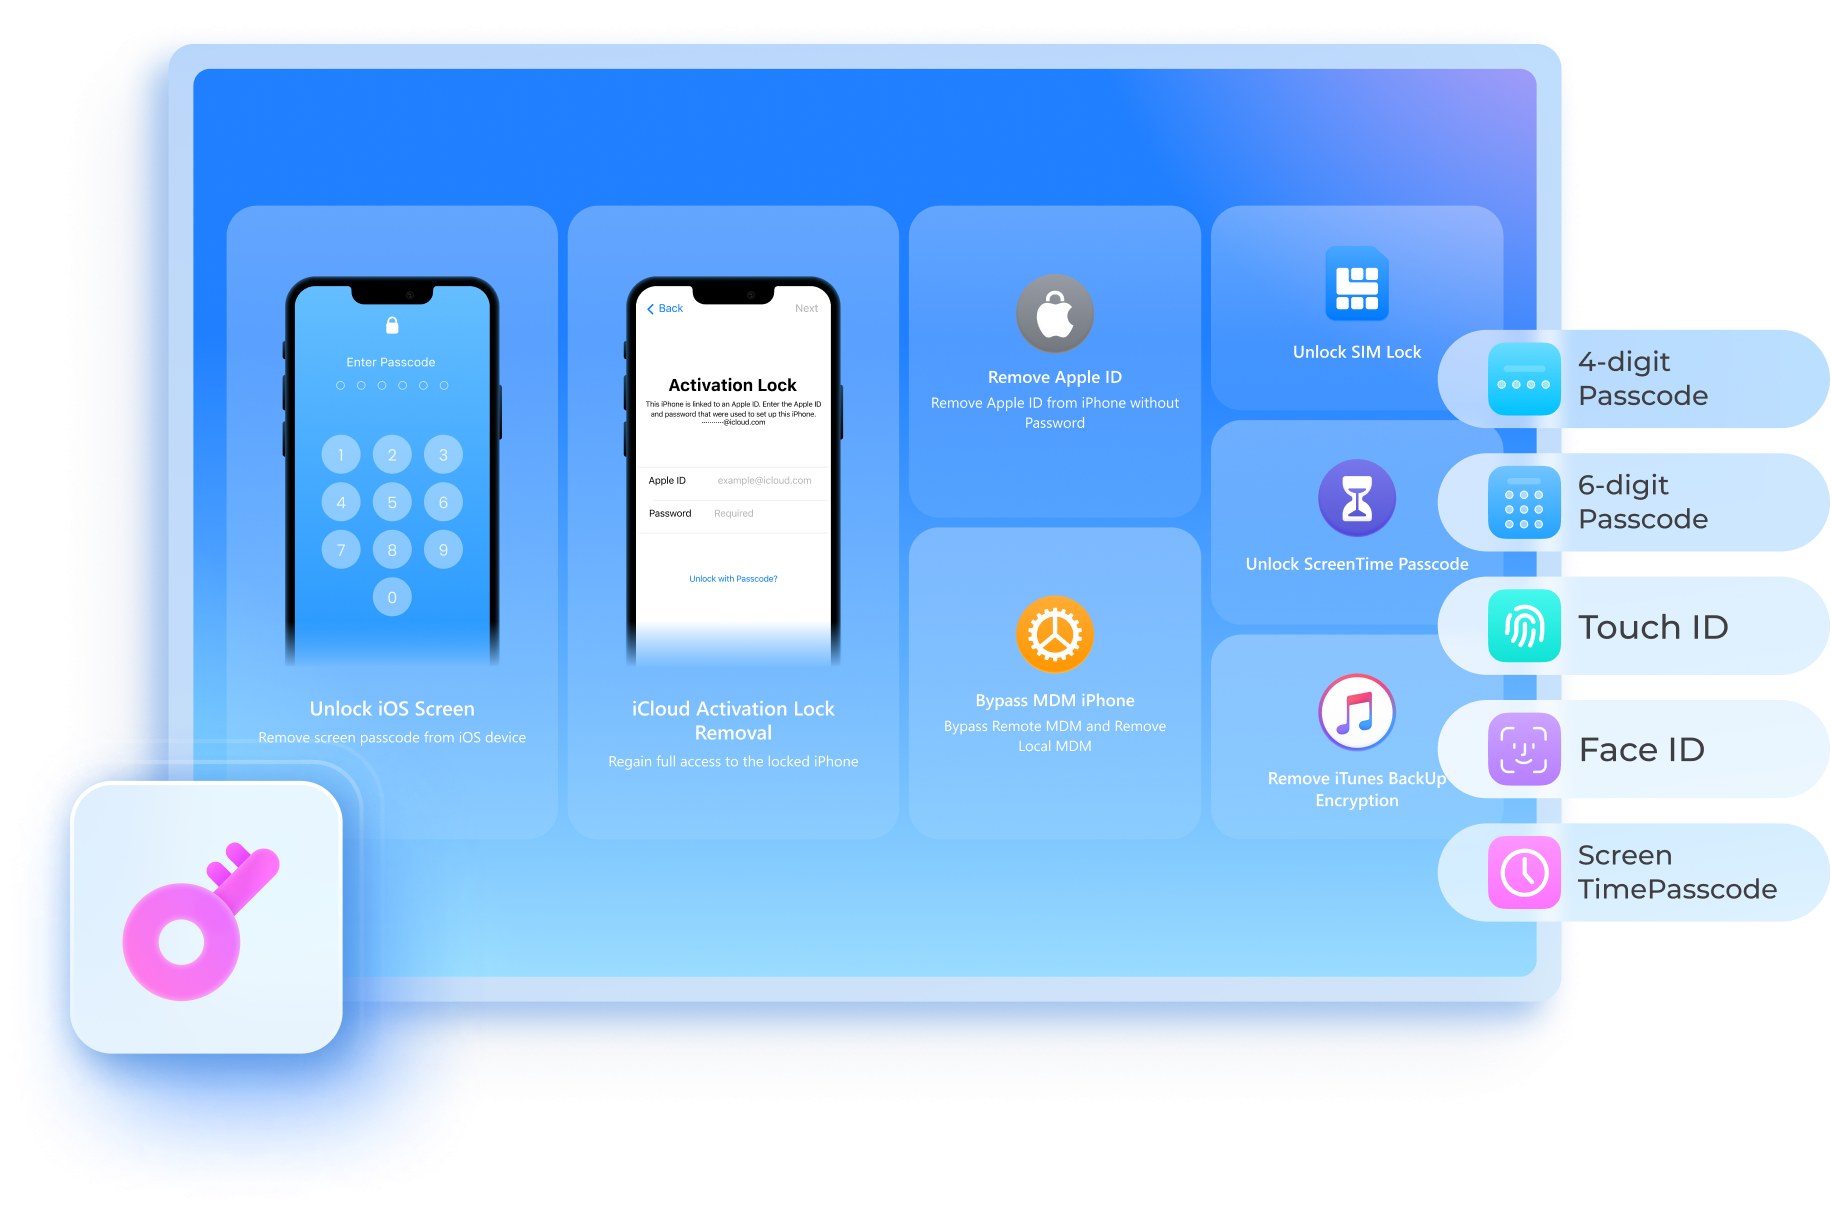
Why Dr.Fone - Screen Unlock Is Your Go-To Solution
Let’s discuss why Dr.Fone - Screen Unlock is a game-changer in unlocking phone, especially when using your IMEI number.
- **User-Friendly Interface.**Fone - Screen Unlock boasts an interface designed with you in mind. You don’t need to be a tech guru to use it. The steps are straightforward, making the whole process hassle-free.
- **Wide Compatibility.**One of the best things about Dr.Fone - Screen Unlock is its compatibility with various mobile devices. It doesn’t matter if you’re using an Android or iOS device; this tool has you covered. It’s like having a universal key to open many locks.
- **Safe and Secure.**Security is a top priority when it comes to your phone. Dr.Fone - Screen Unlock ensures that your data remains safe during unlocking. Your personal information won’t be compromised.
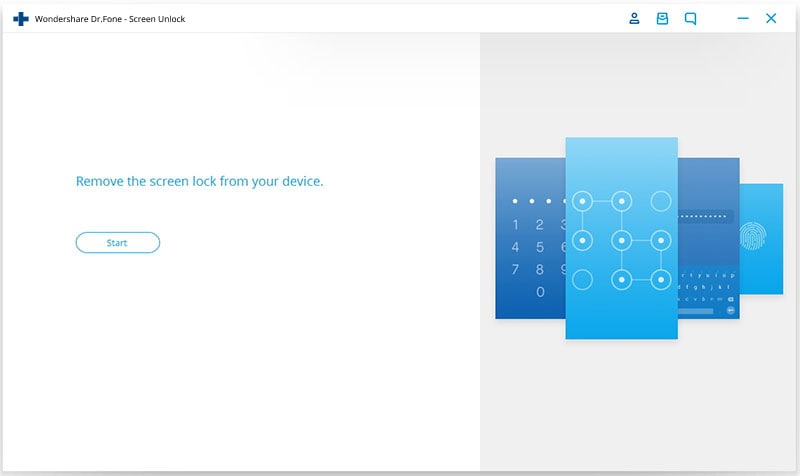
Step-by-Step Guide
Now, let’s dive into how to use Dr.Fone - Screen Unlock to unlock your phone easily :
- Step 1: After downloading and installing Wondershare Dr.Fone on your PC, click Toolbox, click Screen Unlock, then choose iOS. In the window that appears, click the Unlock iOS Screen button.

- Step 2: On the next screen, select Start to begin the unlocking procedure for the iOS device. Make sure that your device’s battery levels are enough.
- Step 3: After that, you should set your iDevice into Recovery Mode. Follow the on-screen instructions to put your iDevice into the appropriate mode for your model. If Recovery Mode does not work, click the Try DFU Mode button at the bottom to access the instructions for entering the iDevice into DFU mode.

- Step 4: After the user successfully enters their iDevice into Recovery Mode, the platform automatically recognizes the Device Model and shows it in the appropriate section. Modify the model and select the System Version to meet your needs if necessary. After that, select Start to begin unlocking your device’s screen.

- Step 5: The following screen reveals the status of the iOS firmware download on the platform. If you want to stop the procedure, click the Stop button. In cases when the iOS firmware is downloading slowly on the platform, utilize the Copy button to copy the URL for manually downloading the iOS firmware.
- Step 6: After successfully downloading the iOS firmware, it is confirmed and displayed on the next screen. Continue by clicking the Unlock Now button to begin the unlocking procedure.
- Step 7: A prompt window displays on the screen, asking for procedure confirmation. Enter the indicated code and tap Unlock to proceed with the final result.

- Step 8: The next screen displays the unlocking iOS device’s progress bar. Keep in mind that the Motorola Razr 40 Ultra device must be connected at all times; otherwise, it will brick.
- Step 9: Once the iDevice has been successfully unlocked, click the Done button to complete the process. If your iDevice is still locked, click Try Again to restart the process.

Conclusion
This article explored the incredible world of IMEI tracking, a powerful tool for locating lost or stolen phones. You’ve learned that your IMEI number is capable of helping you pinpoint your device’s location, but tracking IMEI numbers through Google Earth is impossible.
But that’s not all. This article also introduced and divulged an amazing and reliable tool for unlocking an iPhone. So, the next time you’re in a tight spot with a locked screen, remember that Dr.Fone - Screen Unlock (iOS) is the best software you should get your hands on.
How to Unlock Motorola Razr 40 Ultra Phone without PIN
Being locked out of your device just because you forgot your lock screen pin can be so horrible. When this happens, most people tend to think that this is the end of everything. That isn’t true. You can always unlock your android screen no matter how many times you forget your screen lock pin. This article points out how to unlock your android screen lock if it happens that you forgot Android PIN.
Part 1.How to Unlock your Motorola Razr 40 Ultra PIN Using Dr.Fone - Screen Unlock (Android)
If your android lock screen is locked because you have forgotten the pin, you will, of course, think of finding the best android phone unlocking software . Dr.Fone is the best android lock screen removal that you can use. Within five minutes, you can use this android lock screen removal to remove up to four types of android screen lock types which are: PIN, Pattern, Password, and Fingerprints.
With Dr.Fone - Screen Unlock (Android) , you also can unlock your screen without any data loss. Using this lock removal is very easy as it doesn’t require any technical knowledge. Anyone who knows how to use an android device can use it. This app is used to unlock Samsung Galaxy S, Note, Series and much more.
Dr.Fone - Screen Unlock (Android)
Remove 4 Types of Android Screen Lock without Data Loss
- It can remove 4 screen lock types - pattern, PIN, password & fingerprints.
- Only remove the lock screen, no data loss at all.
- No tech knowledge asked, everybody can handle it.
- Work for Samsung Galaxy S/Note/Tab series, and LG G2/G3/G4, etc.
4,669,934 people have downloaded it
How to Use Dr.Fone - Screen Unlock (Android)
Note:You can also use these tool to bypass other phone’s screen including Huawei, Xiaomi,etc., but it will wipe all your data after unlocking.
Step 1: Download and install Dr.Fone, the android lock screen removal on your device. Launch the program and click “Screen Unlock”.
Step 2: On the interface that appears, click “Start”, and then connect your Motorola Razr 40 Ultra deviceto your PC using a USB cable.
Step 3. Select your phone’s model in the list provided. Type “000000” on the blank box provide and then click the “Confirm” button.Then follow the guide provided to enter download Mode. You can also Power off the android device, and then press Power, Home and Volume Down button simultaneously and then press the Volume Up in order to enter download mode.

Step 4. The program will then download recovery package automatically. Be patient until the process is complete. After that you can now remove the lock pin.
Well done! you have now removed the distressing pin on your phone. Next time put a pin that you can easily remember.
Part 2.How To Enable Your Android Screen Lock PIN
The security of your device is one of the most important things that you should consider. Setting up or enabling your android screen lock PIN will ensure the safety of your personal information and data. Enabling a Screen lock PIN on your Motorola Razr 40 Ultra deviceis very simple. You need no technical knowledge in order to do so. It will take you less than a minute to complete the simple process.
So how do you set up your android screen lock PIN? Here is a step-by-step guide on how to set the lock screen PIN on your android device.
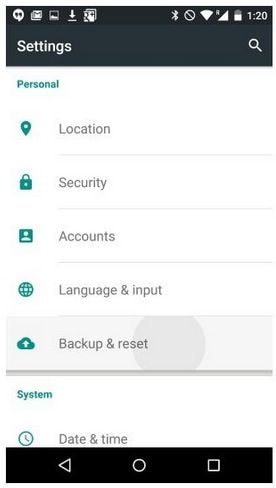
Step 1. Open “Settings” on your Phone

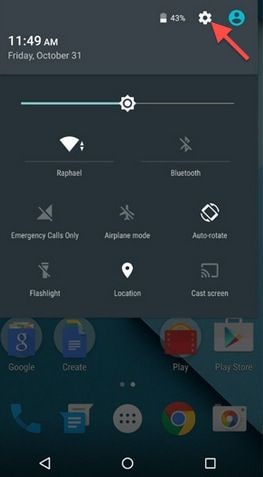
On your android device, open Settings. You can find the settings app in the app; drawer. You can also tap the cog icon on the notification mode and click Settings.
Step 2: Select the “Security” tab under “Personal”
Step 3: Once you have clicked on “Security”, Go to “Screen Lock.” You will be provided with lock screen option such as None, Swipe, Pattern. PIN, and Password.
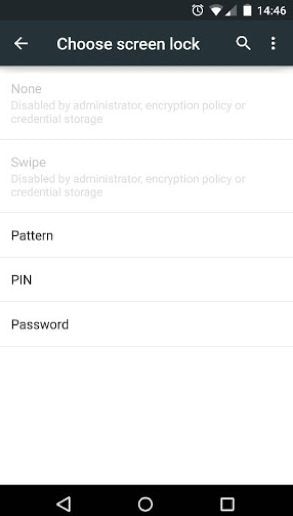
Step 4. Click on “PIN” option. You will be prompted to enter preferred 4-didgit PIN number. You will then be required o key in the same 4 digits to confirm your security PIN. Click “OK” and you will have enabled your Android screen lock PIN.

Good job. You will have to enter this PIN whenever your phone sleeps or when you reboot your phone.
Part 3. How to Disable Your Android Screen Lock PIN
In most occasions, in fact, 99.9%, the first thing that you will see when you power on your device or want to call, receive a call, or want to read a message. The availability of lock screen is to ensure the security and privacy of your personal data such as text, photos, and much more. However, the presence of the lock screen PIN will cause some delay in the actions that you want to take, but not so much. The delay is of course for a few second. The Problem is if you are prone to forgetting the screen lock PIN. This may necessitate the removal of the PIN or disable it in that case. If privacy and security of your device data are not anything that bothers you, then there is no need to waste some of your time in entering the locks screen pin every time you want to access your android device. Disable the Screen lock Pin. The steps are so simple and will not consume more than one minute to do so. Below is a step-by-step guide on how to disable your android screen lock PIN.
Step 1. On your android device, click to open the “Settings” app.
Step 2. In the interface that opens, go to “Security”
Step 3. You can then click on “Screen Lock” and select “None” to disable the screen lock PIN.
You will be prompted to enter the current PIN in order to disable it. Key in the PIN and you will have successfully disabled the Lock screen PIN. When you power off and the power on your android device, you will easily access your phone without any need for security PIN. Similarly, anyone can use your phone if they can gain access to it as it doesn’t have any screen lock.
Enabling screen lock on your Android is the smartest thing to do especially if you value your own privacy. On the other hand, it is a nightmare if you forget screen lock and you don’t know how to go about it. But at this moment, at least you have known a perfect way that you can remove screen lock without losing data on your Android phone.
Also read:
- [New] 2024 Approved Step-by-Step Perfecting FB's 360 Streams
- [New] 2024 Approved Step-by-Step Sharing Media From One iPhone to Another
- [Updated] Crafting a Professional RSS Feed for Your Podcast
- [Updated] In 2024, Simple Windows 11 Techniques for Video Editing
- [Updated] In-Depth Guide to Frozen Indulgence Capture Tech
- A Complete Guide To OEM Unlocking on Vivo T2 Pro 5G
- Downloading SamFw FRP Tool 3.0 for Samsung Galaxy A34 5G
- Forgot Pattern Lock? Heres How You Can Unlock Lava Blaze Curve 5G Pattern Lock Screen
- How To Enable USB Debugging on a Locked Vivo Y02T Phone
- How to Remove Forgotten PIN Of Your Vivo V27 Pro
- In 2024, Digital Leaders The Top 10 Online Video Recorder Apps
- In 2024, ImageTangle The Premier Montage Engineer
- Score Big Savings! Dive Into Lifelike Gaming Sounds With Our Picked Champion of Speaker Systems, Available at a Steal on Amazon | Insights
- Top 12 Prominent Vivo Y27s Fingerprint Not Working Solutions
- Top Roku Streamers
- Title: In 2024, Mastering Lock Screen Settings How to Enable and Disable on Motorola Razr 40 Ultra
- Author: Peter
- Created at : 2024-10-29 01:38:53
- Updated at : 2024-10-30 18:29:00
- Link: https://android-unlock.techidaily.com/in-2024-mastering-lock-screen-settings-how-to-enable-and-disable-on-motorola-razr-40-ultra-by-drfone-android/
- License: This work is licensed under CC BY-NC-SA 4.0.