
In 2024, How To Unlock Any Samsung Galaxy A05s Phone Password Using Emergency Call
How To Unlock Any Samsung Galaxy A05s Phone Password Using Emergency Call
Today, smartphones are an extension of people. Securing them with a PIN, passcode, pattern, fingerprint, or face unlock has become the norm. It’s like putting a digital lock on our private world.
But you have to face it: sometimes, people forget the codes they set to protect their phones or can’t unlock them with their injured fingers or faces. Picture this: you’re staring at your phone screen, trying to recall that password, but it’s not coming to you.
That’s where emergency call bypass is a nifty little trick that can be a lifesaver. In this article, you’ll learn how to unlock any phone password using the emergency call technique. The article will also explore other methods for when your memory fails you. So, read through and never go through this trouble again.

Part 1: What Is the Emergency Call Bypass Method?
The Android emergency call bypass method is a lesser-known workaround for those unfortunate moments when you’re locked out of your phone. This method exploits a loophole in the phone’s lock screen, allowing you to access your device even when you’ve forgotten your password, PIN, or pattern. It’s like finding a secret backdoor when the front door is bolted shut.
“How can unlocking Vivo, Oppo, and Samsung phones using emergency calls be effective?” You may ask. Imagine you need to access important information on your phone but can’t remember your lock screen code. Instead of panicking or rushing to a technician, the emergency call bypass can be a quick and handy solution. It’s particularly useful when immediate access to your phone is crucial and you don’t have time to reset your password through official channels.
Limitations of the Emergency Call Bypass Method
However, it’s important to note that this method has its limitations. It primarily works on older Android devices, specifically those running Android 5.0 (Lollipop) and below. As smartphone technology has evolved, manufacturers have patched many loopholes to enhance security. So, this method might not work for you if you have a more recent Android version.
But don’t worry – if you’re locked out of a newer phone, you can try several other methods, which you will explore later in this article. Remember, the emergency call bypass can be a lifesaver in specific scenarios. However, it’s always best to use such methods responsibly and ethically. And, of course, you should always note your passwords.
Part 2: How To Perform Emergency Call Bypass To Unlock Screen
Unlocking your Android phone without a password using the Emergency Call Bypass method can be tricky, but it’s doable, especially on devices running Android OS 5.0 (Lollipop) and below. Here’s a step-by-step guide on how to unlock any phone password using the emergency call feature:
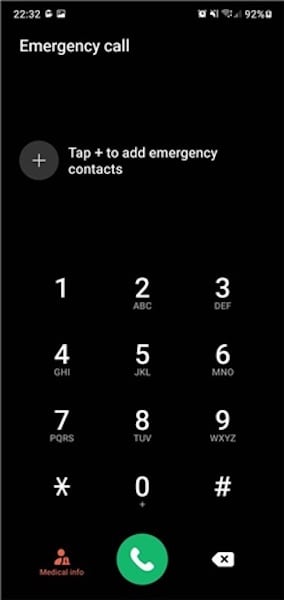
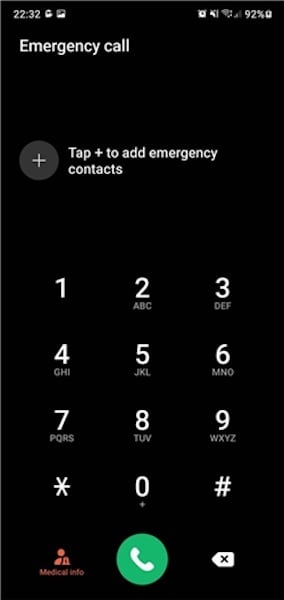
- Step 1: Start by tapping the Emergency Call button on your lock screen. This will bring up the emergency dialer screen.
- Step 2: Type a series of special symbols on the dialer screen, such as asterisks (*). Do this several times in a row.
- Step 3: Double-tap the string of symbols to highlight them, then copy the string. Now, tap on the screen to paste the copied string. Repeat this process 10 to 11 times until you can no longer highlight the series.
- Step 4: Go back to the lock screen. Open the Camera app by tapping the camera icon or sliding left. Simultaneously, pull down the Notification Panel from the top.
- Step 5: In the Notification Panel, tap the gear icon to try and access your device’s settings.
- Step 6: When prompted for a password, long-press and paste the copied string into the password field. Repeat this several times until the option to paste is no longer available.
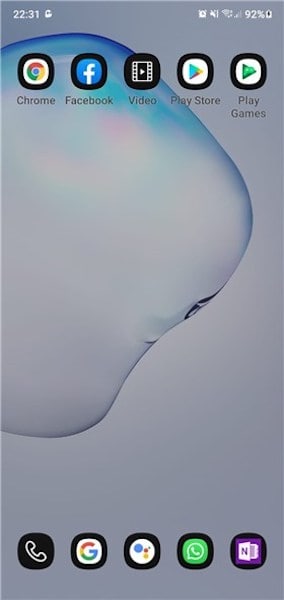
- Step 7: Keep pasting the string until the interface crashes. The lock screen should disappear, and the camera interface will expand. After some time, the camera app should also crash, and your device will unlock, displaying the home screen.
This method, while unconventional, has been known to work on various Android 5 devices, including Samsung models. However, using this technique responsibly and only on devices you own or have permission to access is important. Remember, this method exploits a security flaw and should be used as a last resort.
Part 3: Other Ways To Unlock Your Screen
While the emergency call bypass for Android method is interesting, it’s largely unreliable and outdated, mainly effective on older Android versions. Modern devices have significantly improved security, making this method obsolete. There are other, more reliable methods for those needing to unlock their phone’s screen.
Method 1: Wondershare Dr.Fone – Screen Unlock
Wondershare Dr.Fone is a comprehensive software solution for various mobile issues, including screen unlocking. It’s especially useful when you’ve forgotten your password, pattern, or PIN. Here’s how you can use Dr.Fone to unlock your screen:
![]()

Dr.Fone - Screen Unlock (Android)
The Best UnlockJunky Alternative to Bypass FRP and Solve Your Screen Locks
- Completely unlinked from the previous Google account, it won’t be traced or blocked by it anymore.
- Remove all Android screen locks (PIN/pattern/fingerprints/face ID) in minutes.
- Compatiable with various Android models.
- Provide specific removal solutions to promise good success rate.
4,008,670 people have downloaded it
- Step 1: Launch the Dr.Fone toolkit and go to Toolbox > Screen Unlock. Connect your Android device to your PC.

- Step 2: On the next page, choose Android.

- Step 3: Select Unlock Android Screen, as this is specifically for bypassing the lock screen


- Step 4: Select the brand of your device.

- Step 5: Click Remove without Data Loss to ensure your data stays intact.

- Step 6: Confirm device details. Then, enter “000000” to confirm and initiate the unlocking process.

- Step 7: The software will provide specific instructions to put your device into download mode. Follow them.

- Step 8: Once the process is complete, click Done. If it doesn’t work the first time, try again.

Method 2: Using “Forgot PIN/Passcode” and Google Account
You can use the Forgot PIN/Passcode feature if you’ve linked your phone to a Google account. After multiple failed attempts to unlock your phone, you’ll see a prompt to reset the password via your Google account credentials.
Method 3: Forcing a Data Reset on Your Android Phone
As a last resort, you can perform a factory reset. This will erase all data on your device but remove the lock screen. Access the recovery mode by pressing a combination of keys (usually volume up/down and the power button) and then selecting Wipe data/Factory reset.
Method 4: Booting Into Safe Mode
Booting into safe mode can bypass third-party lock screens. This method won’t work on the default lock screen but can be helpful if an app sets the lock.
In summary, while the emergency call bypass is a thing of the past, there are still various ways to unlock your phone. There’s always a solution, whether through a sophisticated tool like Wondershare Dr.Fone or built-in Android features.
Conclusion
This guide explored how to bypass the Android lock screen using an emergency call. It mainly focused on outdated Android emergency call bypass and more reliable alternatives. Key takeaways include understanding that while older methods like the emergency call bypass are largely ineffective on modern devices, tools like Wondershare Dr.Fone offer a safe and trusted solution.
Learning to unlock your phone screen ensures you’re never locked out of your device, keeping it within your reach. Consider using Dr. Fone- Screen Unlock for a secure and effective way to bypass phone lock screens. It’s an excellent tool for regaining access to your device without risking your data.
How to Remove a Previously Synced Google Account from Your Samsung Galaxy A05s
The setting up process of a new Android phone requires you to add a Google account that saves all activities and data of the phone like search history, details of online shipping, play store purchases, and more. Once the account is set, it cannot be changed till you delete everything from your phone. Moreover, with the introduction of FRP lock, even a factory reset will not remove the synced Google account.
So, now what if you want to sell your phone or have purchased a second-hand device that is still associated with the previous owner’s Google account? No, worries as there are workarounds available that will help you remove your previously synced google account from your Android device.
Keep reading to know more in detail about how to bypass previously synced google accounts.
Heres a full guide on how to remove google account from android, click to know more!
Part 1: Remove Previously Synced Google Account from Android Phone Without Phone Reset
In this part, we will discuss the methods that can be used for removing the previously synced account from your Android phone without a phone reset.
Method 1: Removing Google Account using the Android Settings Menu
If you just plan to reset your phone, maybe because of the lag caused by the phone cache, and you know the inconvenience of Google FRP as a protection mechanism, then you can remove Google FRP through the Settings menu.
The steps for this method are listed below.
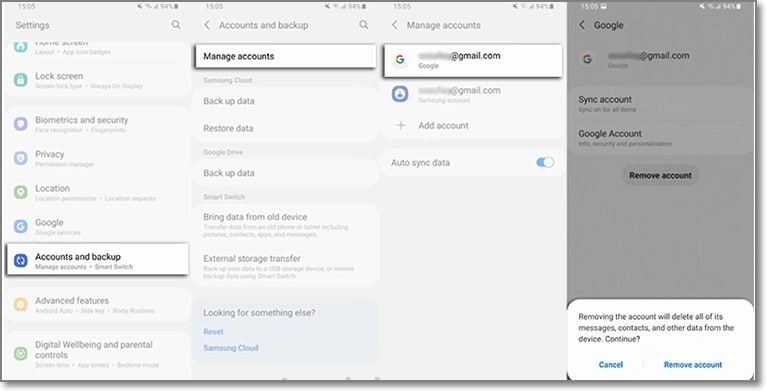
- Step 1: On your Android phone go to the Settings option and choose Accounts & Backup.
- Step 2: Select the Manage Accounts option now and the list of the associated Google Devices will appear.
- Step 3: Choose and click on the Google Account that you want to remove and a pop-up message will appear to inform you that all the account data will be deleted with this action.
To confirm the removal of the account, click on the Remove account button.
There is another method using which you can remotely remove the Google account associated with your phone. The steps for the method are listed below.
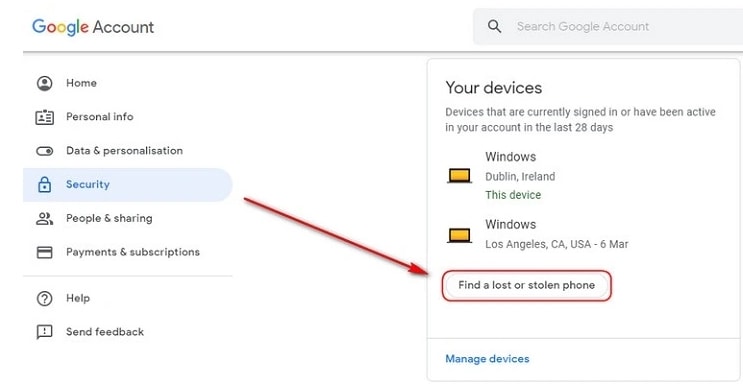
- Step 1: Using another device or a PC, sign in to your Google account that was previously synced on this device and choose the Security option.
- Step 2: Next scroll down and then tap on the Your devices option and choose to Manage devices.
- Step 3: You will now see the list of devices linked to your Google account. Next, tap on Find a lost or stolen phone and then select the Remove option present next to Account access.
- Step 4: You will be again asked if you want to delete the account. Select the Remove option.
- Step 5: The account will be removed successfully and the confirmation message will appear.
Note: This method will actually sign out you from the Google account and will not delete it permanently. To again get access to the account, a notification will appear on your phone to enter the password.

Part 2: How to Disable Factory Reset Protection to Bypass Google Account Verification After Factory Reset
The Factory Reset Protection (FRP) is a security feature for the Android device that allows factory reset only after the associated Google ID and password are entered correctly. With multiple accounts and passwords to remember there is quite a possibility that you may forget your Android phone Google account details and here the need to bypass Google account verification arises.
Though there are multiple tools available we recommend Dr. Fone - Screen Unlock (Android) as the best and the most reliable option. Using this excellent Windows and Mac-based software, FRP lock on all popular Android devices including Samsung, LG, HTC, and others. The tool is simple to use and requires no technology. There is also an option where you can unlock your device if you do not know the OS version.
![]()
Dr.Fone - Screen Unlock (Android)
Get into Locked Phones within Minutes
- 4 screen lock types are available: pattern, PIN, password & fingerprints.
- Easily remove the lock screen; No need to root your device.
- Everybody can handle it without any technical background.
- Provide specific removal solutions to promise good success rate
4,008,669 people have downloaded it
Steps to remove FRP lock using Dr. Fone-Screen Unlock (Android)
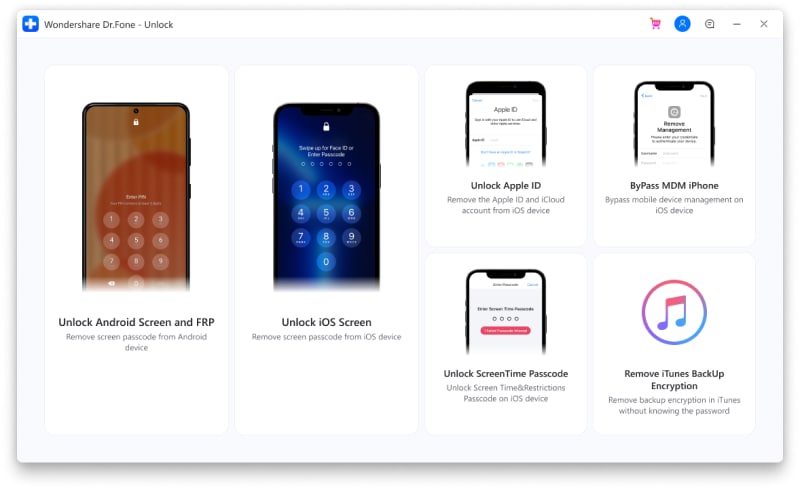
Step 1: Download, install and run the software on your system, and from the main interface choose the Screen Unlock option. Make sure that your phone is connected to WiFi.
Step 2: Next, choose Unlock Android Screen/FRP and then select the Remove Google FRP Lock option.
Step 3: Next, choose the OS version of your device from the given options, and then using a USB cable, connect your phone to your system.
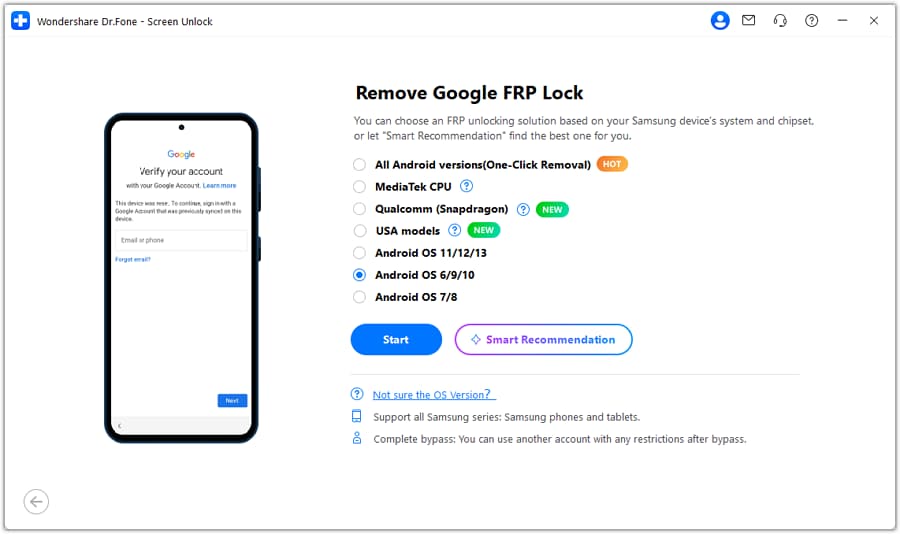
Step 4: After the Samsung Galaxy A05s device is connected, the Samsung Galaxy A05s device information will appear on the software for you to confirm and the notification for the same will be sent to your Android phone.
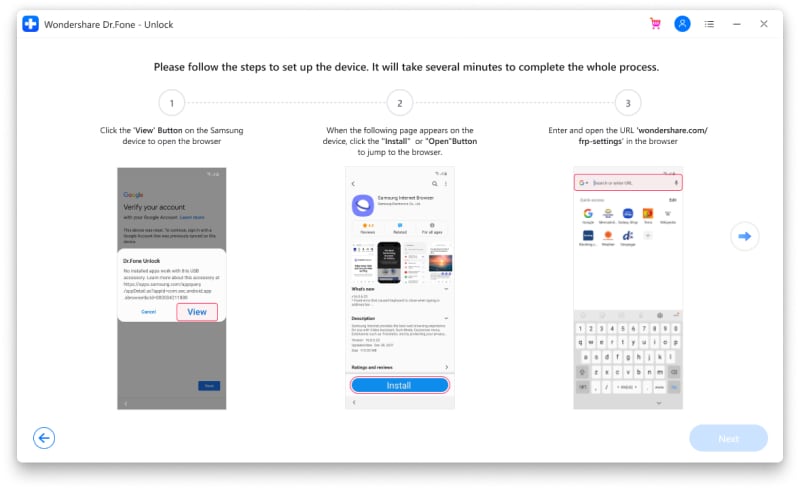
Step 5: Now follow the notifications for removing the FRP lock and in the browser enter drfonetoolkit.com.
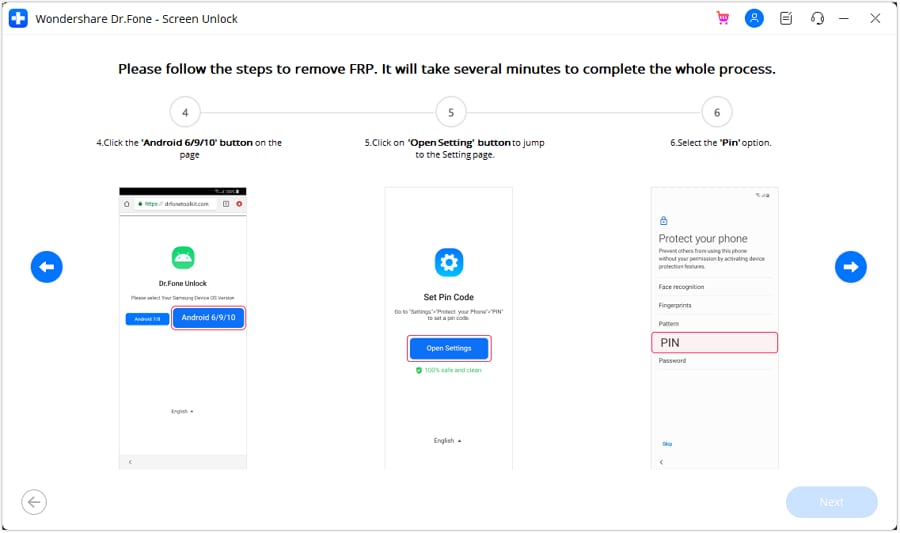
Step 6: Next, click on the Android 6/9/10 button, choose Open Settings and select the PIN option to set a PIN to be used in the further steps.
Step 7: Keep following the steps as they appear till you reach the Google Account Sign-In page. Here click on the Skip option that will successfully remove and bypass the Google Account.

The above given are the brief steps for the FRP bypass process. To learn about the entire process in detail, check Dr.Fone-Screen Unlock (Android) guide .
Part 3: Hire a Remote FRP Removal Service to Bypass ZTE/Motorola After Factory Reset
To bypass the FRP lock on your ZTE, Motorola, and Samsung device, there is also an online service called UnlockJunky.com that claims to remove the FRP lock and previously linked account on your Android device within 5-15 minutes. This is a paid service that also claims that if they are unable to remove the lock, they will refund the amount to their customers.
So, if you cannot sign in with a Google account that was previously synced, you can give this, method a try.
Step 1: Open the official service page Unlockjunky on your browser.
Step 2: Next, choose the Samsung Galaxy A05s device’s brand, model, and unlock type from their respective drop-down menus. Click on Unlock Now button after entering the details.
Step 3: Now you need to initiate the order by providing the details asked and completing the payment.
Step 4: Next, the software needs to be downloaded and installed on your system, and using a USB cable, connect your phone to your computer.
Step 5: Connect with one of the support provider members through the live chat and they will help you remove the FRP lock on your Android phone.
With the steps above, you can remove the account previously synced on this device.

Limitations of using the Unlockjunky method:
- This is a paid service.
- Works only with Motorola, ZTE, and Samsung devices.
- There is no surety that the service will work for removing the FRP lock on your devices.
- If you have to remove the FRP lock from multiple devices, a separate payment for each device has to be done.
Conclusion
Above we have listed several ways to remove a previously synced Google account on your Android device. The best of all the listed solutions is Dr. Fone - Screen Unlock (Android) as it supports bypassing FRP lock on multiple Android devices in a hassle-free manner. Once the license is purchased, you can unlock as many numbers of devices as you want without any worries.
How to Reset Gmail Password on Samsung Galaxy A05s Devices
Nowadays, along with Windows or Apple devices, Android devices are starting to take its place as one of the most popular, reliable, and efficient technical equipment brands. As a result, the use of Android as an operating system for both PC and portable tools is becoming an extremely hot trend.
Android devices pride themselves on providing their customers with the best features possible. Not only do they support offline features, but Android devices are also capable of offering users with several services online. One of them is the ability to make use of Gmail - a very famous email site nowadays.
Gmail being used directly by an Android tool is a great advantage, but it still contains some small drawbacks that users may have to go through. According to a recent survey, the majority of Android users were likely to wonder if they were able to reset Gmail password on Android devices.
Luckily for you, this performance is possible. In this article, a very informative and detailed description will be delivered to you to help you solve the problem of resetting your Gmail password.
Part 1: Reset Gmail Password When you Forget it
There will be times when you come into the situation of not knowing what your Gmail password is, or you just simply forget it. You want to change your password but you don’t have access to a computer or laptop to perform this task. Now with the help of Android, you can do it through your own Android devices.
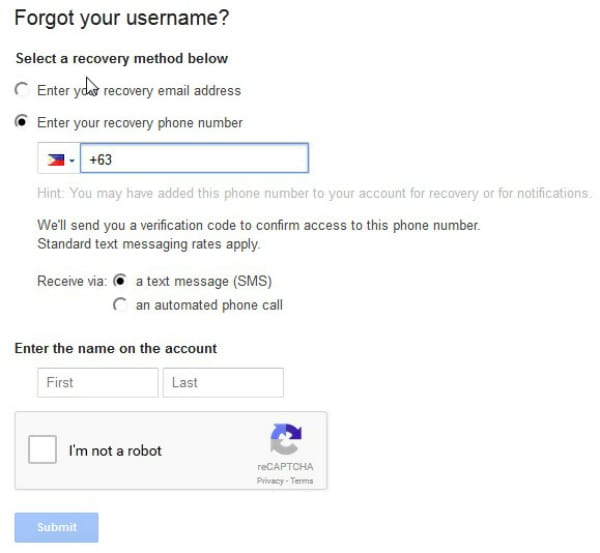
Step 1: Visit the Gmail login page from your Android device. Click on the Need helpline, which is highlighted in blue.

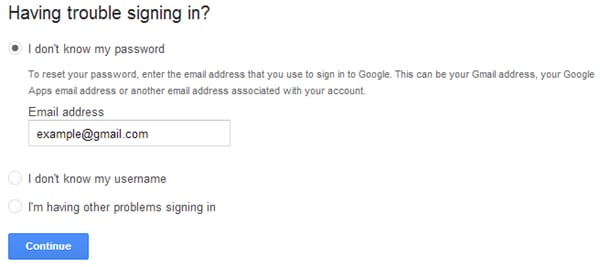
Step 2: After that, you will be moved to the Google Account Recovery page. There will be 3 main options which indicate 3 frequent problems. Select the first one, which is entitled “I don’t know my password”. Once you have chosen it, you will be required to fill in your Gmail address in the bar provided. Click on the Continue button as long as you have made sure to finish all these tasks.
Step 3: In this step, you may be asked to fill in a CAPCHA form. Just simply do it and move to the next page. There you had better type in the last password that you are still able to recall if possible, then click on the Continue button to move. Or else, you can skip this step by clicking on I don’t know button.
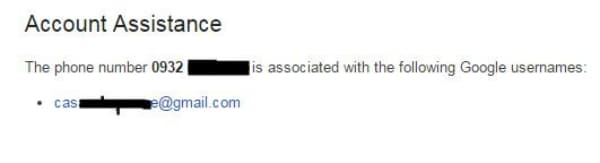
Step 4: Finally, you will be shown a list of options on how to reset your Gmail password on Android devices. You can either use your alternative email address or your phone number to receive a verification code. Bear in mind to fill in any required information and put a check in the CAPCHA box to submit the process.
Step 5: In this step, a blank bar will appear and it will demand you to type in your verification code. Just do it carefully to make sure there is no error. Once you have done it, a new screen will appear to tell you.

Step 6: After you have done all the previous steps, you will know how to reset your Gmail password directly from your Android device.
Part 2: Change Gmail Password When You Still Know it
Besides not knowing your password, there are still circumstances when you wish to change your current password for various reasons. Just simply follow these steps.
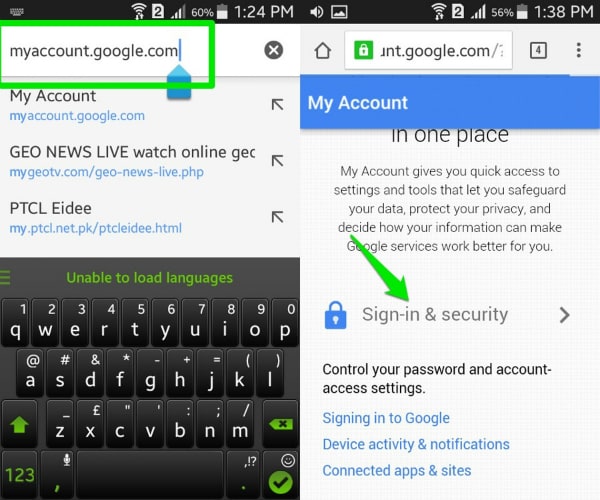
Step 1: Make sure your Android device is connected with the Internet. Then get access to the link myaccount.google.com. After logging into your account (or maybe you have already done this), scroll down, find the Sign-in and security option and choose it.
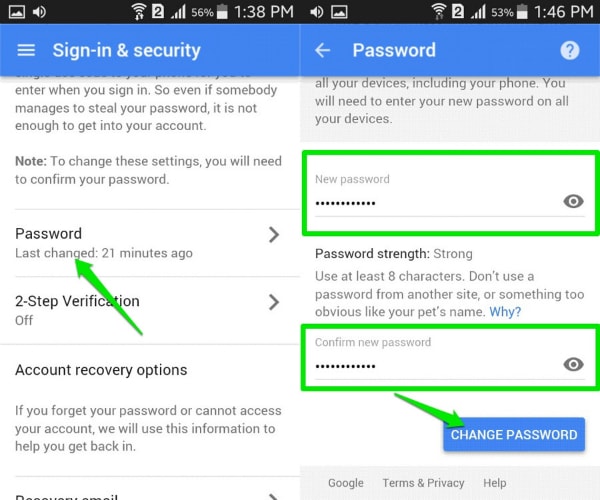
Step 2: Find the Password option in the list. Tap on it to be moved to another screen. In the menu, type in your new password that you wish to exchange, confirm it and then click on the Change password button.
Part 3: Bonus Tips
Gmail is undoubtedly a marvelous tool to use on Android devices, but have you really understood all the tips and tricks to take the best advantage of it? Below are the 5 most helpful tips that we want to offer you.
- Far from your imagination, Gmail on Android devices is capable of allowing you to make use of several accounts at the same time, even if it’s not a Gmail account. This performance not only helps you to organize your work better, but it also increase the efficiency of your job. Just simply log in your Gmail account on Gmail app, click on the down arrow which is placed next to your avatar and name, then choose Add account. You will be moved to another page, choose Personal (IMAP/POP) choice and follow the detailed guide on the screen.
- If your Android device is used by only one user, and you are guaranteed about the security of it, try to keep the Gmail logged in. It would help you to avoid wasting unnecessary time to sign in your account every time you need, not to mention that it prevent you from being confused of not knowing your account/password.
- You are capable of sorting your mails with a certain level of accuracy once you are fully aware of the features of Gmail app on Android devices. Just click on the email, then choose Settings menu and mark it as “Mark as not important”, “Mark important” or “Report to spam” owing to the priority of your email.
- Gmail app provided you with the ability to have conversations online, and whenever a message comes, there will be a sound. In case you are in a vital conference, or you don’t want to be disturbed by the noise, you can mute it. All you have to do is to tap into the conversation, choose the three dots icon then click on the Mute option in the menu.
- Enhance the speed and the accuracy of your search with the use of certain phrases. Let’s take an instance to see what Gmail can do for you in this case. If you want to search for the mails which have been sent by a certain person, typefrom:(name of the person on Gmail) in the searching bar. And in case you would love to look for a private message from that person, please type is:chat:(name of the person on Gmail) .

Part 4: Video on How to Reset Gmail Password on Android Devices
- Title: In 2024, How To Unlock Any Samsung Galaxy A05s Phone Password Using Emergency Call
- Author: Peter
- Created at : 2024-07-16 10:14:46
- Updated at : 2024-07-17 10:14:46
- Link: https://android-unlock.techidaily.com/in-2024-how-to-unlock-any-samsung-galaxy-a05s-phone-password-using-emergency-call-by-drfone-android/
- License: This work is licensed under CC BY-NC-SA 4.0.