
In 2024, How to Reset a Motorola Razr 40 Phone that is Locked?
How to Reset a Motorola Razr 40 Phone that is Locked?
We all have been there when put a tough to crack the lock on the smartphone and forget the password all along. Such circumstances can be tedious at times, but there is a way around it. If you have spent countless hours on how to reset a Motorola Razr 40 phone that is locked, or how to get into a locked Motorola Razr 40 phone quickly with or without Factory Reset. This is the right article for you. Here we will describe all the different ways in which you can reset your phone with the convenience of software to even reset it manually. So, without making further due, let’s jump right into it.
Part 1: What should I be aware of before resetting a Motorola Razr 40 Phone that is locked?
Before you go to reset your locked Motorola Razr 40 phone, it’s crucial to learn about a few key factors. These factors will enable you to make a well-informed choice and help avoid potential complications during the factory reset process.
1. Data Loss
Resetting your locked Motorola Razr 40 phone typically involves performing a factory reset. The process erases all data and settings on the Motorola Razr 40 device. This includes your files, apps, contacts, and other information stored on the phone. You can easily restore these data if you have backed up data before. It’s crucial to back up essential data regularly to avoid data loss.
2. Factory Reset Protection (FRP)
Motorola Razr 40 , like many other Android manufacturers, implements Factory Reset Protection. It acts as a preemptive safeguard against unauthorized access to a device after a reset. If your phone is linked to a Google account, you will need to input the accurate login credentials after a reset.
Failing to do so may lead to your device being locked. Understanding how to bypass or recover from FRP lock is essential if you find yourself in this situation.
Part 2: How to Reset a Motorola Razr 40 Phone That is Locked With Google Find My Device?
Resetting a locked Motorola Razr 40 phone through Google Find My Device presents a convenient solution. It, however, needs you to have activated this functionality on your device. To initiate the reset, please adhere to the following steps:
Step 1: Open a web browser on any computer or alternative device and navigate to the Google Find My Device website. Sign in with the same Google account associated with your locked Motorola Razr 40 phone.
Step 2: Upon successful login, a list of devices linked to your Google account will be displayed. Locate your locked Motorola Razr 40 phone from the list and select it. Select the “Erase Device” option from the left-hand panel, and it will trigger a remote factory reset for your locked phone.
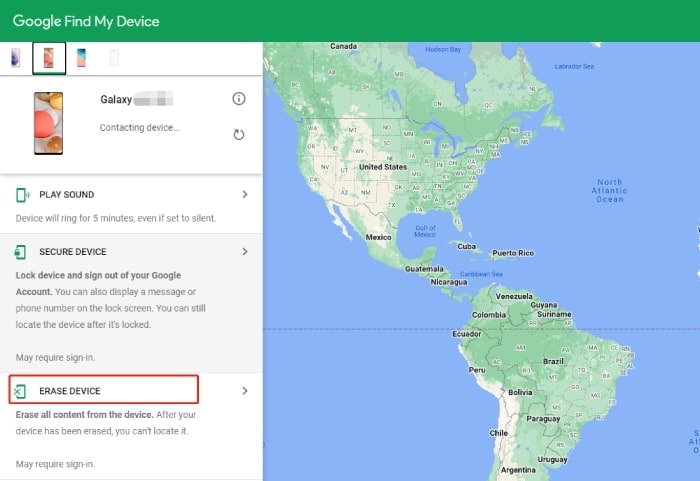
Step 3: A confirmation dialog will appear, prompting you to input your Google account password. Finally, click the “Erase” button to initiate the factory reset process.
Part 3: How to reset a Motorola Razr 40 phone that is locked without a password?
In order to reset your Motorola Razr 40 phone without a password, you need to have a single software known as Dr.Fone - Screen Unlock (Android) . It’s a powerful and versatile software tool designed to help you unlock your devices under various circumstances. Whether you’ve forgotten your device’s password, PIN, pattern, or fingerprint, or you’re dealing with a locked device due to a broken screen, Dr.Fone - Screen Unlock (Android) can assist you. In order to reset phone correctly, go through the steps given below:
Before resetting your Motorola Razr 40 phone that is locked, you can install the Dr.Fone application on your Windows PC or Mac first.
![]()
Dr.Fone - Screen Unlock (Android)
The Best Unlock Tool to Reset a Motorola Razr 40 Phone That Is Locked Without a Password!
- Remove all Android screen locks (PIN/pattern/fingerprints/face ID) in minutes.
- Work for forgotten passwords, second-hand Motorola Razr 40 devices, etc.
- Everyone can handle the lock screen without any tech knowledge.
- Provide specific removal solutions to promise good success rate.
4,008,671 people have downloaded it
Step 1: Launch the Program
First of all, launch the Dr.Fone Screen Unlock on your computer, and you will be greeted with a welcome screen like this. Now, head over to the “Screen Unlock” section.

Step 2: Connect Device
Now, you need to connect your Motorola Razr 40 phone to the computer via a USB cable and select “Android” > “Unlock Android Screen.” This particular step is an application for all the Android phones out there.

Step 3: Choose Device Model
Here you need to select the exact brand of your phone. In your case, you can just tap “Motorola Razr 40 .” The program then will start the process for the lock screen removal.


Step 4: Unlock Screen
Go along with the instructions on the screen and remove all the settings of the Motorola Razr 40 device. Within a short while, the screen will be unlocked.

After the entire process is completed, you can easily access your Motorola Razr 40 Phone without the need to enter your password. All the restrictions that were set properly to unlock will be removed so that you can use your phone as intended.
Part 4: How to reset a Motorola Razr 40 phone that is locked with a hard reset
Disclaimer: Only perform this step if you are well accustomed to the Android recovery system or at least know your way around your Motorola Razr 40 phone.
That being said, you should only resort to using a hard reset if you don’t have any important data on your phone. Further including, resetting your phone with the hard reset option will wipe out any data that’s been stored in it. Now, proceed forward will all the steps are given below:
Step 1: Charge Device
Charge your Motorola Razr 40 Phone so that it has a batter of at least 30% or higher. Then turn off the phone.
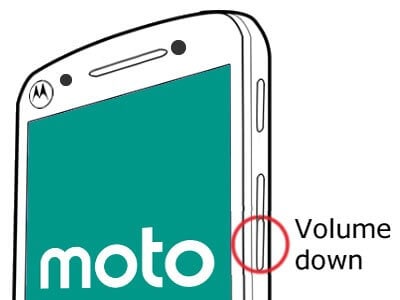
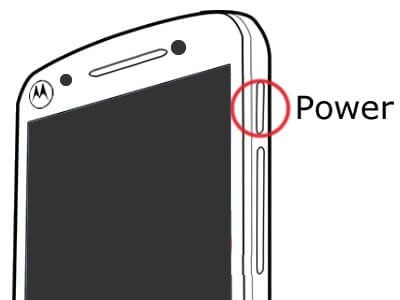
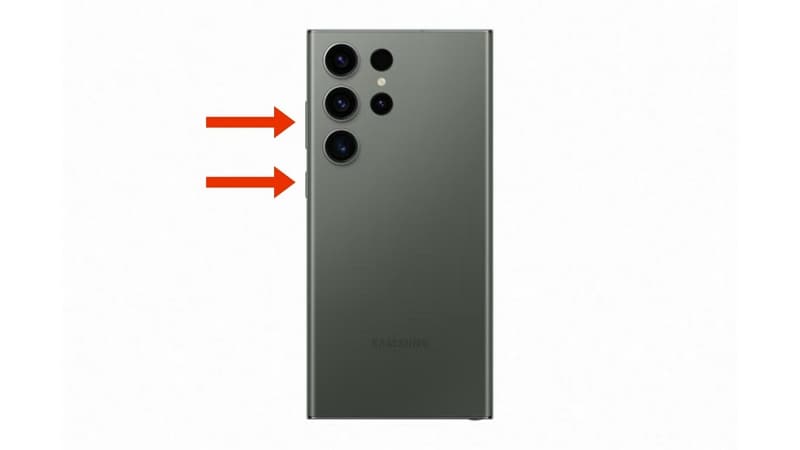
Step 2: Press keys
Now, you need to press the Volume Down + Power button simultaneously until the Motorola Razr 40 device logo shows up on the screen.
Step 3: Enter Recovery Mode
Now, press the Volume Down button to navigate to the Recovery Mode.
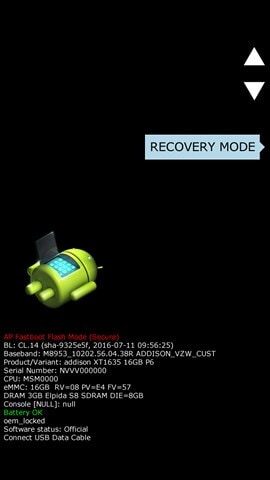
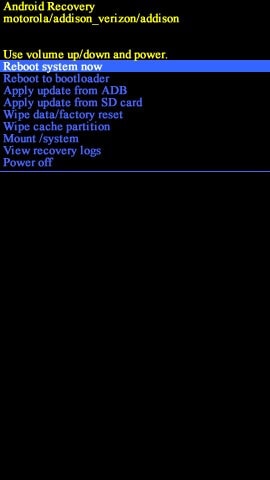
Step 4: Factory Reset
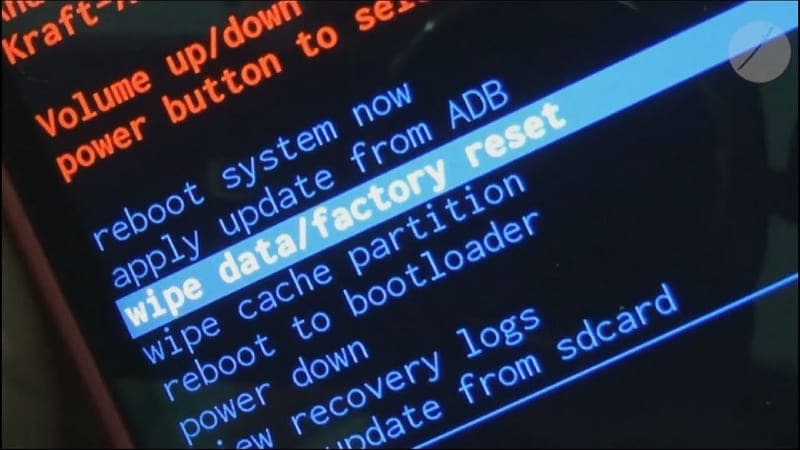
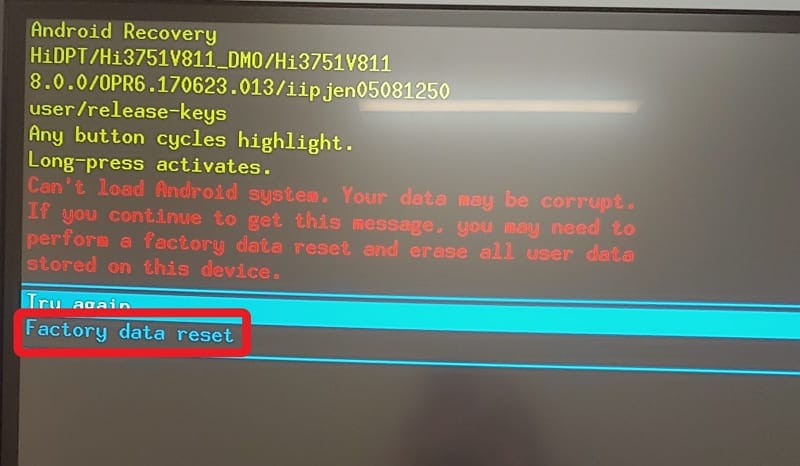
Use the buttons to navigate to the “Wipe data/factory reset” option and select it by pressing the Power button. Now, choose the option ”Factory data Reset” and wait for a few seconds till it is completed.

Step 5: Reboot Now
Again use the Volume buttons and select the “Reboot system now.”
After you have successfully reset your Motorola Razr 40 phone, it would take a few minutes to boot up. Once that is done, you are left with a clean slate, just like a completely new smartphone.
Part 5: Unlock locked Motorola Razr 40 phone with Gmail ID and password
It is imperative to understand that unlocking your Motorola Razr 40 Phone using a Gmail ID and password should be your last resort and especially if you are using an older version of Android. Among all the tricks of how to reset a Motorola Razr 40 phone that is locked, it only works if you are running around version 4.4 KitKat or older than that. Neither less to say, in order for the step to work properly, you need your Gmail account to be properly configured with the Motorola Razr 40 device.
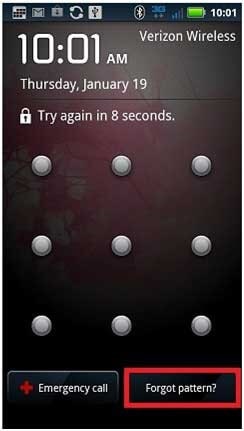
Step 1: Attempt Passwords
At first, you need to make five attempts to unlock your device. Whether you have used a PIN or Pattern lock, Android will always give you five attempts to get the password right. Once you get that, it will trigger the “Forget Password/Pattern” option on Your Motorola Razr 40. This way, you can sneak back into the system once again.
Step 2: Enter Credentials
Once you hit the option, you will be redirected to another page, where you need to enter your Gmail id and password. Make sure that you get the information right, and select “Sign in.”
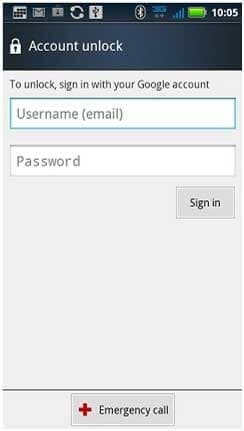
Once you get everything right, this will bypass any password or pattern you once had put on your Phone. Just remember, you need to have a stable internet connection in order for the step to work seamlessly.
Bonus Tip: Are There Preventive Measures To Avoid Future Lockouts?
Want to prevent future lockouts and ensure a smoother smartphone experience? Consider implementing the following preventive measures:
1. Setting Up Alternative Lock Methods
One way to avoid getting locked out of your Motorola Razr 40 phone is to set up alternative lock methods. In addition to PINs, passwords, and patterns, you can use biometric methods. These include fingerprint recognition or facial recognition if your device supports them. Such options provide convenient and secure ways to unlock your phone.
2. Regularly Backing Up Your Data
Regular data backups are crucial to safeguarding your essential files and information. Utilize cloud backup services or local backup solutions to routinely save your data. In case of a lockout or a factory reset, you can quickly restore your data without loss.
3. Using Secure and Memorable Passwords
When setting up lock methods, opt for strong, unique, and memorable passwords. Avoid using easily guessable information like birthdays or simple patterns. Strong passwords can enhance security while minimizing the chances of forgetting your credentials.
Conclusion
There is no point in arguing that looking through how to reset a Motorola Razr 40 phone that is locked after you have forgotten the password is indeed a hectic process. But, there is a way around it too. By going through all the steps mentioned above, you can always get an unlocked phone with ease.
To our recommendation, we would suggest going through Dr.Fone - Screen Unlock (Android) so that you can make the entire process as seamless as possible. It is by far the easiest and most convenient process to work around. Neither less to say, there are a ton of video tutorials that can assist you in case you get stuck in the middle of the process.
Delete Gmail Account With/Without Password On Motorola Razr 40
Email accounts have proven their worth in digital devices beyond sending emails. Lately, Android devices have only operated with a Gmail account. This is because most of the data, such as contact information, messages, and other details, are saved across the storage space offered with the email. Against all recognizable uses of Gmail accounts, users look for ways how to delete Gmail accounts.
To this day, it is known that Gmail accounts can be removed with or without a password. However, one should know that if they consider deleting their Gmail account, they won’t be able to send or receive emails. With that, let’s proceed to reveal all essential methods that can be used to delete a Gmail account permanently. This article will also focus on a perfect tool that assists in making the process easier.
Part 1. Synopsis: Things To Know Before Deleting Gmail Account
Although the process of deleting a Gmail account sounds basic, there are many pointers connected to it. For that, this part is putting up a discussion on the important things that a user should know before they delete their Gmail account permanently:
- No Going Back: If you delete a Gmail account, the process is irreversible. All details and information will be lost, and the email won’t be trackable ever again.
- Cannot Reset Passwords if Connected: If the Gmail account is connected to any other service, make sure that you remember their passwords. Since the account will be deleted, you cannot reset their passwords.
- Access to Other Services: Although you are deleting your Gmail account, you can still access Google Photos, Google Drive, and other services.
- Lookout For Emails: Ensure that the emails in your account are saved. You can easily download them anywhere before deleting the Gmail account.
Part 2. Delete Your Gmail Account Using Your Password: Desktop Solution
For the first method, we will discuss how to delete a Google account with your password. You will use your computer for this process and access the Google Account services. The service helps you save all your essential Gmail data before you remove it. To understand how it makes it possible, look through the steps provided below:
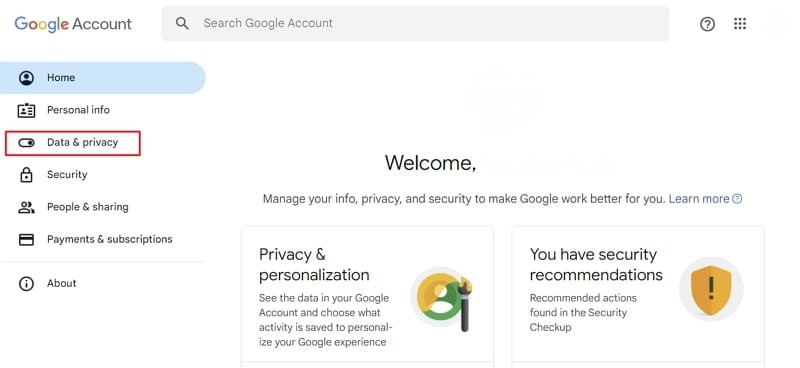
- Step 1. Access the website https://myaccount.google.com/ on your desktop browser and log in with your credentials. Proceed to the “Data & privacy” section from the left panel.
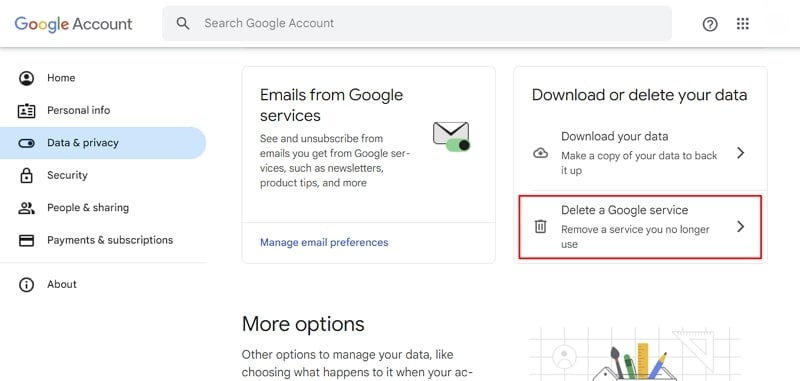
- Step 2. On the following window, scroll down and look for the “Delete a Google service” option. Accessing this would allow you to delete your Gmail account permanently.
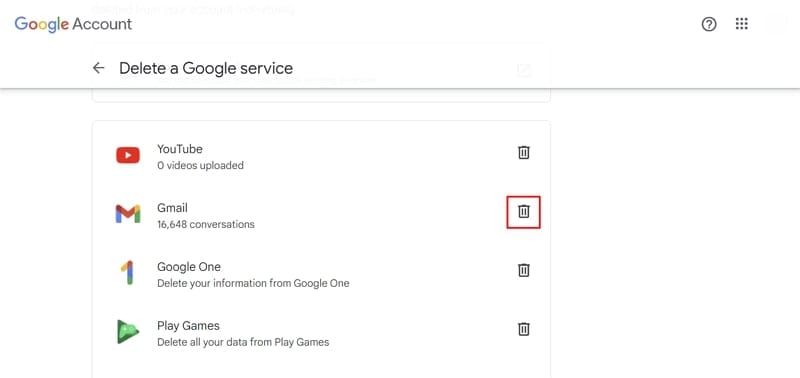
- Step 3. You will be led to a new screen where you need to provide your password credentials again. On successfully providing your password, look for the “Gmail” option on the next screen. Click the “Trash” icon to continue deleting the Gmail account.
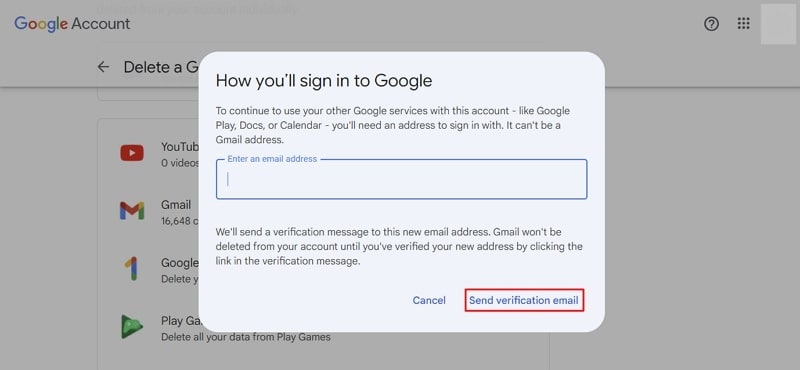
- Step 4. A new pop-up window opens, demanding another email address that can help connect to other Google services. Provide the email address and continue to click “Send verification email .” The Gmail account won’t be deleted until the user verifies the email sent to the new address.
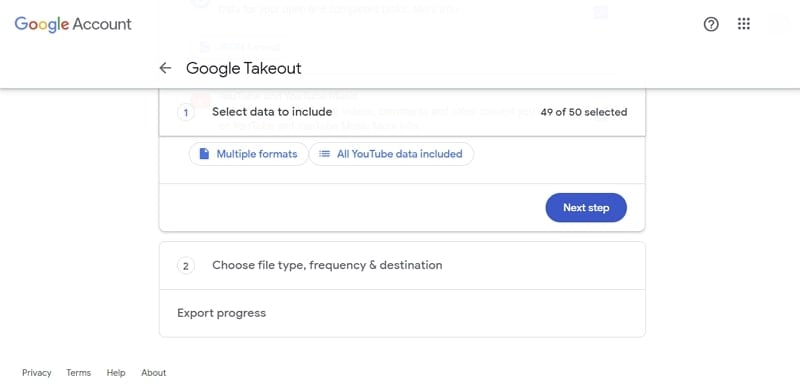
- Step 5. For those who want to save their email data, look for the “Download your data” option in the same window. This leads you to the Google Takeout window, where you need to select the data to include. After selecting the data, define the file type, frequency, and destination for exporting all important data.
Part 3. Delete Your Gmail Account From Your Smartphone: Android & iOS
If you use a smartphone device and want to delete your Gmail account from that particular device, you are at the right place. The following methods will help you understand how to delete Gmail from your Android and iOS devices:
Android Devices
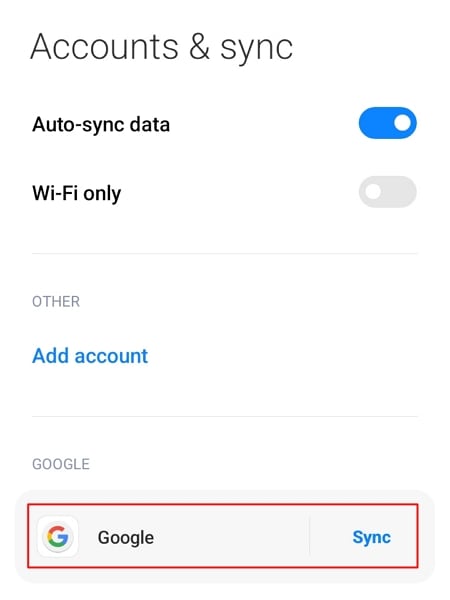
- Step 1. Look for “Settings” on your Android and continue to the “Accounts & sync” option in the list. As you proceed into the next window, look for the Google account and select it.
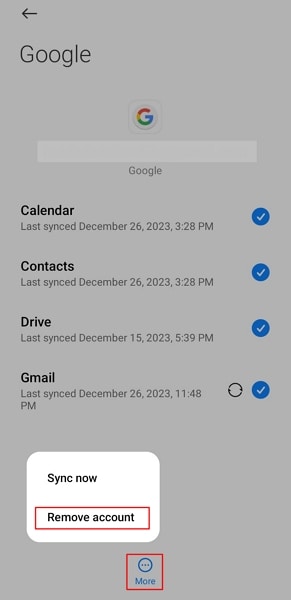
- Step 2. Select the “More” option at the bottom on the following screen. Choose the “Remove account” option in the pop-up menu and provide your credentials to execute the deletion of your Gmail account.
iOS Devices
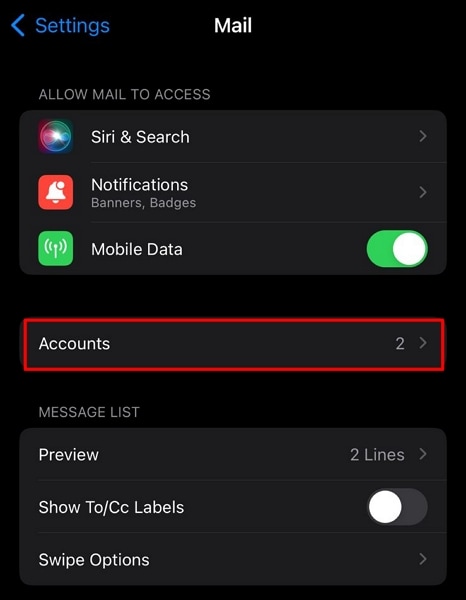
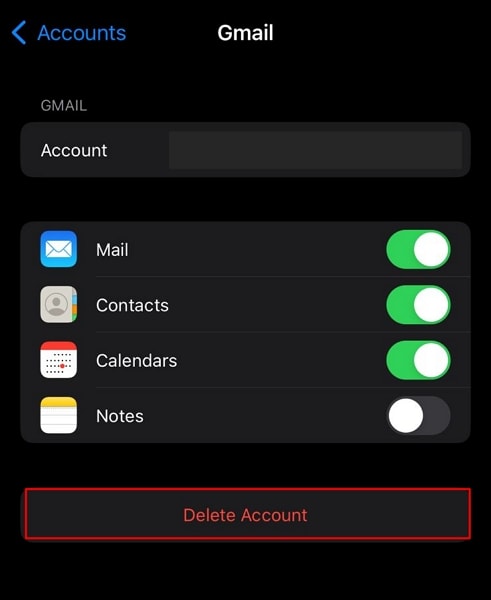
- Step 1. Open your iPhone’s “Settings” app and scroll down to the “Mail” option. You will find the “Accounts” option on the following screen, which you need to tap to proceed.
- Step 2. Discover the option of “Gmail” in the list of signed-in accounts and continue to the next screen. Select “Delete Account” to remove the account from your iOS device.
Part 4. Don’t Know Password of Device? Reset To Delete Gmail Account
What if you’ve forgotten the password to your smartphone device, and you have to delete your Gmail account permanently? In such cases, you are left with the option of accessing the Motorola Razr 40 device’s Recovery Mode and factory resetting the Motorola Razr 40 device, where possible. To know how it is done flawlessly, look through the steps provided next:
Android Devices
- Step 1. Those owning an Android device need to put it in Recovery Mode first. For that, use the combination of the “Power” and “Volume” keys to put the Motorola Razr 40 device in Recovery Mode.
- Step 2. Once you boot into the Recovery Mode, use the Power and Volume buttons to scroll through the menu. Scroll down with the Volume buttons and select the “Wipe data/factory reset” option with the Power button.
- Step 3. Select “Factory data reset” on the next screen and confirm that factory reset your Android device successfully. The device automatically gets out of Recovery Mode and starts normally after resetting.
iOS Devices
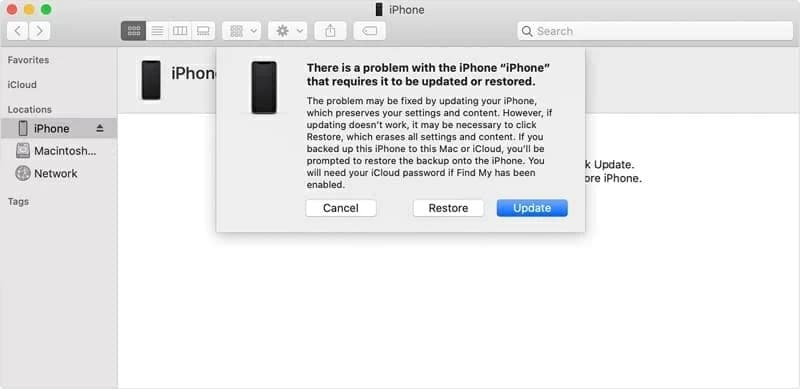
Step 1. You need to turn on Finder if you own a macOS Catalina or later device. Conversely, use iTunes if you have a macOS Mojave or earlier version or if you are using Windows. Connect your iPhone to the computer using the lightning cable and put it in Recovery Mode.
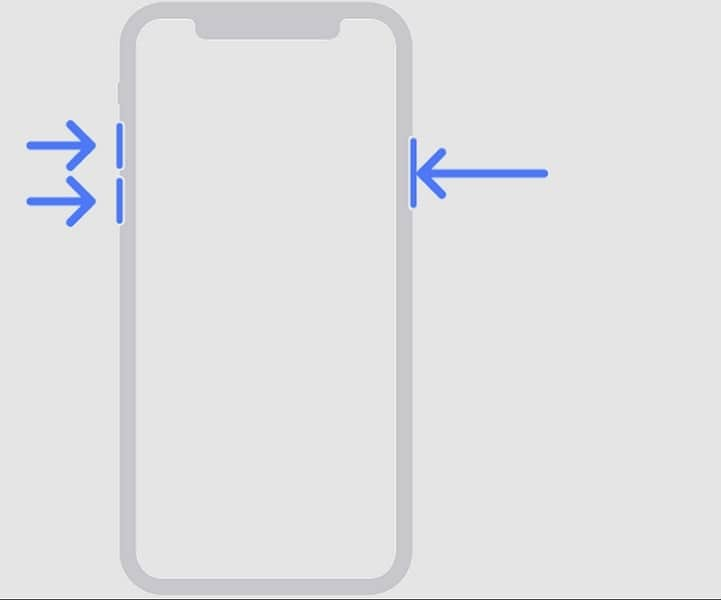
For iPhone X or Later Models: Press and release the “Volume Up” button, followed by the “Volume Down” button. Hold the “Side” button until the Recovery Mode screen appears.
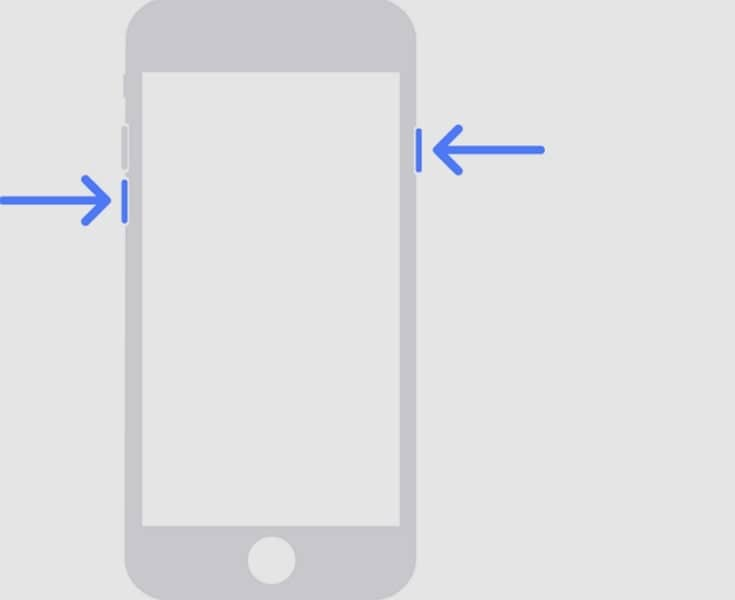
- For iPhone 7 Models: Hold the “Side” and “Volume Down” button until the Recovery Mode screen appears.
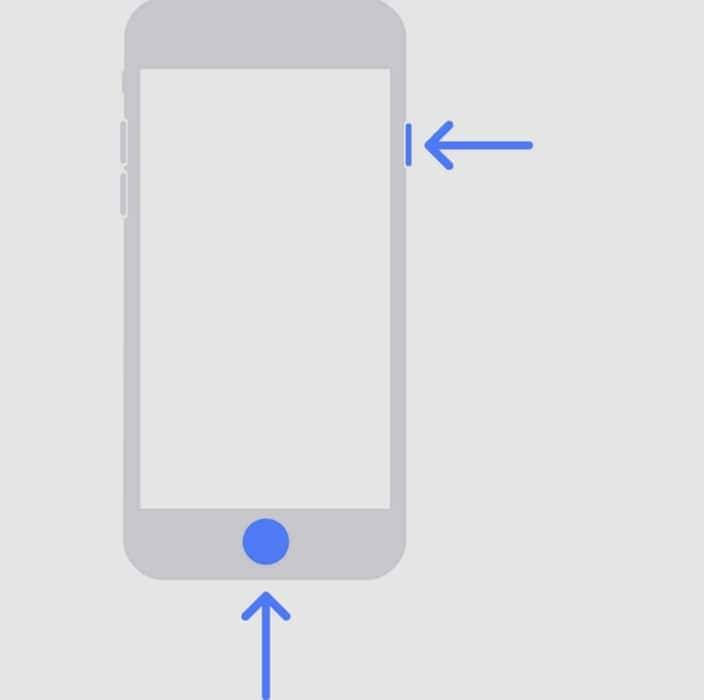
- For iPhone 6 and Earlier Models: Hold the “Side” and “Home” buttons simultaneously until the Recovery Mode screen appears.
- Step 2. The device automatically gets detected on Finder/iTunes, and a pop-up appears on the screen. Click “Restore” to reset your iOS device to factory settings.
Part 5. Remove Gmail Account From Device Without Password: Using Wondershare Dr.Fone
While you seek some appropriate way to close a Gmail account from a device whose password you’ve forgotten, you might get into Wondershare Dr.Fone. This all-in-one service offers a unique Screen Unlock feature that helps you restore your device. If you have forgotten the lock screen password of your Android device, Dr.Fone – Screen Unlock (Android) makes it exceptionally easy to recover.
Key Features of Wondershare Dr.Fone
![]()
Dr.Fone - Screen Unlock (Android)
The Best UnlockJunky Alternative to Bypass FRP and Solve Your Screen Locks
- Remove all Android screen locks (PIN/pattern/fingerprints/face ID) in minutes.
- Bypass the FRP lock of Samsung without a PIN or Google account.
- Everyone can handle the lock screen without any tech knowledge.
- Provide specific removal solutions to promise good success rate.
4,008,671 people have downloaded it
Whether it is your latest Samsung or other Android smartphone, the process is easy to work with. You might look for more details about this unique tool, for which some important features are highlighted as follows:
- It removes all major types of screen locks from your Android devices.
- Provides support to the latest Android devices, along with all mainstream brands.
- You can recover your device with and without data loss, according to your discretion.
Steps To Remove Google Account While Removing Screen Lock
The following steps highlight the way to remove screen lock from your Android device, which would also cover removing the Google Account automatically:
- Step 1.Launch Screen Unlock Feature
To start with the process, launch Dr.Fone on your computer and navigate to the “Toolbox” section. Proceed to the “Screen Unlock” feature, which opens a new window. After selecting “Android” as your device type, select “Unlock Android Screen” from the available options.
- Step 2.Select Device Brand and Unlock Mechanism
As you direct into the next window, select the brand of your Android device. Continue to select “100% Remove Screen Lock” from the following window.

- Step 3. Follow the Instructions and Successfully Remove the Screen Lock
According to your selected device brand, Dr.Fone provides guidelines for entering the specific mode. Follow the on-screen instructions to start unlocking the screen of your device. If the process is successful, click “Done” to conclude using Dr.Fone – Screen Unlock.
Conclusion
This article has specifically provided you with some important details on how to delete a Gmail account with ease. The article explains everything from the methods of deleting it from the computer to removing it from the Motorola Razr 40 device. Furthermore, it also serves as a guidance for those who have forgotten their device passwords. For that, they’ve provided an insight into Wondershare Dr.Fone – Screen Unlock and its unique functions.
How to Use Google Assistant on Your Lock Screen Of Motorola Razr 40 Phone
Android has undergone numerous changes to enhance user experience and security. One notable feature that was once present was the ability to unlock phones with voice Google Assistant. However, Google Assistant has removed this feature across all versions since 2021.
While this voice-unlocking feature is no longer available, there are still many things you can do with Google Assistant, even when the Motorola Razr 40 device is locked. This tool brings an added layer of convenience to your smartphone experience.
Let’s dig deeper into how you can use Google Assistant on the lock screen and make the most out of this tool in the following article.
Part 1. What You Can Do With Voice Google Assistant
Google Assistant is a virtual assistant powered by artificial intelligence (AI) developed by tech giant Google. This application is readily available on most recent mobile phone models, especially those operating on Android 6.0 and newer versions.
Although you can no longer use the Google Assistant unlock feature, you can still perform a myriad of tasks using Google Assistant. These include:
- Getting the weather
- Setting alarms
- Playing music
- Sending texts
- Making a call
- Asking Google for information, etc.
Enable Google Assistant on Lock Screen: A Step-by-Step Guide
Now that you’re eager to try the potential of Google Assistant on your lock screen, let’s walk through the simple steps on how to enable this tool.
- Step 1: Open Google Assistant:
Look for “Google Assistant” and open the app.
- Step 2: Ask Google Assistant to open the settings.
You can ask, “Hey Google, open the Google Assistant settings,” and it will show you the Google Assistant settings.
- Step 3: Allow Google Assistant on the lock screen.
Locate the “Lock Screen” settings and make sure to switch on “Assistant responses on lock screen.”

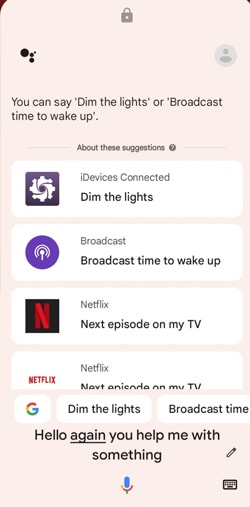
Part 2. How To Use Google Assistant on Lock Screen
After you’ve successfully enabled Google Assistant on your lock screen, let’s see how to use Google Assistant to do certain tasks more efficiently and hands-free.
- Step 1: Wake Up Google Assistant
Start by waking up Google Assistant. You can do this by saying the wake word “Hey Google” or “OK Google.” If it doesn’t work, you can long-press the home button or use any dedicated gesture to activate Google Assistant.
- Step 2: Issue a Voice Command
Once Google Assistant is active, issue a voice command related to the task you want to perform. For example:
“Hey Google, what’s the weather today?”
“OK Google, set an alarm for 5 PM.”
“Hey Google, play my Spotify playlist.”
When you can still unlock with Google Assistant, you can ask it to “unlock my phone” or use any similar command.
- Step 3: Interact with Responses
Google Assistant will then provide spoken responses and display relevant information on the lock screen. For instance, if you ask for the weather, it might verbally provide the current conditions and display a brief summary on your lock screen.

Part 3. Common Problems When Using Google Assistant
Unable to use Google Assistant to unlock phone is not the only drawback that users may have encountered in recent changes. Although Google Assistant on the lock screen presents a revolutionary way to interact with your phone, like any technology, it also comes with its share of challenges. Some of the common problems when using Google Assistant are:
- Misunderstandings and misinterpretations
One prevalent issue users encounter is Google Assistant misunderstanding or misinterpreting voice commands. This can be influenced by factors such as background noise, accent variations, or pronunciation differences.
- Limited context understanding
While Google Assistant is adept at understanding individual commands, it may struggle with complex, multi-step requests that rely heavily on context. Break down your tasks into simpler commands to enhance comprehension and execute it more accurately.
- Inability to execute certain tasks
Google Assistant’s capabilities are extensive, but there are instances where it may struggle to execute specific tasks. For example, it can’t execute tasks that involve interacting with certain third-party applications or services. You can’t also unlock phone with voice Google Assistant.
Tips to Make Voice Google Assistant Recognize Your Commands
One of the most infuriating problems with voice Google Assistant is that users often encounter difficulties in having their commands accurately recognized. To enhance the accuracy of voice recognition with Google Assistant, you can consider implementing the following tips:
- Speak Clearly and Naturally
Make sure that you speak in a clear and natural manner. Avoid mumbling or speaking too quickly. Enunciate your words, giving Google Assistant a better chance to interpret your commands accurately.
- Use Simple and Direct Phrases
Keep your commands simple and direct. Avoid unnecessary elaboration or complex sentence structures. Google Assistant is more likely to understand straightforward commands.
- Check Your Microphone
Ensure that your device’s microphone is in good working condition. Dirt or debris on your phone’s microphone can affect its performance. Clean the microphone area and try again.
- Quiet Environment
Background noise can interfere with voice recognition. Try to issue commands in a quiet environment to minimize any potential confusion caused by external sounds.
Part 4. How to Unlock Android Phone Screen Without Passcode
Now, you know that you can’t unlock phone via Google Assistant anymore. But what if you accidentally forget your phone’s passcode? Is there a reliable method to regain access to your Android device without the passcode?
Fortunately, Wondershare Dr.Fone offers a straightforward solution for precisely such scenarios. It provides a simple and effective way to unlock your Android phone screen through Dr.Fone - Screen Unlock when the screen lock is forgotten or becomes inaccessible.
![]()
Dr.Fone - Screen Unlock (Android)
The Best UnlockJunky Alternative to Solve Your Screen Locks
- Completely unlinked from the previous Google account, it won’t be traced or blocked by it anymore.
- Remove all Android screen locks (PIN/pattern/fingerprints/face ID) in minutes.
- Compatiable with various Android models.
- Provide specific removal solutions to promise good success rate.
4,008,670 people have downloaded it
If you are wondering how to unlock your Android phone screen without a passcode with Dr.Fone – Screen Unlock, follow the steps below.
- Step 1: Launch the Screen Unlock Tool
Open the latest version of Wondershare Dr.Fone on your computer and connect your phone device using a USB cable. Once connected, navigate to the Toolbox > Screen Unlock to access Dr.Fone – Screen Unlock tool.
- Step 2: Select Android for your device type.
As the Dr.Fone Screen Unlock tool supports both Android and iOS, you will need to indicate the specific device you are using. Opt for the Android option if you are unlocking an Android device. Then, continue to choose “Unlock Android Screen” on the next screen.
- Step 3: Remove Screen Lock Without Data Loss
- In this step, you will be directed to select your device brand. Choose the Android device brand you are using and opt for “Remove without Data Loss” if you don’t want to lose your data.
- Step 4: Define Device Details
Next, make sure to check and confirm the Brand, Device Name, and Device Model to unlock your Android screen. Tick the checkmark that says you agree with the warning and are ready to proceed. Click “Next” to unlock your screen.

- Step 5: Confirm to Unlock Screen
Type “000000” continue by clicking Confirm.

- Step 6: Put Android in Download Mode
Dr.Fone will then guide you to put your Android device into Download Mode according to the model you have identified. After you have followed the instructions, Dr.Fone will automatically lead to the next screen to proceed the unlocking process.

After that, you can monitor the progress and wait for a few minutes until it shows “Unlocked successfully.”
You May Also Interested:
Unlocking Your Realme Phone Made Easy: Step-by-Step Guide
8 Safe and Effective Methods to Unlock Your iPhone Without a Passcode
Complete Guide to Unlock Mi Account Without Password In 2024
Conclusion
Google Assistant is a versatile virtual assistant that is designed to help you with a wide range of tasks and make your daily life more convenient. Accessible on most modern Android devices, it enables users to perform several tasks through voice commands.
However, if you are looking for ways to unlock phone with Google Assistant, this function is no longer available. Google Assistant unlock feature has been discontinued since 2021. But in case you’ve forgotten the screen lock passcode, you can use Wondershare Dr.Fone Screen Unlock tool to regain access to your Android phone. This tool facilitates the unlocking process without data loss, featuring a user-friendly learning curve.
Also read:
- [New] In 2024, Instagram Reels Harnessing TikTok Secrets for Popularity Surge
- [Updated] 2024 Approved Facebook Registration Simplified
- [Updated] In 2024, Directly Infuse YouTube Music Into Any iMovie Project
- [Updated] Orchestrate Your Pixels With Offline Harmony
- [Updated] Picture Perfect in the Sky Free & Paid Cloud Solutions Reviewed for 2024
- 15 Proven Strategies to Enhance Your Oratory Abilities: A Comprehensive Guide
- All You Need to Know About the Upcoming Xbox VR Headset: Price, Specs & Launch Date Insights
- How to Factory Reset Honor Magic5 Ultimate in 5 Easy Ways | Dr.fone
- How To Unlock Motorola Edge 40 Neo Phone Without Password?
- In 2024, How To Change Lava Blaze Pro 5G Lock Screen Password?
- In 2024, How to Remove Forgotten PIN Of Your HTC U23 Pro
- In 2024, How To Remove Screen Lock PIN On Lava Blaze 2 Pro Like A Pro 5 Easy Ways
- In 2024, How To Unlock a Motorola Moto G23 Easily?
- In 2024, Locked Out of Your Android Phone? Here Are 3 Solutions to Regain Access
- In 2024, The Ultimate Guide How to Bypass Swipe Screen to Unlock on Motorola Defy 2 Device
- Launching Soon: The Budget-Friendly Qualcomm Mini Desktop PC with Snapdragon X Processor Available for Preorder
- Pave Your Path to Popularity Secure 1,000 Fans/Month on Instagram for 2024
- Top 10 Fingerprint Lock Apps to Lock Your HTC U23 Phone
- Top Tips for Increasing ARK's FPS Performance on Your PC
- Title: In 2024, How to Reset a Motorola Razr 40 Phone that is Locked?
- Author: Peter
- Created at : 2024-10-23 17:46:19
- Updated at : 2024-10-25 17:34:35
- Link: https://android-unlock.techidaily.com/in-2024-how-to-reset-a-motorola-razr-40-phone-that-is-locked-by-drfone-android/
- License: This work is licensed under CC BY-NC-SA 4.0.