
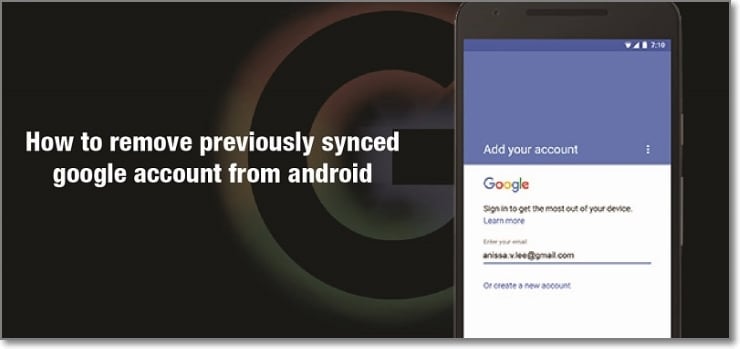
In 2024, How to Remove a Previously Synced Google Account from Your Vivo Y78 5G
How to Remove a Previously Synced Google Account from Your Vivo Y78 5G
The setting up process of a new Android phone requires you to add a Google account that saves all activities and data of the phone like search history, details of online shipping, play store purchases, and more. Once the account is set, it cannot be changed till you delete everything from your phone. Moreover, with the introduction of FRP lock, even a factory reset will not remove the synced Google account.
So, now what if you want to sell your phone or have purchased a second-hand device that is still associated with the previous owner’s Google account? No, worries as there are workarounds available that will help you remove your previously synced google account from your Android device.
Keep reading to know more in detail about how to bypass previously synced google accounts.
Heres a full guide on how to remove google account from android, click to know more!

Part 1: Remove Previously Synced Google Account from Android Phone Without Phone Reset
In this part, we will discuss the methods that can be used for removing the previously synced account from your Android phone without a phone reset.
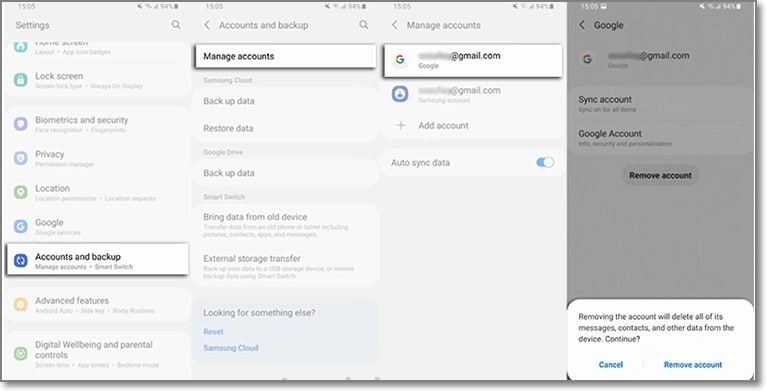
Method 1: Removing Google Account using the Android Settings Menu
If you just plan to reset your phone, maybe because of the lag caused by the phone cache, and you know the inconvenience of Google FRP as a protection mechanism, then you can remove Google FRP through the Settings menu.
The steps for this method are listed below.
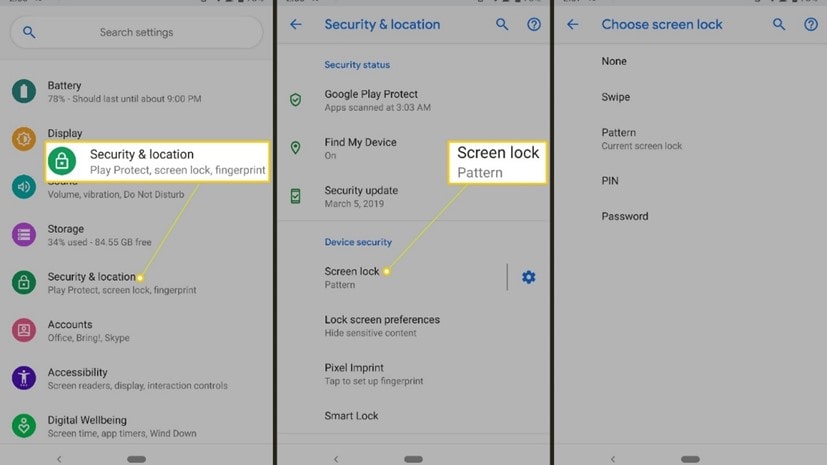
- Step 1: On your Android phone go to the Settings option and choose Accounts & Backup.
- Step 2: Select the Manage Accounts option now and the list of the associated Google Devices will appear.
- Step 3: Choose and click on the Google Account that you want to remove and a pop-up message will appear to inform you that all the account data will be deleted with this action.
To confirm the removal of the account, click on the Remove account button.
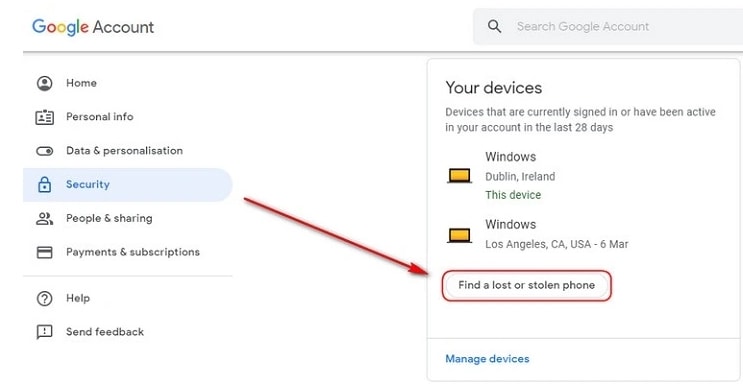
Method 2: Remove the Google account from the Android phone using the computer
There is another method using which you can remotely remove the Google account associated with your phone. The steps for the method are listed below.
- Step 1: Using another device or a PC, sign in to your Google account that was previously synced on this device and choose the Security option.
- Step 2: Next scroll down and then tap on the Your devices option and choose to Manage devices.
- Step 3: You will now see the list of devices linked to your Google account. Next, tap on Find a lost or stolen phone and then select the Remove option present next to Account access.
- Step 4: You will be again asked if you want to delete the account. Select the Remove option.
- Step 5: The account will be removed successfully and the confirmation message will appear.
Note: This method will actually sign out you from the Google account and will not delete it permanently. To again get access to the account, a notification will appear on your phone to enter the password.
Part 2: How to Disable Factory Reset Protection to Bypass Google Account Verification After Factory Reset
The Factory Reset Protection (FRP) is a security feature for the Android device that allows factory reset only after the associated Google ID and password are entered correctly. With multiple accounts and passwords to remember there is quite a possibility that you may forget your Android phone Google account details and here the need to bypass Google account verification arises.
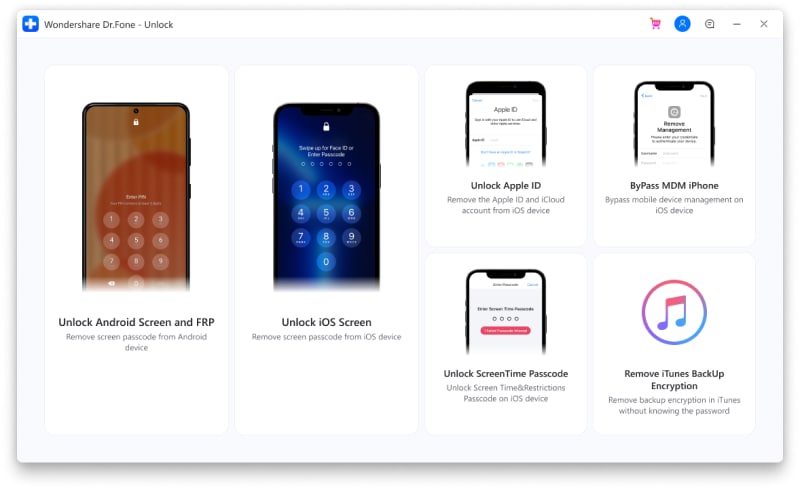
Though there are multiple tools available we recommend Dr. Fone - Screen Unlock (Android) as the best and the most reliable option. Using this excellent Windows and Mac-based software, FRP lock on all popular Android devices including Samsung, LG, HTC, and others. The tool is simple to use and requires no technology. There is also an option where you can unlock your device if you do not know the OS version.
![]()
Dr.Fone - Screen Unlock (Android)
Get into Locked Phones within Minutes
- 4 screen lock types are available: pattern, PIN, password & fingerprints.
- Easily remove the lock screen; No need to root your device.
- Everybody can handle it without any technical background.
- Provide specific removal solutions to promise good success rate
4,008,669 people have downloaded it
Steps to remove FRP lock using Dr. Fone-Screen Unlock (Android)
Step 1: Download, install and run the software on your system, and from the main interface choose the Screen Unlock option. Make sure that your phone is connected to WiFi.

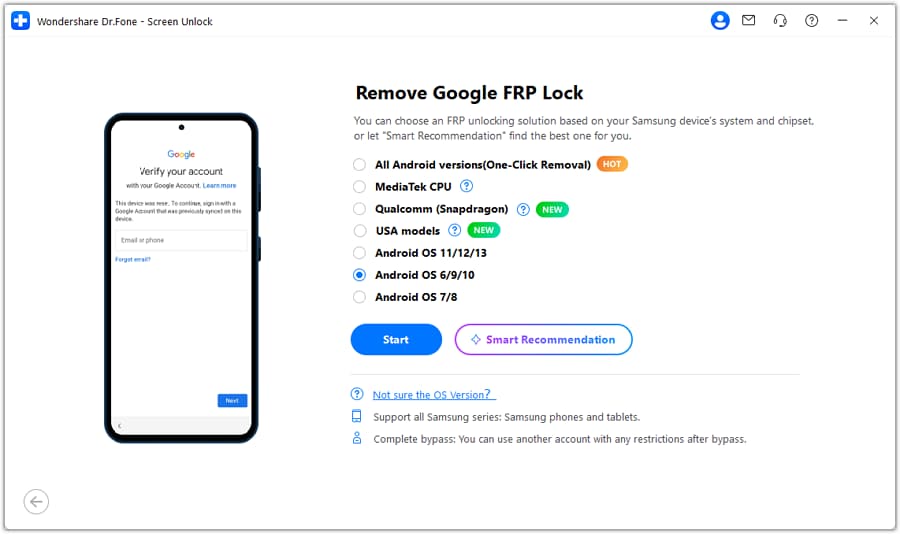
Step 2: Next, choose Unlock Android Screen/FRP and then select the Remove Google FRP Lock option.
Step 3: Next, choose the OS version of your device from the given options, and then using a USB cable, connect your phone to your system.
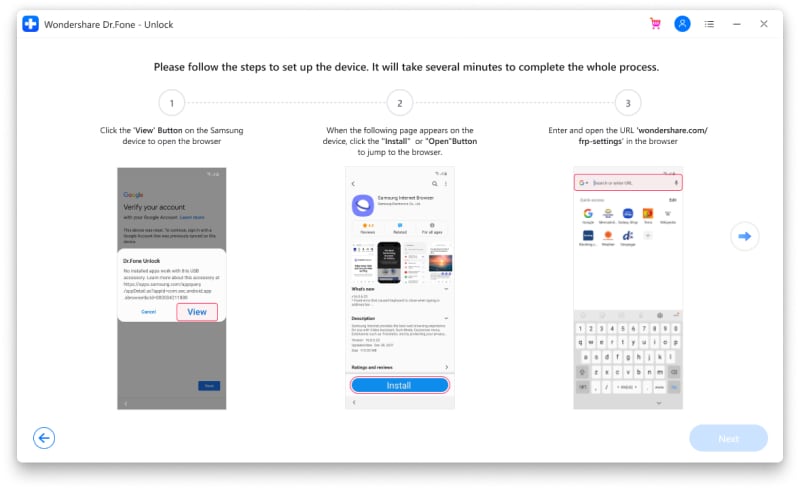
Step 4: After the Vivo Y78 5G device is connected, the Vivo Y78 5G device information will appear on the software for you to confirm and the notification for the same will be sent to your Android phone.
Step 5: Now follow the notifications for removing the FRP lock and in the browser enter drfonetoolkit.com.
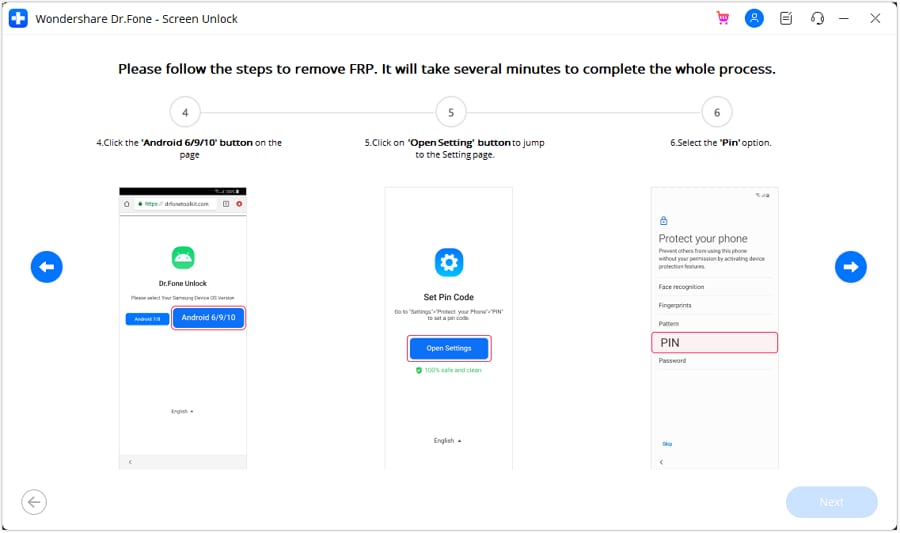
Step 6: Next, click on the Android 6/9/10 button, choose Open Settings and select the PIN option to set a PIN to be used in the further steps.
Step 7: Keep following the steps as they appear till you reach the Google Account Sign-In page. Here click on the Skip option that will successfully remove and bypass the Google Account.

The above given are the brief steps for the FRP bypass process. To learn about the entire process in detail, check Dr.Fone-Screen Unlock (Android) guide .
Part 3: Hire a Remote FRP Removal Service to Bypass ZTE/Motorola After Factory Reset
To bypass the FRP lock on your ZTE, Motorola, and Samsung device, there is also an online service called UnlockJunky.com that claims to remove the FRP lock and previously linked account on your Android device within 5-15 minutes. This is a paid service that also claims that if they are unable to remove the lock, they will refund the amount to their customers.
So, if you cannot sign in with a Google account that was previously synced, you can give this, method a try.
Step 1: Open the official service page Unlockjunky on your browser.
Step 2: Next, choose the Vivo Y78 5G device’s brand, model, and unlock type from their respective drop-down menus. Click on Unlock Now button after entering the details.
Step 3: Now you need to initiate the order by providing the details asked and completing the payment.
Step 4: Next, the software needs to be downloaded and installed on your system, and using a USB cable, connect your phone to your computer.
Step 5: Connect with one of the support provider members through the live chat and they will help you remove the FRP lock on your Android phone.
With the steps above, you can remove the account previously synced on this device.

Limitations of using the Unlockjunky method:
- This is a paid service.
- Works only with Motorola, ZTE, and Samsung devices.
- There is no surety that the service will work for removing the FRP lock on your devices.
- If you have to remove the FRP lock from multiple devices, a separate payment for each device has to be done.
Conclusion
Above we have listed several ways to remove a previously synced Google account on your Android device. The best of all the listed solutions is Dr. Fone - Screen Unlock (Android) as it supports bypassing FRP lock on multiple Android devices in a hassle-free manner. Once the license is purchased, you can unlock as many numbers of devices as you want without any worries.

How To Easily Unlock Vivo Screen?
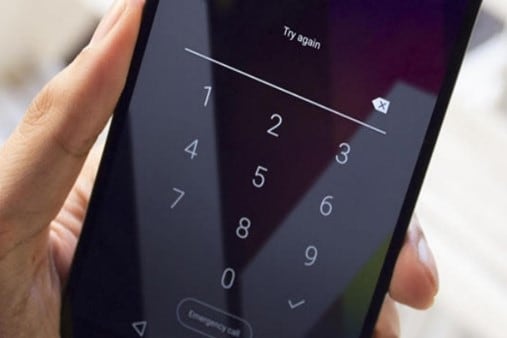
If you’ve ever had a Vivo phone, then you know that their screens are locked by default. It can be a pain if you want to access your messages or change your background image quickly. If you just set your Vivo password, screen lock code, pattern lock, or PIN last night or a few days ago, you are most likely to forget it.
The result is that you have locked out of your phone, and you have to reset your device’s password. But fortunately, there’s an easy way to unlock your Vivo screen without entering any passwords. You can have your phone up and running in a few simple steps without contacting customer service.
So don’t wait any longer - read on for instructions on how to unlock the Vivo phone pin code.
Let’s get started!
4 Easy Ways To Unlock Vivo Screen
Like most people, you probably lock your Vivo phone as soon as you turn it on. It’s a good way to keep your phone safe from prying eyes and accidental button presses. But what happens when you forget your phone’s passcode? Or worse, what if your phone gets locked by a malicious app?
There are a few different ways to unlock your Vivo phone. We’ll show you how to do it.
Method 1. Google Find My Device (Without Password/Pin/Pattern)
If you’re like me, you’ve probably tried a million different ways to unlock your Vivo phone, only to be frustrated by the results. Luckily, there’s an easy way to unlock your Vivo phone using Google’s Find My Device feature.
Google will use your location, phone information, and connection log to find your Nokia.
Follow these steps to unlock the Vivo lock screen password without losing data:
- Step 1: Sign into your Google account and navigate the Find My Device website.

- Step 2: Sign in with your Google account, which you used on your locked Vivo phone.
- Step 3: The Android Device Manager dashboard will show your locked Vivo with three options: Ring, Lock, and Erase.
- Step 4: Simply click on “Lock”.
- Step 5: Enter a password that is not your Google account password in the “New Password” field.
- Step 6: Type the new password in the “Confirm password” field. This password lock will replace the current lock screen.
- Step 7: You can leave the “Recovery message” field empty or type anything in it.
- Step 8: Enter another phone number in the “Phone number” field, although this is optional.
- Step 9: Choose “Lock” after entering your password and filling out the optional fields if you wish.
- Step 10: If the process is successful, you will receive the unlock code within a few seconds.
- Step 11: Navigate to the “Screen Settings” menu after unlocking your device.
- Step 12: Use a new password; you can use the temporary password if you want.
You can use it to unlock your Vivo if you have activated the Android Device Manager or Google Find My Device before your phone was locked.
A few conditions, however, must be met for this to work
- You must turn on your Vivo phone.
- Before locking your phone, you must activate Google Find My Device or Android Device Manager.
- You must have your Vivo GPS turned on to use it.
- You must be connected to WiFi on your device to log into your Google account.
- Your phone needs to be set to location.
Method 2. Unlock Vivo Lock Screen With Hard Reset
If you perform a hard reset on your Vivo lock screen, all data, and user information will be erased, including your screen lock, password, pattern lock, and PIN.
Follow the steps below if you want to know how to unlock the Vivo phone keypad with the hard reset, follow the steps below.
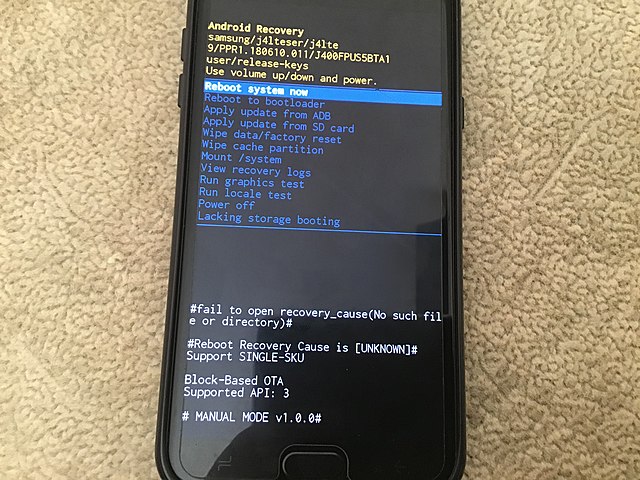
- Step 1: Turn off your Vivo phone.
- Step 2: Press the “Volume down” and “Power key” buttons simultaneously for a few seconds.
- Step 3: Press the “Volume Up” and “Power” buttons for a few additional seconds once the screen darkens.
- Step 4: Release all buttons and keys if you did step 3 correctly. Once you release all buttons, you’ll see a dark screen with options.
- Step 5: Choose “Wipe data/factory reset” from the menu, using “Volume Up” to scroll up, “Volume Down” to scroll down, and “Power” to select.
- Step 6: From the Android Recovery screen, select the “Yes” option by pressing the “Volume Down” button and the “Power” key.
- Step 7: With the “Power” key, select “Reboot system now” from the next display.
Your Vivo is now password, pattern lock, screen lock, and PIN-free after a hard reset.
Method 3. Unlock With Answer Security Questions
You can reset the Vivo pattern lock using Google security questions without losing data.
Follow the steps below on how to unlock the Vivo phone pin code:
- Step 1: Power on your Nokia.
- Step 2: Press “Forgot pattern” several times until you see “Forgot password”.
- Step 3: Click on “Forgot pattern” to access the unlock screen.
- Step 4: Enter your Google account details or answer questions to unlock the screen. Select “Answer question”.
- Step 5: Enter your exact security answers and tap the “Unlock” button.
- Step 6: Choose “YES” from the “YES” or “NO” menu, and the password field will appear.
- Step 7: Change your password or PIN.
- Step 8: You will see your Vivo unlocked soon.
Method 4. Unlock the Keypad With a Security Code
You could reset your Vivo lock screen phone using the default security code, even if you haven’t set any security code. Here’s how to quickly unlock the Vivo lock screen security code.
- Step 1: Shut down your device.
- Step 2: Press these buttons in the following sequence on a classic phone.
Call button (green button) + Asterisk key (*) + Three (3)
- Step 3: Your screen displays a Formatting message when you press these keys.
- Step 4: Wait for the formatting to complete before releasing the keys.
o 12345.
Conclusion
If you have a classic-style keypad phone or an Android device, unlocking a locked Vivo phone keypad is not easy. However, we believe that every problem has a solution. You can unlock Vivo Android phones using any of the methods listed above.
Tips: Wondershare Dr.Fone is a tool that helps you keep your important data safe. It can back up all the important information on your Vivo phone, like photos, music, videos, contacts, and more and is compatible with over 8000 Android devices. The backup process is easy and only takes a few clicks. You can also restore your backup to any device you want, and choose which data you want to restore. This is a great way to make sure you never lose your important Vivo data!
How to Remove Forgotten PIN Of Your Vivo Y78 5G
Users of Android phones can benefit from data and file protection tools like passwords, patterns, and PINs. But there are also some significant hazards. For instance, your children may have repeatedly used the wrong password to access your Android phone, or you may have forgotten PIN on your device, pattern, or PIN.
We can use various valuable techniques to remove the Android phone password. According to you, the most typical or initial option must be factory reset. However, if you try to use the factory reset, you will lose all the data on your Android phone.
Read the information below, but first, let’s talk about Android phone passwords and how they operate before moving on to the ways.
The Importance of the Android Lock System
In general, phone passwords are used to secure your device against unauthorized access and shield your files and data from it. You can try using a pattern, password, PIN, or another method to unlock your device. Although it has many benefits, there are also hazards. Risk in the sense that if you lose your device’s password or pattern, you will be unable to access it and will be stuck somewhere.
Several firms are making Android phones, so why shouldn’t more? Because Android phones are in high demand, numerous new businesses are now producing them. We can see that more people than any other operating system use mobile devices with Android. With an Android phone, we can do many functions, be constantly connected to the outside world, and everything runs smoothly.
This is an important issue that needs to be resolved right away. Therefore, some methods can assist you in getting out of it, one of which is doing a factory reset. They believe this is the most effective and secure way; thus, many try it. What about the information you have on the Vivo Y78 5G device, though? What should you do next because a factory reset will destroy your data?
Methods to Recover Forgotten Password or PIN
1. Google Smart Lock
If you have added a trusted area or device in Google Smart Lock, you can go to that trusted area and reset your password. Alternatively, you can also use trusted devices to unlock your device.
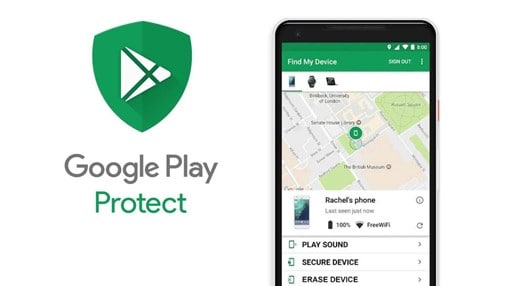
2. Google Find My Device
As you are likely aware, every Android device is connected to a Google account. As a result, if you’d like, you may also use it to unlock Android. You’ll need to know your Google account login information for this. When you’re ready, use these instructions to find out how to unlock a phone password.
- Login using your Google credentials by going to the official Google Find My Device website.
- You will see the gadgets connected to your Google account as you enter the interface and a map of where they are.
- To wipe the Vivo Y78 5G device, click the ERASE DEVICE option on the left side panel. You will then be required for your password.
- Once more, select “Erase.” This will reset the Vivo Y78 5G device and get rid of the forgot pattern lock.
3. Recovery Mode
Users of Android smartphones and tablets can troubleshoot various issues with their devices using a feature known as Android Recovery Mode. If you discover that your device is functioning strangely, it might be helpful. Recovery Mode Android technically refers to a unique bootable partition with a recovery application installed inside it.
However, users can also use it to reset the android password if it is forgotten. The instructions for resetting android devices through recovery mode differ for every android device.
4. Dr.Fone - Screen Unlock
On most Android handsets, it is wise to give it a try on Dr.Fone to unlock the screen lock easily. It allows you to remove the password, PIN, pattern, and fingerprint from an Android phone.
Step 1. Select Unlock Android Screen
Please select “Unlock Android Screen” to ensure you have the correct unlock process.

Step 2. Select device model
If you see this page, please choose the option fitting your phone, otherwise, you can’t unlock your device as you wish.
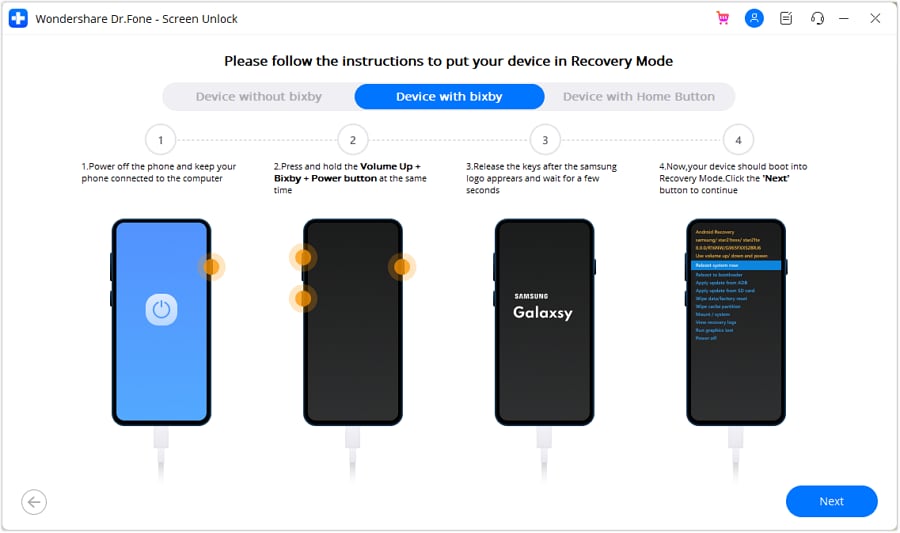
(Enter Recovery Mode via the Samsung phone with Bixby)
(Enter Recovery Mode via the Samsung phone without Bixby)
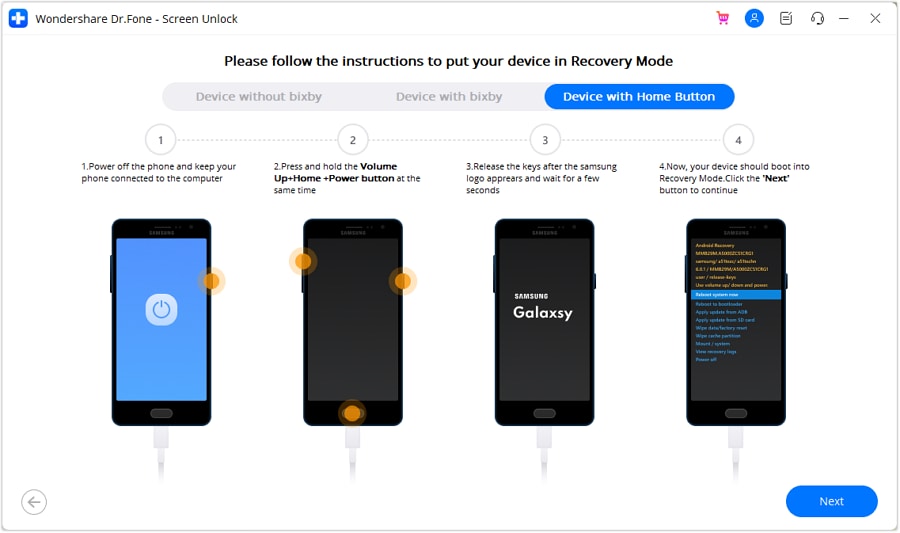
(Enter Recovery Mode via the Samsung phone with the Home button)
Step 3. Instructions to Wipe Cache Partition
On the page Recovery Mode, it’s the most important step to unlock your device. Please click the right buttons.
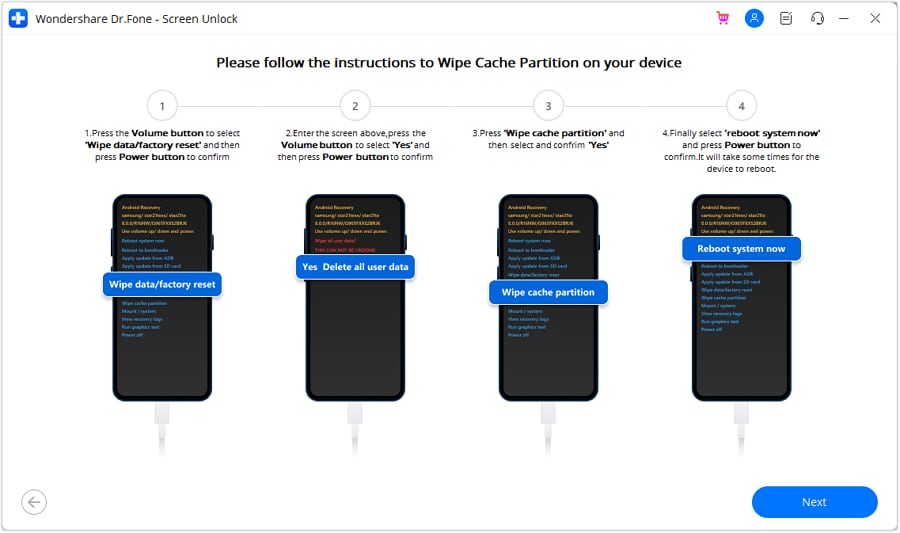
Congratulations! Now you can access your phone again, and there’re no obstacles when you do anything on your phone.

FAQs
- Will Dr.Fone - Screen Unlock Do Harm To My Vivo Y78 5G?
Answer: No, Dr.Fone is safe for your device, all hardware will be safe, and you can still use your phone as usual when you try our products, but for devices other than Samsung and LG, you may have to face data loss. So, if you want to keep your data safe, please have a backup on your phone.
- How To Keep My Data Safe?
Answer: Dr.Fone - Phone Backup is a good option for backing up the sensitive data on your device. If you want to know more, don’t hesitate and find any required information on our website.
Conclusion
Any methods mentioned above can work to overcome the obstacle of unlocking the screen with your Android handset. The best thing about all methods we said is that you just need some easy ways to complete the tasks.
- Title: In 2024, How to Remove a Previously Synced Google Account from Your Vivo Y78 5G
- Author: Peter
- Created at : 2024-07-16 11:28:27
- Updated at : 2024-07-17 11:28:27
- Link: https://android-unlock.techidaily.com/in-2024-how-to-remove-a-previously-synced-google-account-from-your-vivo-y78-5g-by-drfone-android/
- License: This work is licensed under CC BY-NC-SA 4.0.