
:max_bytes(150000):strip_icc():format(webp)/SetaLiveWallpaperinWindows11-b8ca3913592d4a5790808131bf8f34e1.jpg)
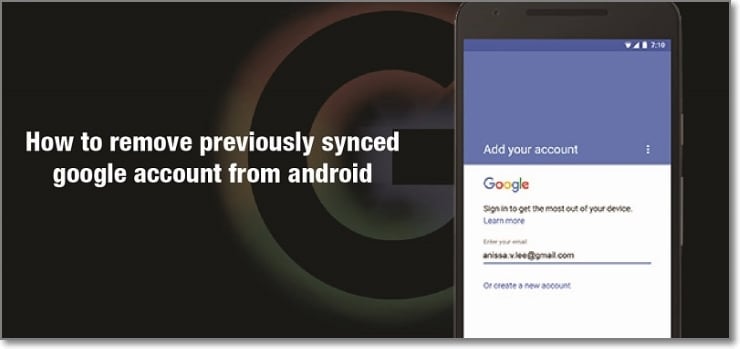
In 2024, How to Remove a Previously Synced Google Account from Your Samsung Galaxy S23
How to Remove a Previously Synced Google Account from Your Samsung Galaxy S23
The setting up process of a new Android phone requires you to add a Google account that saves all activities and data of the phone like search history, details of online shipping, play store purchases, and more. Once the account is set, it cannot be changed till you delete everything from your phone. Moreover, with the introduction of FRP lock, even a factory reset will not remove the synced Google account.
So, now what if you want to sell your phone or have purchased a second-hand device that is still associated with the previous owner’s Google account? No, worries as there are workarounds available that will help you remove your previously synced google account from your Android device.
Keep reading to know more in detail about how to bypass previously synced google accounts.
Heres a full guide on how to remove google account from android, click to know more!
Part 1: Remove Previously Synced Google Account from Android Phone Without Phone Reset
In this part, we will discuss the methods that can be used for removing the previously synced account from your Android phone without a phone reset.
Method 1: Removing Google Account using the Android Settings Menu
If you just plan to reset your phone, maybe because of the lag caused by the phone cache, and you know the inconvenience of Google FRP as a protection mechanism, then you can remove Google FRP through the Settings menu.
The steps for this method are listed below.
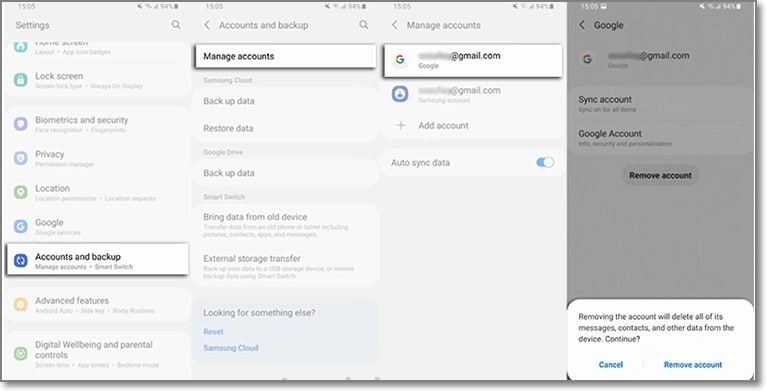
- Step 1: On your Android phone go to the Settings option and choose Accounts & Backup.
- Step 2: Select the Manage Accounts option now and the list of the associated Google Devices will appear.
- Step 3: Choose and click on the Google Account that you want to remove and a pop-up message will appear to inform you that all the account data will be deleted with this action.
To confirm the removal of the account, click on the Remove account button.
Method 2: Remove the Google account from the Android phone using the computer
There is another method using which you can remotely remove the Google account associated with your phone. The steps for the method are listed below.
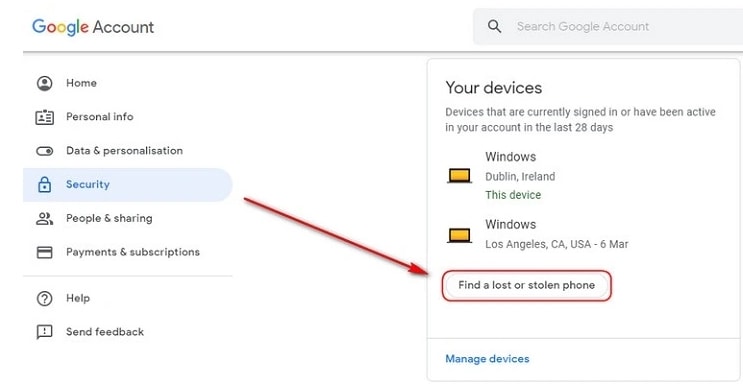
- Step 1: Using another device or a PC, sign in to your Google account that was previously synced on this device and choose the Security option.
- Step 2: Next scroll down and then tap on the Your devices option and choose to Manage devices.
- Step 3: You will now see the list of devices linked to your Google account. Next, tap on Find a lost or stolen phone and then select the Remove option present next to Account access.
- Step 4: You will be again asked if you want to delete the account. Select the Remove option.
- Step 5: The account will be removed successfully and the confirmation message will appear.
Note: This method will actually sign out you from the Google account and will not delete it permanently. To again get access to the account, a notification will appear on your phone to enter the password.
Part 2: How to Disable Factory Reset Protection to Bypass Google Account Verification After Factory Reset
The Factory Reset Protection (FRP) is a security feature for the Android device that allows factory reset only after the associated Google ID and password are entered correctly. With multiple accounts and passwords to remember there is quite a possibility that you may forget your Android phone Google account details and here the need to bypass Google account verification arises.
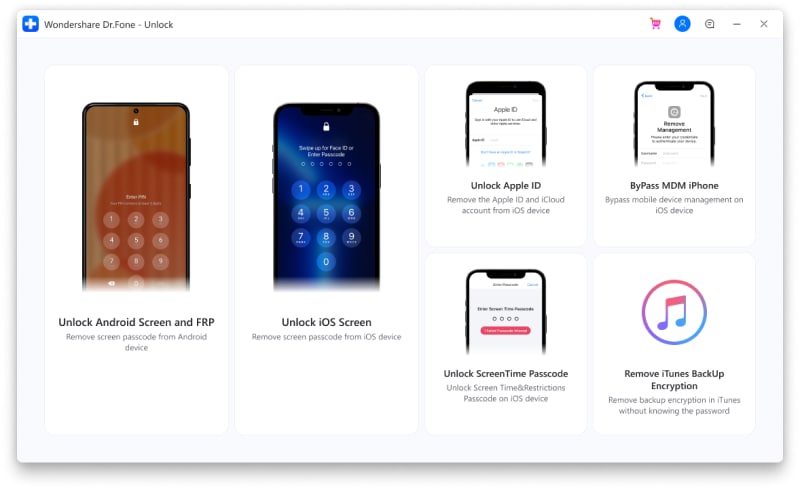
Though there are multiple tools available we recommend Dr. Fone - Screen Unlock (Android) as the best and the most reliable option. Using this excellent Windows and Mac-based software, FRP lock on all popular Android devices including Samsung, LG, HTC, and others. The tool is simple to use and requires no technology. There is also an option where you can unlock your device if you do not know the OS version.
![]()
Dr.Fone - Screen Unlock (Android)
Get into Locked Phones within Minutes
- 4 screen lock types are available: pattern, PIN, password & fingerprints.
- Easily remove the lock screen; No need to root your device.
- Everybody can handle it without any technical background.
- Provide specific removal solutions to promise good success rate
4,008,669 people have downloaded it
Steps to remove FRP lock using Dr. Fone-Screen Unlock (Android)
Step 1: Download, install and run the software on your system, and from the main interface choose the Screen Unlock option. Make sure that your phone is connected to WiFi.

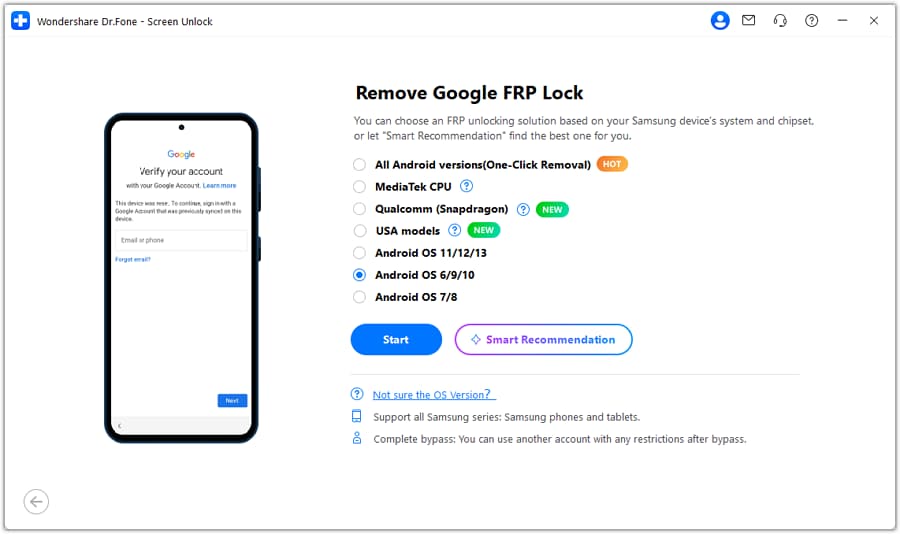
Step 2: Next, choose Unlock Android Screen/FRP and then select the Remove Google FRP Lock option.
Step 3: Next, choose the OS version of your device from the given options, and then using a USB cable, connect your phone to your system.
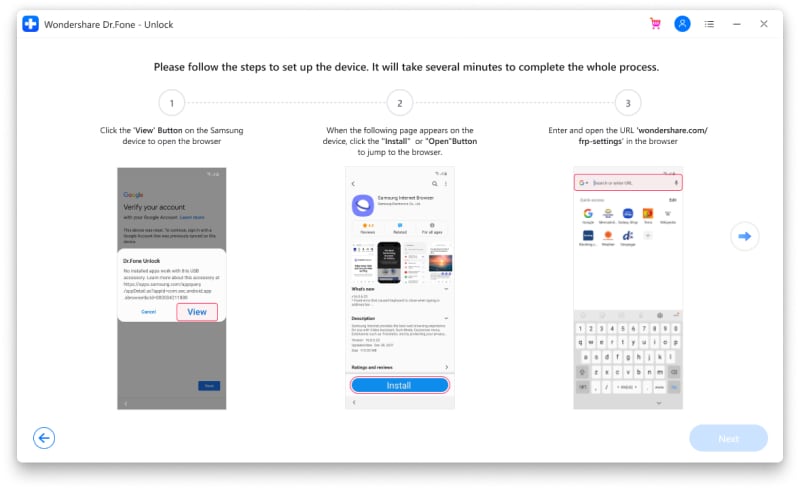
Step 4: After the Samsung Galaxy S23 device is connected, the Samsung Galaxy S23 device information will appear on the software for you to confirm and the notification for the same will be sent to your Android phone.
Step 5: Now follow the notifications for removing the FRP lock and in the browser enter drfonetoolkit.com.
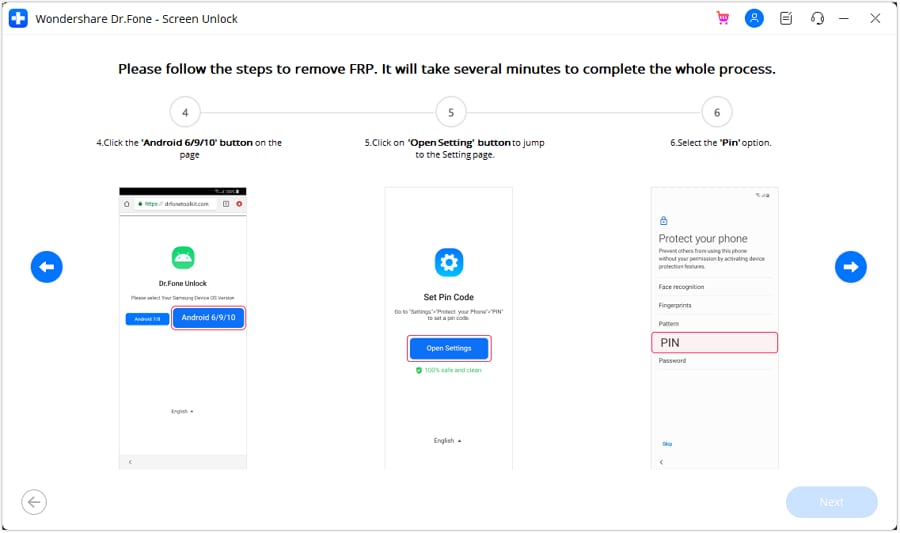
Step 6: Next, click on the Android 6/9/10 button, choose Open Settings and select the PIN option to set a PIN to be used in the further steps.
Step 7: Keep following the steps as they appear till you reach the Google Account Sign-In page. Here click on the Skip option that will successfully remove and bypass the Google Account.

The above given are the brief steps for the FRP bypass process. To learn about the entire process in detail, check Dr.Fone-Screen Unlock (Android) guide .
Part 3: Hire a Remote FRP Removal Service to Bypass ZTE/Motorola After Factory Reset
To bypass the FRP lock on your ZTE, Motorola, and Samsung device, there is also an online service called UnlockJunky.com that claims to remove the FRP lock and previously linked account on your Android device within 5-15 minutes. This is a paid service that also claims that if they are unable to remove the lock, they will refund the amount to their customers.
So, if you cannot sign in with a Google account that was previously synced, you can give this, method a try.
Step 1: Open the official service page Unlockjunky on your browser.
Step 2: Next, choose the Samsung Galaxy S23 device’s brand, model, and unlock type from their respective drop-down menus. Click on Unlock Now button after entering the details.
Step 3: Now you need to initiate the order by providing the details asked and completing the payment.
Step 4: Next, the software needs to be downloaded and installed on your system, and using a USB cable, connect your phone to your computer.
Step 5: Connect with one of the support provider members through the live chat and they will help you remove the FRP lock on your Android phone.
With the steps above, you can remove the account previously synced on this device.

Limitations of using the Unlockjunky method:
- This is a paid service.
- Works only with Motorola, ZTE, and Samsung devices.
- There is no surety that the service will work for removing the FRP lock on your devices.
- If you have to remove the FRP lock from multiple devices, a separate payment for each device has to be done.
Conclusion
Above we have listed several ways to remove a previously synced Google account on your Android device. The best of all the listed solutions is Dr. Fone - Screen Unlock (Android) as it supports bypassing FRP lock on multiple Android devices in a hassle-free manner. Once the license is purchased, you can unlock as many numbers of devices as you want without any worries.
How To Unlock Any Samsung Galaxy S23 Phone Password Using Emergency Call
Today, smartphones are an extension of people. Securing them with a PIN, passcode, pattern, fingerprint, or face unlock has become the norm. It’s like putting a digital lock on our private world.
But you have to face it: sometimes, people forget the codes they set to protect their phones or can’t unlock them with their injured fingers or faces. Picture this: you’re staring at your phone screen, trying to recall that password, but it’s not coming to you.
That’s where emergency call bypass is a nifty little trick that can be a lifesaver. In this article, you’ll learn how to unlock any phone password using the emergency call technique. The article will also explore other methods for when your memory fails you. So, read through and never go through this trouble again.
Part 1: What Is the Emergency Call Bypass Method?
The Android emergency call bypass method is a lesser-known workaround for those unfortunate moments when you’re locked out of your phone. This method exploits a loophole in the phone’s lock screen, allowing you to access your device even when you’ve forgotten your password, PIN, or pattern. It’s like finding a secret backdoor when the front door is bolted shut.
“How can unlocking Vivo, Oppo, and Samsung phones using emergency calls be effective?” You may ask. Imagine you need to access important information on your phone but can’t remember your lock screen code. Instead of panicking or rushing to a technician, the emergency call bypass can be a quick and handy solution. It’s particularly useful when immediate access to your phone is crucial and you don’t have time to reset your password through official channels.
Limitations of the Emergency Call Bypass Method
However, it’s important to note that this method has its limitations. It primarily works on older Android devices, specifically those running Android 5.0 (Lollipop) and below. As smartphone technology has evolved, manufacturers have patched many loopholes to enhance security. So, this method might not work for you if you have a more recent Android version.
But don’t worry – if you’re locked out of a newer phone, you can try several other methods, which you will explore later in this article. Remember, the emergency call bypass can be a lifesaver in specific scenarios. However, it’s always best to use such methods responsibly and ethically. And, of course, you should always note your passwords.
Part 2: How To Perform Emergency Call Bypass To Unlock Screen
Unlocking your Android phone without a password using the Emergency Call Bypass method can be tricky, but it’s doable, especially on devices running Android OS 5.0 (Lollipop) and below. Here’s a step-by-step guide on how to unlock any phone password using the emergency call feature:
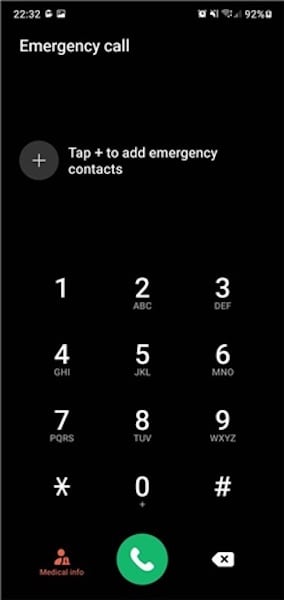
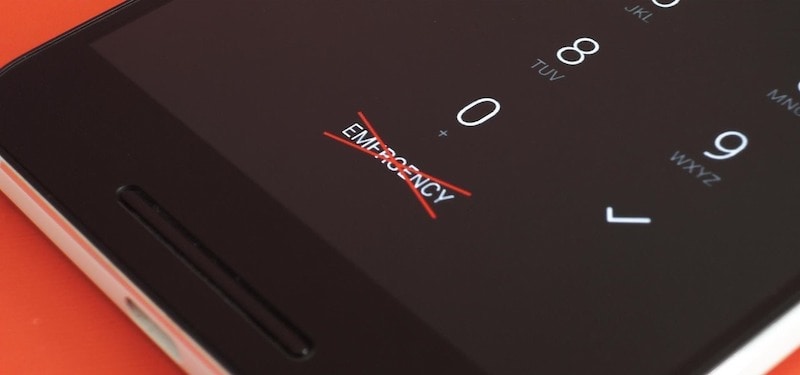
- Step 1: Start by tapping the Emergency Call button on your lock screen. This will bring up the emergency dialer screen.
- Step 2: Type a series of special symbols on the dialer screen, such as asterisks (*). Do this several times in a row.
- Step 3: Double-tap the string of symbols to highlight them, then copy the string. Now, tap on the screen to paste the copied string. Repeat this process 10 to 11 times until you can no longer highlight the series.
- Step 4: Go back to the lock screen. Open the Camera app by tapping the camera icon or sliding left. Simultaneously, pull down the Notification Panel from the top.
- Step 5: In the Notification Panel, tap the gear icon to try and access your device’s settings.
- Step 6: When prompted for a password, long-press and paste the copied string into the password field. Repeat this several times until the option to paste is no longer available.
- Step 7: Keep pasting the string until the interface crashes. The lock screen should disappear, and the camera interface will expand. After some time, the camera app should also crash, and your device will unlock, displaying the home screen.
This method, while unconventional, has been known to work on various Android 5 devices, including Samsung models. However, using this technique responsibly and only on devices you own or have permission to access is important. Remember, this method exploits a security flaw and should be used as a last resort.
Part 3: Other Ways To Unlock Your Screen
While the emergency call bypass for Android method is interesting, it’s largely unreliable and outdated, mainly effective on older Android versions. Modern devices have significantly improved security, making this method obsolete. There are other, more reliable methods for those needing to unlock their phone’s screen.
Method 1: Wondershare Dr.Fone – Screen Unlock
Wondershare Dr.Fone is a comprehensive software solution for various mobile issues, including screen unlocking. It’s especially useful when you’ve forgotten your password, pattern, or PIN. Here’s how you can use Dr.Fone to unlock your screen:
![]()
Dr.Fone - Screen Unlock (Android)
The Best UnlockJunky Alternative to Bypass FRP and Solve Your Screen Locks
- Completely unlinked from the previous Google account, it won’t be traced or blocked by it anymore.
- Remove all Android screen locks (PIN/pattern/fingerprints/face ID) in minutes.
- Compatiable with various Android models.
- Provide specific removal solutions to promise good success rate.
4,008,670 people have downloaded it
- Step 1: Launch the Dr.Fone toolkit and go to Toolbox > Screen Unlock. Connect your Android device to your PC.
- Step 2: On the next page, choose Android.

- Step 3: Select Unlock Android Screen, as this is specifically for bypassing the lock screen

- Step 4: Select the brand of your device.

- Step 5: Click Remove without Data Loss to ensure your data stays intact.

- Step 6: Confirm device details. Then, enter “000000” to confirm and initiate the unlocking process.

- Step 7: The software will provide specific instructions to put your device into download mode. Follow them.

- Step 8: Once the process is complete, click Done. If it doesn’t work the first time, try again.

Method 2: Using “Forgot PIN/Passcode” and Google Account
You can use the Forgot PIN/Passcode feature if you’ve linked your phone to a Google account. After multiple failed attempts to unlock your phone, you’ll see a prompt to reset the password via your Google account credentials.
Method 3: Forcing a Data Reset on Your Android Phone
As a last resort, you can perform a factory reset. This will erase all data on your device but remove the lock screen. Access the recovery mode by pressing a combination of keys (usually volume up/down and the power button) and then selecting Wipe data/Factory reset.
Method 4: Booting Into Safe Mode
Booting into safe mode can bypass third-party lock screens. This method won’t work on the default lock screen but can be helpful if an app sets the lock.
In summary, while the emergency call bypass is a thing of the past, there are still various ways to unlock your phone. There’s always a solution, whether through a sophisticated tool like Wondershare Dr.Fone or built-in Android features.
Conclusion
This guide explored how to bypass the Android lock screen using an emergency call. It mainly focused on outdated Android emergency call bypass and more reliable alternatives. Key takeaways include understanding that while older methods like the emergency call bypass are largely ineffective on modern devices, tools like Wondershare Dr.Fone offer a safe and trusted solution.
Learning to unlock your phone screen ensures you’re never locked out of your device, keeping it within your reach. Consider using Dr. Fone- Screen Unlock for a secure and effective way to bypass phone lock screens. It’s an excellent tool for regaining access to your device without risking your data.
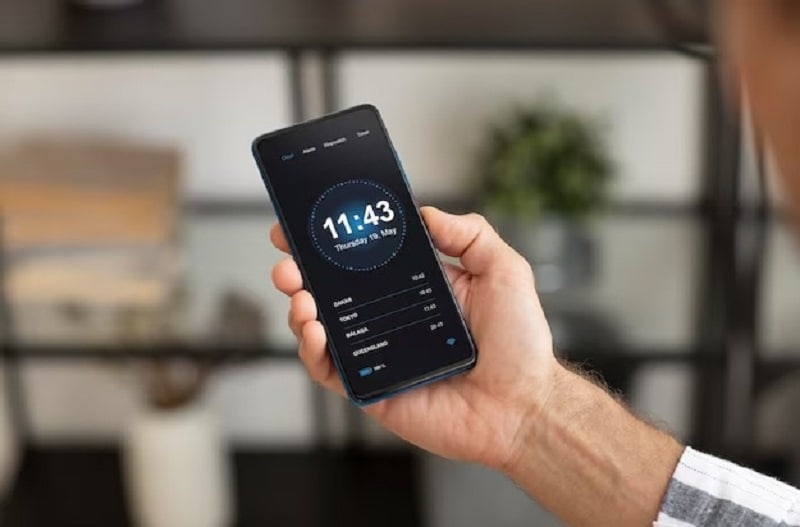
How To Change Samsung Galaxy S23 Lock Screen Clock in Seconds
The initial glimpse of your phone often involves the lock screen. This essential feature is customizable based on your Android device. With the advent of Android 12, a double-line clock has stirred some controversy among users. It’s because the Android lock screen clock veered from the one-line design of the previous version.
The larger clock style appears when there’s no notification. It will only switch to the old one-line format when a notification pops up. Discover how to change the lock screen clock on your Android and tweak its appearance. Explore the article to learn more.
Part 1. How Do I Put a Clock on My Android Lock Screen?
Android devices running version 12 or later come with the clock feature activated by default. Take note that its appearance may change under specific circumstances. It can change when there are unread notifications visible on the lock screen.
For devices running Android 11, changing the lock screen clock is still available. In some instances, you can even customize its style by following these simple steps:
- Step 1: For users with Android 11 or older, go to Settings > Lock screen & security. Depending on your phone model, tap Lock screen or Security.

- Step 2: Go to Customize Lock screen > Clock. Next, customize or activate the lock screen clock.
Note
The exact names of settings may change depending on the manufacturer and version of Android. But the navigation should be similar.
Part 2. How To Change Lock Screen Clock on Android [5 Methods]
Currently, there isn’t an official method to change the lock screen clock on Android 12. However, there are several workarounds you can do. Let’s explore these techniques and see which works best for you.
Method 1: Change Your Wallpaper
In Android 11, adjusting your wallpaper is accessible through the Android Settings menu.
- Step 1A: Navigate to the “All Apps” screen and select Settings. For Samsung Galaxy devices on Android 11, access the Wallpaper option within the settings menu.

In Android 12, the process remains consistent.
- Step 1: Locate the Wallpaper & style button within the Settings menu**.**

- Step 2: Follow the provided instructions to transform your lock screen experience. Replace the oversized clock with dynamic, changing wallpapers.
Method 2: Turn Off the Always-On Display
An alternative to avoid the Android lock screen clock is disabling the Always-on Display (AOD).
- Step 1: Access the Settings menu on your Android device. Scroll down and choose Lock screen > Always On Display.

- Step 2: Toggle off to deactivate the Always On Display.
_Note_
While this won’t alter the lock screen clock itself, it will turn off the display. It will prevent the constant presence of the lock screen clock. Instead, the clock will only become visible when you press the power button.
Method 3: Disable the Double-Line Clock
Originally, there was no provision to change the lock screen clock in Android 12. With the release of a new update, Google introduced an option to deactivate the clock, bringing relief to users. Follow the steps below to disable the double-line clock on your Android.
- Step 1: Go to Settings > Display. Next, choose Lock screen.

- Step 2: Toggle the Double-line clock off.
_Note_
If you want to display a digital or analog clock, open the _Clock_ app. Tap the _three dots_ > _Settings_ > _Style_****.
Method 4: Turn On Screensaver
An alternative method to modify the Android lock screen clock involves activating Android’s screen saver. There are options where it’s more pleasing than the default lock screen clock. If you want to change the lock screen clock, follow the steps.
- Step 1: Open the Clock app and tap the three dots in the upper-right corner. Select Screensaver and toggle it on.

- Step 2: If you want to customize the screensaver clock’s appearance, go to Settings > Display > Screensaver. Choose analog, digital, or night mode.
Method 5: Keep Unread Notifications
To avoid adjusting your Android device settings, you can make the lock screen clock smaller by maintaining unread notifications. The clock occupies less space when there are unread notifications. It shifts back to the top-left corner when you receive a new notification. Simply leave notifications unread to keep the clock smaller.
Bonus
For users who prefer not to have a lock screen clock, follow these steps:
- Step 1: Open Settings > Lock screen or Security & lock screen.
- Step 2: Look for Clock and FaceWidgets or a similar option. Disable or toggle off the Clock or Show clock setting. Save changes, and your lock screen should no longer display the clock.
Part 3. An Exception: Change the Lock Screen Clock on Samsung Phones
Changing the lock screen clock on Samsung phones is similar to the general Android process. However, the steps are quite different, offering Samsung users a unique customization experience. If you wish to personalize your lock screen clock, here’s how:
- Step 1: Go to Settings > Lock screen or Lock screen & security. Choose Customize lock screen > Clock, Clock style, or Lock screen clock.

- Step 2: Choose between different styles, such as digital, analog, or others. Some Samsung models offer extra settings like color, size, and more to enhance your lock screen further. Select the one that suits your taste.
If you’d rather remove the lock screen clock on your Samsung device, follow these steps:
- Step 1: Go to Settings > Lock screen or Lock screen & security.Choose Customize lock screen > Clock, Clock style, or Lock screen clock.
- Step 2: Disable or toggle off this setting to remove the clock from your lock screen.
If you ever find yourself locked out of your Android device due to a mishap while changing your lock screen clock or any other reason, don’t fret. Wondershare Dr.Fone– Screen Unlock - Android can effortlessly bypass the lock screen and unlock your device without a hassle.
Read More About Android Lock Screen:
9 Ways to Bypass Samsung Lock Screen without Data Loss [2024]
How To Easily Unlock Nokia Screen: 4 Effective Methods
How to Change Lock Screen Wallpaper on Android
Part 4. How To Unlock Accidentally Locked Android Screen
Accidentally locking yourself out of your Android device can be a stressful experience. Dr.Fone provides a hassle-free solution to unlock your Android screen without losing any data. Whether you’ve locked yourself out or forgot your PIN, Dr.Fone ensures a straightforward and secure unlocking process. Here’s a step-by-step guide to using the tool:
![]()
Dr.Fone - Screen Unlock (Android)
The Best UnlockJunky Alternative to Bypass FRP and Solve Your Screen Locks
- Completely unlinked from the previous Google account, it won’t be traced or blocked by it anymore.
- Remove all Android screen locks (PIN/pattern/fingerprints/face ID) in minutes.
- Compatiable with various Android models.
- Provide specific removal solutions to promise good success rate.
4,008,670 people have downloaded it
- Step 1: Download and install Dr.Fone on your computer. Launch the program after installation and go to Toolbox > Screen Unlock.
- Step 2: Choose Android in the next window and click on Unlock Android Screen.
- Step 3: Choose your device brand and click Remove without Data Loss. Select the Brand, Device Name, and Device Model of your smartphone. Once done, toggle the checkmark on I agree with the warning, and I am ready to proceed button.

- Step 4: Follow the on-screen instructions. Once they’re done, Dr.Fone will automatically proceed with the unlocking process. There will be a new screen showing the completion if done correctly. If it fails, click on Try again. Otherwise, click Done to finish.
What Else Can Dr.Fone Do for Android Owners?
Dr.Fone Screen Unlock for Android is a comprehensive tool that goes beyond unlocking screens. It also provides a range of features to address various Android device-related issues, such as:
Bypass Factory Reset Protection (FRP)
You can bypass Factory Reset Protection on your Android device with Dr. Fone. It allows you to set it up without the original Google account credentials.
Unlock Samsung/LG without data loss
Whether you own a Samsung or LG device, Dr.Fone allows you to unlock your phone without compromising any data stored on the Samsung Galaxy S23 device.
Supports 2000+ Android models
Dr.Fone is compatible with a vast array of Android models. It supports over 2000 devices, making it a versatile solution for Android users.
Conclusion
Knowing how to change the lock screen clocks on your Android offers a personalized touch. Android 12 users can effortlessly adjust settings, while Android 11 and older versions require a manual setup. Samsung owners, meanwhile, enjoy a similar but unique customization process. Follow the steps outlined above for those seeking to remove the lock screen entirely.
On the other hand, if you accidentally lock yourself out of your smartphone, Dr.Fone is a go-to solution, ensuring a smooth unlocking process. Whether tweaking your Android lock screen clock or facing accidental lockouts, explore these methods to tailor your Android experience.
Also read:
- In 2024, How To Unlock Samsung Galaxy S23 Phone Without Password?
- How to Unlock Oppo Find X7 Ultra Phone with Broken Screen
- How to Reset your Vivo X Flip Lock Screen Password
- In 2024, Unlocking Made Easy The Best 10 Apps for Unlocking Your Vivo X100 Device
- Complete Review & Guide to Techeligible FRP Bypass and More For Samsung Galaxy S23+
- In 2024, 6 Proven Ways to Unlock Vivo Y27 5G Phone When You Forget the Password
- How To Enable USB Debugging on a Locked Samsung Galaxy A14 5G Phone
- In 2024, Best Ways on How to Unlock/Bypass/Swipe/Remove Vivo Y78t Fingerprint Lock
- In 2024, How To Remove Screen Lock PIN On Oppo Find N3 Like A Pro 5 Easy Ways
- Full Guide to Unlock Your Samsung Galaxy M34 5G
- The Ultimate Guide to Samsung Galaxy S23 Pattern Lock Screen Everything You Need to Know
- In 2024, Forgot Pattern Lock? Heres How You Can Unlock Vivo V27e Pattern Lock Screen
- How to Unlock Vivo Y100i Bootloader Easily
- Downloading SamFw FRP Tool 3.0 for Asus ROG Phone 8 Pro
- Top 15 Apps To Hack WiFi Password On Samsung Galaxy A25 5G
- How to Unlock Vivo Y02T Pattern Lock if Forgotten? 6 Ways
- Best Ways on How to Unlock/Bypass/Swipe/Remove Asus Fingerprint Lock
- In 2024, How to Unlock Vivo S17t Phone with Broken Screen
- In 2024, Mastering Android Device Manager The Ultimate Guide to Unlocking Your Vivo T2 Pro 5G Device
- Lock Your Samsung Galaxy A14 4G Phone in Style The Top 5 Gesture Lock Screen Apps
- A Complete Guide To OEM Unlocking on Lava Yuva 3
- Can I Bypass a Forgotten Phone Password Of Vivo S17?
- In 2024, How to Remove Forgotten PIN Of Your Samsung Galaxy S24
- How to Unlock Oppo F25 Pro 5G PIN Code/Pattern Lock/Password
- In 2024, How to Change Lock Screen Wallpaper on Samsung Galaxy A14 4G
- A Complete Guide To OEM Unlocking on Oppo A38
- How To Remove or Bypass Knox Enrollment Service On Samsung Galaxy F04
- In 2024, How To Remove or Bypass Knox Enrollment Service On Samsung Galaxy A24
- Full Tutorial to Bypass Your Samsung Galaxy A23 5G Face Lock?
- In 2024, How To Change Samsung Galaxy A54 5G Lock Screen Clock in Seconds
- How To Change Vivo Y78 5G Lock Screen Clock in Seconds
- Can I Bypass a Forgotten Phone Password Of Samsung Galaxy A54 5G?
- In 2024, The Ultimate Guide How to Bypass Swipe Screen to Unlock on Samsung Galaxy A15 5G Device
- In 2024, How To Change Vivo V27e Lock Screen Password?
- How to Unlock Vivo V29 Pro Phone without Any Data Loss
- How To Unlock a Vivo Y100A Easily?
- In 2024, How To Change Samsung Galaxy S23 Tactical Edition Lock Screen Clock in Seconds
- In 2024, Downloading SamFw FRP Tool 3.0 for Oppo A79 5G
- Top 12 Prominent Vivo T2 Pro 5G Fingerprint Not Working Solutions
- In 2024, 7 Ways to Unlock a Locked Vivo Y17s Phone
- In 2024, Tips and Tricks for Setting Up your Vivo V29e Phone Pattern Lock
- In 2024, How To Change Vivo Y55s 5G (2023) Lock Screen Password?
- 5 Solutions For Lava Storm 5G Unlock Without Password
- How to Bypass Android Lock Screen Using Emergency Call On Samsung Galaxy A15 4G?
- In 2024, Can I Bypass a Forgotten Phone Password Of Oppo Find X7?
- A Complete Guide To OEM Unlocking on Vivo X Fold 2
- In 2024, How To Unlock Samsung Galaxy Z Flip 5 Phone Without Password?
- How to Track OnePlus 11 5G Location by Number | Dr.fone
- Solved Warning Camera Failed on Samsung Galaxy Z Fold 5 | Dr.fone
- Top 10 Video Editing Tools for Young Creators Free and Paid Options for 2024
- What is the best Pokemon for pokemon pvp ranking On Vivo Y78 5G? | Dr.fone
- In 2024, How To Remove Flashlight From Apple iPhone 13 mini Lock Screen
- In 2024, Solutions to Spy on Motorola Moto G 5G (2023) with and without jailbreak | Dr.fone
- How to Stop Life360 from Tracking You On Apple iPhone 11 Pro? | Dr.fone
- Updated 2024 Approved How to Make a Talking AI Avatar From Photos Easy Guide
- How to Hard Reset Realme Narzo N55 Without Password | Dr.fone
- Bypass iCloud Activation Lock with IMEI Code On iPhone 12 Pro
- New 2024 Approved Best Movie Makers for Windows 10 Free and Paid
- 4 Things You Must Know About Apple iPhone XS Activation Lock
- Troubleshooting Guide How to Fix an Unresponsive Sony Xperia 1 V Screen | Dr.fone
- Advance Repair for Bad and Corrupt Video Files of Honor Magic Vs 2
- In 2024, iPogo will be the new iSpoofer On Tecno Spark 20 Pro+? | Dr.fone
- Honor 70 Lite 5G Screen Unresponsive? Heres How to Fix It | Dr.fone
- How to Turn Off Google Location to Stop Tracking You on Nokia C210 | Dr.fone
- Authentication Error Occurred on Motorola Moto G24? Here Are 10 Proven Fixes | Dr.fone
- How to rescue lost call logs from Moto E13
- In 2024, How to Bypass Google FRP Lock on Nokia C12 Devices
- 2024 Approved Top FCPX Learning Resources Top Channels and Sites
- How to Unlock T-Mobile Apple iPhone 6 online without SIM Card?
- In 2024, How I Transferred Messages from Nokia C22 to iPhone 12/XS (Max) in Seconds | Dr.fone
- Does Airplane Mode Turn off GPS Location On Xiaomi Redmi A2? | Dr.fone
- New Level Up Videos By Applying Keyframe Like A Pro
- The Ultimate Guide to Get the Rare Candy on Pokemon Go Fire Red On Oppo F25 Pro 5G | Dr.fone
- How to bypass Tecno Spark 20’s lock screen pattern, PIN or password
- A Comprehensive Guide to iCloud Unlock From Apple iPhone 12 mini Online
- What To Do if Your Infinix Smart 8 Pro Auto Does Not Work | Dr.fone
- How to Find iSpoofer Pro Activation Key On Honor Magic 5 Lite? | Dr.fone
- In 2024, Fake the Location to Get Around the MLB Blackouts on Honor Magic Vs 2 | Dr.fone
- How to Soft Reset Realme C67 5G phone? | Dr.fone
- New 2024 Approved How to Translate Instagram Videos for Global Engagement
- How to Transfer Photos from Nokia C02 to New Android? | Dr.fone
- In 2024, Top 10 Telegram Spy Tools On HTC U23 for Parents | Dr.fone
- New How To Remove The Endless Loop From Animated GIF
- In 2024, Effective Ways To Fix Checkra1n Error 31 From Apple iPhone 8
- Updated Dubbing Videos With Voiceovers | Using Wondershare Filmora for 2024
- In 2024, Best Ways on How to Unlock/Bypass/Swipe/Remove Itel P55 5G Fingerprint Lock
- The Best Android Unlock Software For OnePlus Ace 2V Device Top 5 Picks to Remove Android Locks
- New Top-Rated AVI Video Cutting Tools Trim and Split AVI Videos Multi-Platform
- Title: In 2024, How to Remove a Previously Synced Google Account from Your Samsung Galaxy S23
- Author: Peter
- Created at : 2024-04-30 19:04:50
- Updated at : 2024-05-01 19:04:50
- Link: https://android-unlock.techidaily.com/in-2024-how-to-remove-a-previously-synced-google-account-from-your-samsung-galaxy-s23-by-drfone-android/
- License: This work is licensed under CC BY-NC-SA 4.0.
