
In 2024, How to Remove a Previously Synced Google Account from Your Lenovo ThinkPhone
How to Remove a Previously Synced Google Account from Your Lenovo ThinkPhone
The setting up process of a new Android phone requires you to add a Google account that saves all activities and data of the phone like search history, details of online shipping, play store purchases, and more. Once the account is set, it cannot be changed till you delete everything from your phone. Moreover, with the introduction of FRP lock, even a factory reset will not remove the synced Google account.
So, now what if you want to sell your phone or have purchased a second-hand device that is still associated with the previous owner’s Google account? No, worries as there are workarounds available that will help you remove your previously synced google account from your Android device.
Keep reading to know more in detail about how to bypass previously synced google accounts.
Heres a full guide on how to remove google account from android, click to know more!
Disclaimer: This post includes affiliate links
If you click on a link and make a purchase, I may receive a commission at no extra cost to you.
Part 1: Remove Previously Synced Google Account from Android Phone Without Phone Reset
In this part, we will discuss the methods that can be used for removing the previously synced account from your Android phone without a phone reset.
Method 1: Removing Google Account using the Android Settings Menu
If you just plan to reset your phone, maybe because of the lag caused by the phone cache, and you know the inconvenience of Google FRP as a protection mechanism, then you can remove Google FRP through the Settings menu.
The steps for this method are listed below.
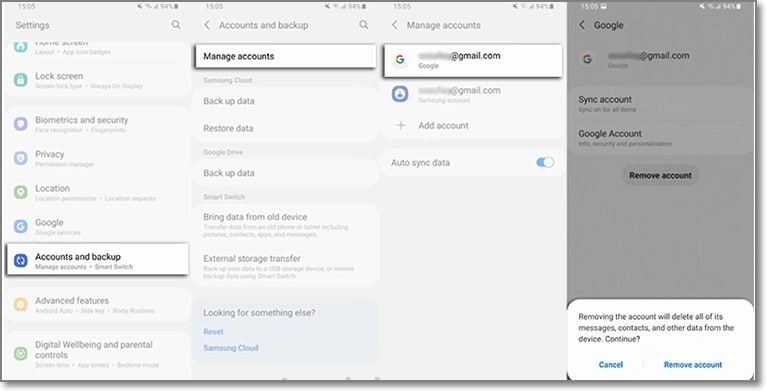
- Step 1: On your Android phone go to the Settings option and choose Accounts & Backup.
- Step 2: Select the Manage Accounts option now and the list of the associated Google Devices will appear.
- Step 3: Choose and click on the Google Account that you want to remove and a pop-up message will appear to inform you that all the account data will be deleted with this action.
To confirm the removal of the account, click on the Remove account button.
Method 2: Remove the Google account from the Android phone using the computer
There is another method using which you can remotely remove the Google account associated with your phone. The steps for the method are listed below.
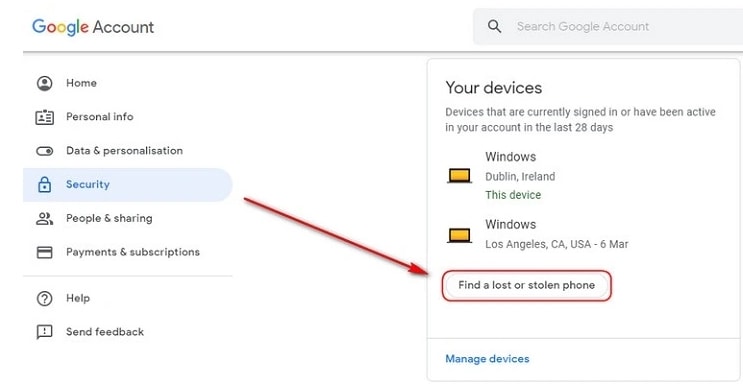
- Step 1: Using another device or a PC, sign in to your Google account that was previously synced on this device and choose the Security option.
- Step 2: Next scroll down and then tap on the Your devices option and choose to Manage devices.
- Step 3: You will now see the list of devices linked to your Google account. Next, tap on Find a lost or stolen phone and then select the Remove option present next to Account access.
- Step 4: You will be again asked if you want to delete the account. Select the Remove option.
- Step 5: The account will be removed successfully and the confirmation message will appear.
Note: This method will actually sign out you from the Google account and will not delete it permanently. To again get access to the account, a notification will appear on your phone to enter the password.
Part 2: How to Disable Factory Reset Protection to Bypass Google Account Verification After Factory Reset
The Factory Reset Protection (FRP) is a security feature for the Android device that allows factory reset only after the associated Google ID and password are entered correctly. With multiple accounts and passwords to remember there is quite a possibility that you may forget your Android phone Google account details and here the need to bypass Google account verification arises.
Though there are multiple tools available we recommend Dr. Fone - Screen Unlock (Android) as the best and the most reliable option. Using this excellent Windows and Mac-based software, FRP lock on all popular Android devices including Samsung, LG, HTC, and others. The tool is simple to use and requires no technology. There is also an option where you can unlock your device if you do not know the OS version.
![]()
Dr.Fone - Screen Unlock (Android)
Get into Locked Phones within Minutes
- 4 screen lock types are available: pattern, PIN, password & fingerprints.
- Easily remove the lock screen; No need to root your device.
- Everybody can handle it without any technical background.
- Provide specific removal solutions to promise good success rate
4,008,669 people have downloaded it
Steps to remove FRP lock using Dr. Fone-Screen Unlock (Android)
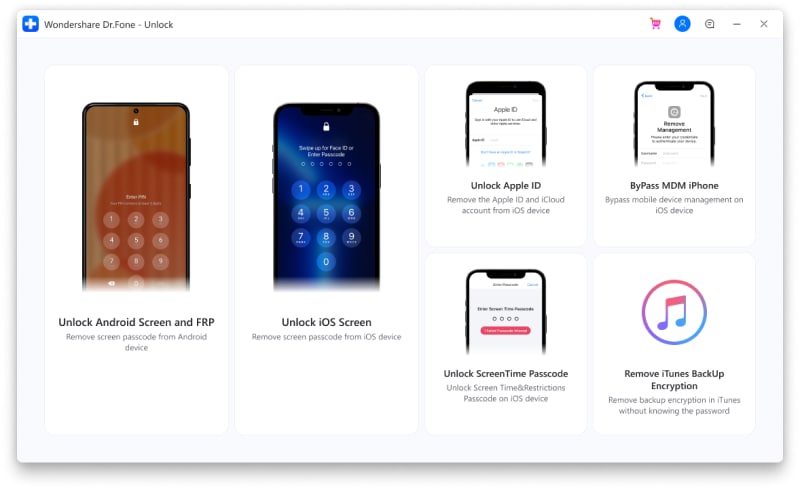
Step 1: Download, install and run the software on your system, and from the main interface choose the Screen Unlock option. Make sure that your phone is connected to WiFi.

Step 2: Next, choose Unlock Android Screen/FRP and then select the Remove Google FRP Lock option.
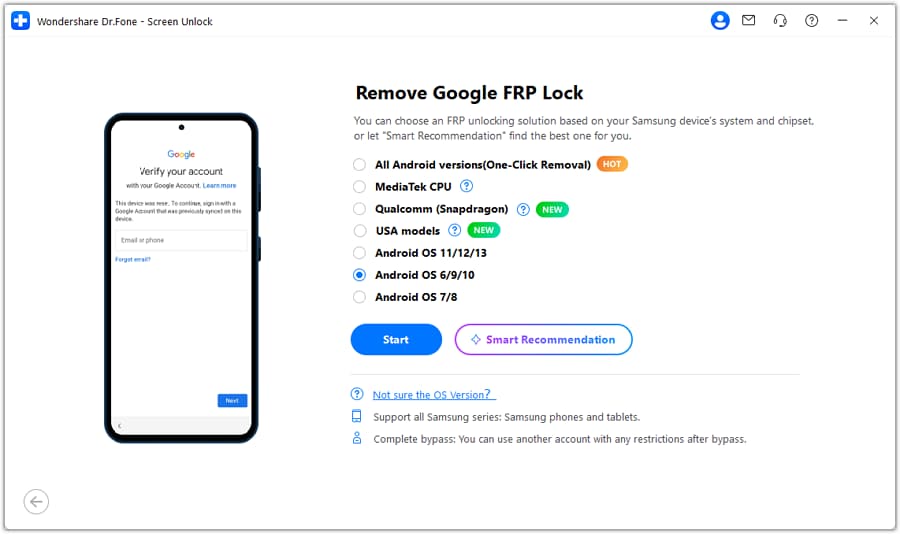
Step 3: Next, choose the OS version of your device from the given options, and then using a USB cable, connect your phone to your system.
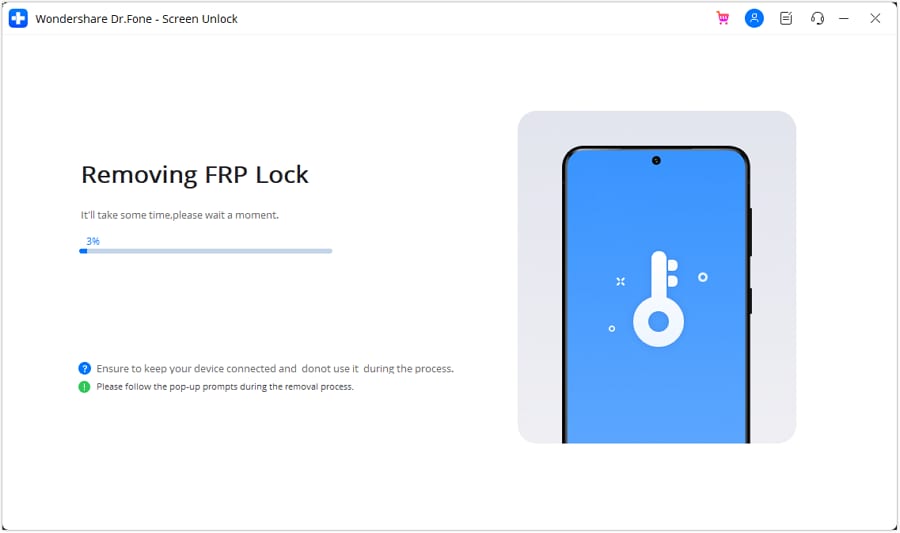
Step 4: After the Lenovo ThinkPhone device is connected, the Lenovo ThinkPhone device information will appear on the software for you to confirm and the notification for the same will be sent to your Android phone.
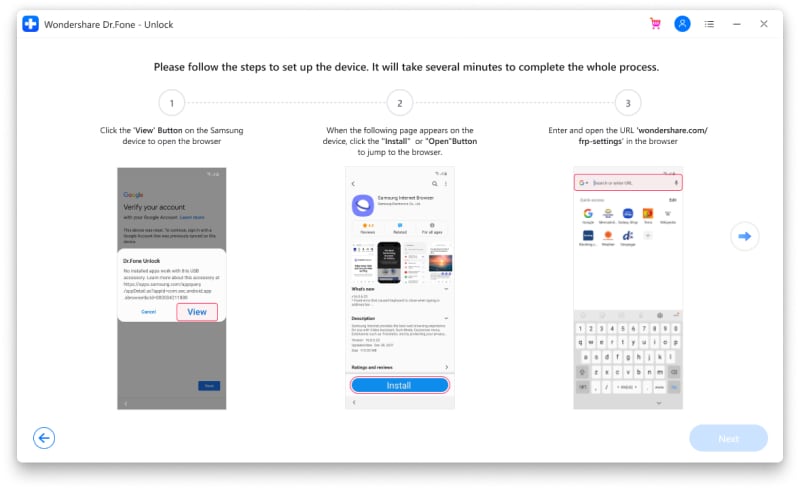
Step 5: Now follow the notifications for removing the FRP lock and in the browser enter drfonetoolkit.com.
Step 6: Next, click on the Android 6/9/10 button, choose Open Settings and select the PIN option to set a PIN to be used in the further steps.
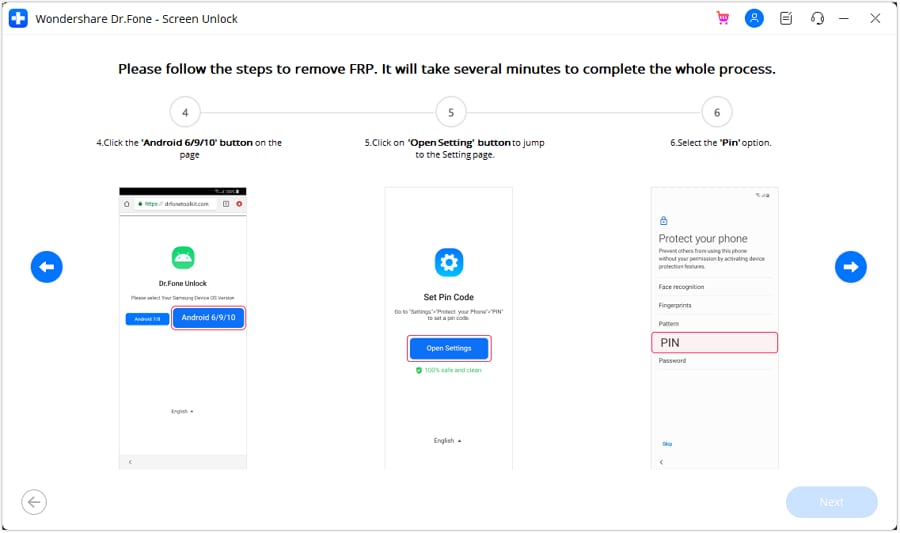
Step 7: Keep following the steps as they appear till you reach the Google Account Sign-In page. Here click on the Skip option that will successfully remove and bypass the Google Account.

The above given are the brief steps for the FRP bypass process. To learn about the entire process in detail, check Dr.Fone-Screen Unlock (Android) guide .
Part 3: Hire a Remote FRP Removal Service to Bypass ZTE/Motorola After Factory Reset
To bypass the FRP lock on your ZTE, Motorola, and Samsung device, there is also an online service called UnlockJunky.com that claims to remove the FRP lock and previously linked account on your Android device within 5-15 minutes. This is a paid service that also claims that if they are unable to remove the lock, they will refund the amount to their customers.
So, if you cannot sign in with a Google account that was previously synced, you can give this, method a try.
Step 1: Open the official service page Unlockjunky on your browser.
Step 2: Next, choose the Lenovo ThinkPhone device’s brand, model, and unlock type from their respective drop-down menus. Click on Unlock Now button after entering the details.
Step 3: Now you need to initiate the order by providing the details asked and completing the payment.
Step 4: Next, the software needs to be downloaded and installed on your system, and using a USB cable, connect your phone to your computer.
Step 5: Connect with one of the support provider members through the live chat and they will help you remove the FRP lock on your Android phone.
With the steps above, you can remove the account previously synced on this device.

Limitations of using the Unlockjunky method:
- This is a paid service.
- Works only with Motorola, ZTE, and Samsung devices.
- There is no surety that the service will work for removing the FRP lock on your devices.
- If you have to remove the FRP lock from multiple devices, a separate payment for each device has to be done.
Conclusion
Above we have listed several ways to remove a previously synced Google account on your Android device. The best of all the listed solutions is Dr. Fone - Screen Unlock (Android) as it supports bypassing FRP lock on multiple Android devices in a hassle-free manner. Once the license is purchased, you can unlock as many numbers of devices as you want without any worries.
Rootjunky APK To Bypass Google FRP Lock For Lenovo ThinkPhone
Factory Reset Protection (FRP) is a security feature built into Android devices running Android 5.1 Lollipop and later versions. It prevents someone from using your phone after a factory data reset without Google account login credentials. The FRP makes it much less attractive for thieves to steal Android phones, knowing they will need help to access them.
FRP automatically activates when you add a Google account to your Android phone. It links the Lenovo ThinkPhone device to your account, making it the “trusted owner.” Once activated, FRP becomes embedded in the phone’s system.
While Google FRP is a valuable security feature, it’s vital to acknowledge that there are legitimate situations where bypassing it might be necessary. These instances include forgotten Google account credentials, buying a second-hand device, and device issues. In these cases, tools like RootJunky can help you bypass FRP Lock. We’ll explore how to use RootJunky APK later, but first, let’s define what it is and its role in FRP bypass.

The RootJunky APK is a free Android application also called RootJunky SDL or RootJunky FRP Bypass tool. This app’s primary function is to bypass the Google Account FRP lock on Samsung devices. Rootjunky uses the weaknesses in Android’s setup process to create a new user account or switch existing ones, letting you bypass the FRP and regain control of your phone.
You can complete this process using the app by connecting your phone to a computer through an OTG cable. RootJunky can be helpfu l if you’ve forgotten your Google account password or bought a second-hand phone locked to someone else’s account. However, only use it if you have legitimate reasons to bypass FRP lock, like accessing your device after forgetting your Google account details.

Downloading the RootJunky FRP bypass tool from unofficial sources can introduce malware risks, so stick to trusted sources like the official website. Additionally, when exploring RootJunky, it is vital to keep the following in mind:
- Not all Android devices are susceptible to the methods used by RootJunky. It is necessary to check compatibility with your specific device model and Android version.
- Using FRP bypass tools like RootJunkycan potentially compromise the security of your device. Be cautious and proceed if you fully understand the risks involved.
- Bypassing FRP may involve data loss.
- Download RootJunky FRP bypass APK from a reliable source to minimize the risk of malware or viruses. You can check the APK file from official websites or trusted forums.
- Google constantly updates its security measures, so these tools may not always work effectively.
Part 2: How To Use RootJunky To Bypass Google FRP?
Here are the general steps to use the FRP Bypass APK RootJunky app to bypass Google FRP lock. But remember that specific steps may vary depending on your device and Android version:
- Step 1: On your computer, download the Rootjunky RealTerm program from the official Rootjunky website.

- Step 2: On your phone, download the Rootjunky APK (com.rootjunky.frpbypass-1.0.apk) file from the official website or other reputable sites.

- Step 3: Go to Settings > Security and tap Install unknown apps. Then, enable unknown sources to allow installation of apps from outside the Play Store. Connect your device to a Wi-Fi network.

- Step 4: On your Android phone, open a file explorer app and install the downloaded RootJunky APK file.
- Step 5: Connect your smartphone to your computer using a USB cable.
- Step 6: Launch the Rootjunky RealTerm program on your computer. Under the Display tab, check the Half Duplex option.
- Step 7: On your computer, go to Device Manager > Modems. Locate your device’s port name (e.g., COM3).
- Step 8: On the RealTerm program, enter the correct port number under the Ports tab, then click Change.

Step 9: Click Send to establish a connection. Enter the two commands:
at + creg? \ r \ n
atd1234; \ r \ n
Step 10: Once connected, the Rootjunky APK on your phone will provide on-screen instructions to bypass FRP.
Step 11: If prompted, perform a factory data reset of your device.
While RootJunky offers a free method for FRP bypass, it can be incompatible with your device’s brand, requiring technical knowledge, tedious, and potentially risky. If you are looking for a simpler, safer, and more user-friendly solution, Wondershare Dr.Fone might be a better fit for you. If you want to learn how to use this tool to bypass FRP lock with minimal technical expertise, then keep reading.
Part 3: Easier Tool Than RootJunky APK To Bypass Google FRP
Google FRP adds an extra layer of security after a device reset. However, regaining access to the smartphone can be challenging if you forget your Google account details, forget your lock screen, or just buy a used device. While methods like the FRP RootJunky app exist, using it can be complex or risky.
Consider exploring third-party options like Dr.Fone for a potentially easier and safer FRP bypass solution. Dr.Fone Screen Unlock tool helps remove the Android FRP lock without requiring a PIN or Google Account.
Why Use Dr.Fone - Screen Unlock?
Here are some of the key features of Dr.Fone - Screen Unlock:
- **User-friendly:**Fone boasts an intuitive interface, eliminating the need for technical expertise. Even beginners can navigate the process with ease.
- **Widespread Brand Compatibility:**Fone supports mainstream brands, such as Samsung, Xiaomi, Oppo, Redmi, Realme, and Vivo, catering to a broader user base.
- **Fast and Efficient:**Regain access to your device in minutes without wasting time on tedious procedures.
Step-by-step Guide to Removing FRP Lock With Dr.Fone - Screen Unlock
Ready to leave the hassle of using RootJunky and easily bypass the FRP lock? Download and install Dr.Fone on your computer, then follow these steps to learn how to bypass Google FRP on your device:
- Step 1: Launch Dr.Fone on your computer and connect it to your Android device. Choose Screen Unlock from the Toolbox in the main interface.
- Step 2: Choose Android as your device type. This will take you to the next screen, where you can select Remove Google FRP Lock to proceed.

- Step 3: Select your device’s brand from the list and click Start to continue.

Note:
The next steps may vary depending on the brand you selected.
- Step 4: Select the OS version of your device and click Start to continue.

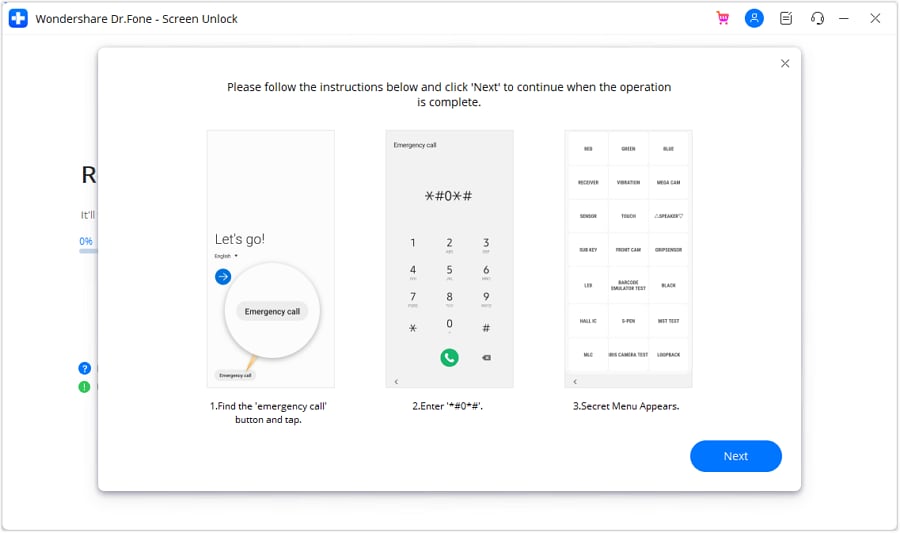
- Step 5: Access the secret menu on your phone using the on-screen instructions, then click Next to proceed to the next step.
- Step 6: When your Samsung prompts you to activate USB debugging, tap Allow. Then, on your computer screen, click Authorized to confirm.

- Step 7: You will see the FRP lock being bypassed on your Android device on the next screen.
- Step 8: Click Done if the FRP lock removal was successful, otherwise, click Try Again to repeat the process.
That’s it! With Dr.Fone Screen Unlock, you can easily bypass Google FRP and regain access to your Android device, leaving the complexities of RootJunky behind.
Tips: Are you searching for a powerful FRP bypass tool? No worries as Dr.Fone is here to help you. Download it and start a seamless unlock experience!
Conclusion
Both RootJunky and Dr.Fone offer options for you to regain control of phones with Google FRP lock. FRP Bypass RootJunky tool excels with its free-to-use approach, perfect for tech-savvy users comfortable with APK installations. While requiring a paid subscription, Dr. Fone provides pre-rooted firmware installations and broader device compatibility, which is ideal for those seeking a more streamlined but supported experience.
The best choice boils down to your personal needs and budget. Remember, FRP bypass should only be utilized by rightful owners facing genuine lockouts. When used responsibly, these tools can help you access your phone after a factory reset even without your Google account credentials. Choose the tool that best fits your needs and proceed with caution. Use these tools responsibly and regain access to your device the right way.
Unlock Your Lenovo ThinkPhone Phone with Ease: The 3 Best Lock Screen Removal Tools
Let’s just say that you recently changed your Lenovo ThinkPhone phone’s password, and now you are having trouble remembering it. After a few wrong attempts, you will get an alert message saying that more wrong attempts will block your device. In these situations, you can hard reset your device, but it will delete all your data and settings.
Instead of using other methods, you can use an Lenovo ThinkPhone password unlock tool to unlock your device without a password. You can find many unlock tools but if you want an easy-to-use and efficient Lenovo ThinkPhone unlock tool, try Dr.Fone - Screen Unlock. With Dr.Fone, you can unlock your Lenovo ThinkPhone device within five minutes. You don’t have to worry about harm to your phone’s software. Here, we will discuss the three best Lenovo ThinkPhone unlock tools and a complete guide on how to remove the Lenovo ThinkPhone screen lock with Dr.Fone.
Tool 1: Dr.Fone - Screen Unlock (Android)
For Lenovo ThinkPhone smartphone users who have forgotten their password and are locked out of their device, finding a reliable and efficient password unlock tool is crucial. One such tool that stands out is Dr.Fone - Screen Unlock (Android). Dr.Fone - Screen Unlock (Android) offers a fast and efficient solution to unlock your Lenovo ThinkPhone device. With its advanced algorithms and technology, it can bypass various lock screen types, including PIN, password, pattern, and fingerprint. You can regain access to your device within minutes, saving you from the frustration of being locked out of your phone for an extended period.
Dr.Fone - Screen Unlock is the first choice of many people because of the simple device unlock procedure. When you unlock your device with Dr.Fone, you don’t have to worry about damaging its software. Dr.Fone is the most efficient Lenovo ThinkPhone pattern lock remove tool because it can unlock all old and new Lenovo ThinkPhone devices. In addition to that, Dr.Fone also offers various other features like system repair, WhatsApp transfer, phone transfer, data backup and restore, data eraser, etc. Here is the guide to unlocking the Lenovo ThinkPhone lock screen with Dr.Fone.
With Dr.Fone, you can remove the lock screen of any Lenovo ThinkPhone mobile in four easy steps. Each step is easy to follow.
Step 1. Download Wondershare Dr.Fone from our official website and install it on your PC.
Step 2. Launch the Dr.Fone and navigate to the “Toolbox” > “Screen Unlock” > “Android” > “Unlock Android Screen”.
- Step 3. Click the “OPPO” icon and use a USB cable to connect your Lenovo ThinkPhone phone and your PC. Dr.Fone will start to unlock Android screen after getting into the specific mode. There are various phone brands for you to choose, don’t make it wrong, otherwise, all rest processes won’t work well.

- Step 4. Once the unlock progress is over, you can access your Lenovo ThinkPhone phone without any password or pattern.

Tool 2: Lenovo ThinkPhone Password Unlock
Lenovo ThinkPhone unlock tool is free software that enables users to unlock Lenovo ThinkPhone devices without a password. The Lenovo ThinkPhone password unlock tool can bypass screen lock, FRP, Google verification, DIAG, and ADB. It works for all Lenovo ThinkPhone smartphones. It is the best tool for those who forgot their phone’s screen lock password. With Lenovo ThinkPhone unlock tool, you don’t have to complete complex steps, and the method to unlock devices is simple. As an Lenovo ThinkPhone user, you should be aware of the fact that Lenovo ThinkPhone doesn’t allow password changes with a factory reset.
You can only reset your password using the Lenovo ThinkPhone password unlock tool after a factory reset. This tool is compatible with all versions of Windows. It is a one for all solution for many Lenovo ThinkPhone smartphone problems. You can use it to reset the hardware of your Lenovo ThinkPhone phone and delete all data and settings. It features a simple and easy-to-use user interface, and you can get it at no cost. Here are the steps to remove the Lenovo ThinkPhone lock screen with the Lenovo ThinkPhone password unlock the program.
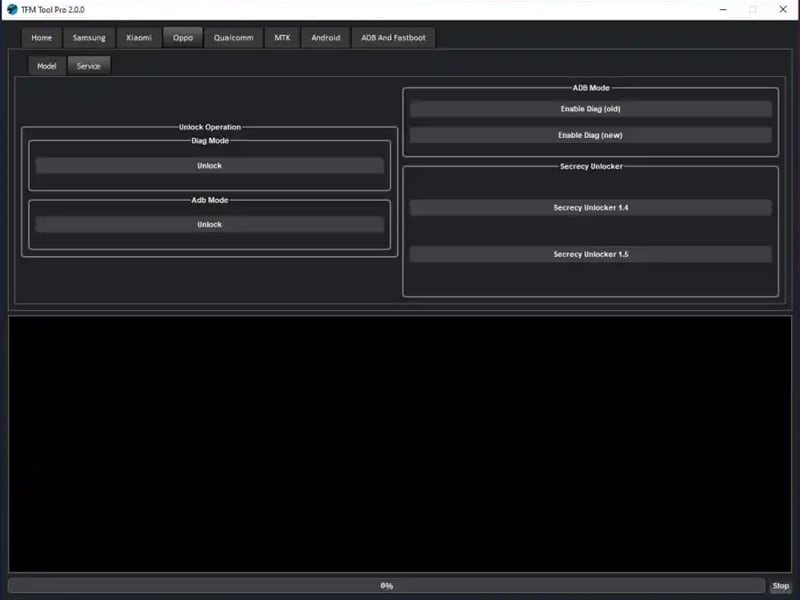
- Step 1. Download and Install the Lenovo ThinkPhone unlock tool. Run the application and power off your smartphone. Select Lenovo ThinkPhone from the brand list and determine the chipset of your device. It can either be MTK or Qualcomm.
- Step 2. For the MTK(MediaTek) chipset, all you need to do is set your MAC address from the network adaptor options and start the unlock process.
- Step 3. For the Qualcomm chipset, select your device model and click on the “Service” tab to enable DIAG mode.
- Step 4. Start the Lenovo ThinkPhone device unlock process. Once the process is complete, your device will automatically boot up and format all data. There will be no screen lock or FRP lock.
Tool 3: iToolab - UnlockGo
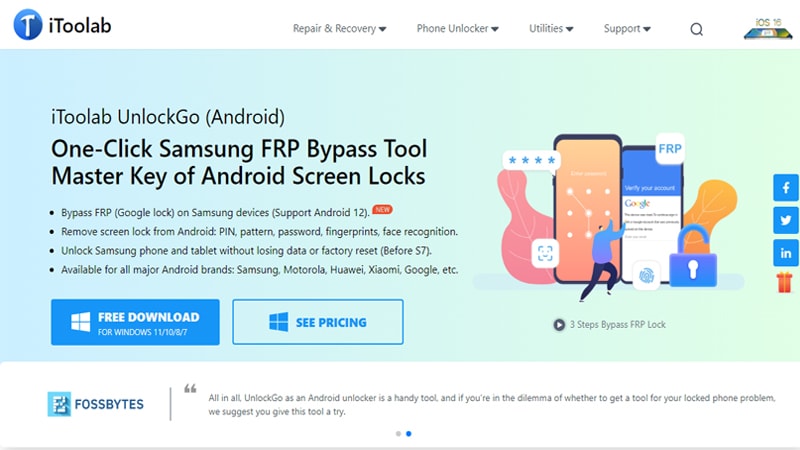
If you have the habit of changing your Lenovo ThinkPhone smartphone frequently, then it is easy to forget your password. Changing your phone’s password is not a problem, but once you forget your phone’s password, things can get troublesome. Without your phone’s password, you might be able to call others, but you can’t unlock your device, use social media, or use any apps on your phone. Although it looks like a bug problem, you can easily deal with it using the proper tools. Instead of trying to unlock your locked Lenovo ThinkPhone device using various unsafe methods, you can use iToolab - UnlockGo to remove its screen lock.
iToolab - UnlockGo is a simple Lenovo ThinkPhone pattern remove tool that enables users to unlock privacy passwords and screen locks of their Lenovo ThinkPhone smartphones. The only reason not to use this tool for Lenovo ThinkPhone screen unlock is that you can lose all your data. Although lock screen removal without data loss is available in UnlockGo it only works for earlier Samsung devices. For Lenovo ThinkPhone users, forgetting their phone’s password means losing all their data to unlock their device. Here are the steps to unlock Lenovo ThinkPhone phones using iToolab - UnlockGo.
- Step 1. Install and launch iToolab - UnlockGo(Android) on your PC. Click on the “Unlock Screen lock” on the main interface.
- Step 2. Select your device brand from the drop-down list. In your case, select “OPPO” and click on the “Unlock” button.
- Step 3. If your device has a home button, press the home + volume up + power keys at the same time to enter recovery mode. If your device does not have the home button, press the volume down + power keys to enter recovery mode.
- Step 4. Once you enable the recovery mode, iToolab - UnlockGo will start the screen lock removal on your Lenovo ThinkPhone device. You will get a notification once the unlock ends. Reboot your device and enter it without a password.
Bonus Tips: Have you ever found yourself locked out of your Lenovo ThinkPhone phone due to the Google Factory Reset Protection (FRP) feature? If so, don’t worry, as there is a solution that can help you bypass this security measure. Easily bypass Google FRP on Lenovo ThinkPhone Phone with Dr.Fone - Screen Unlock (Android). It effortlessly resolves issues like lost Google accounts, forgotten PIN codes, and unlocking used phones. Supported brands include Samsung , Xiaomi, Redmi , Oppo , Realme , and Vivo .
FAQs: Is Dr.Fone - Screen Unlock Safe for Your Lenovo ThinkPhone Phone?
Dr.Fone - Screen Unlock is the safest and most efficient tool to unlock your Lenovo ThinkPhone device without a password. It only removes the lock screen and doesn’t affect your device’s security. One of the advantages of using Dr.Fone is that it saves your phone’s warranty. When you unlock Lenovo ThinkPhone phones with Dr.Fone, you don’t need your Google password or a factory reset. Dr.Fone also gives you the option to back up your data. You can also use it to repair software problems on your device, like screen stuck, volume problems, or device lag.
Dr.Fone - Screen Unlock (Android)
Unlock Your Lenovo ThinkPhone Phone Hassle-Free
- Remove 4 screen lock types: pattern, PIN, password & fingerprints.
- Bypass Android FRP lock without a PIN or Google account.
- Work for Samsung, Xiaomi, Realme, OPPO, etc.
- No tech knowledge required, Simple, click-through, process.
3,981,454 people have downloaded it
Conclusion
These are the three best tools to unlock your Lenovo ThinkPhone smartphone. Each of these tools can unlock your phone without a password. If we want to pick the best Lenovo ThinkPhone password unlock tool, Dr.Fone - Screen Unlock (Android) is better than the other two for various reasons. With Dr.Fone, you get a simple user interface and an easy-to-follow procedure to unlock your device. The tool guides you to complete every step, and you can unlock your Lenovo ThinkPhone smartphone within five minutes. And you also don’t have to worry about losing your phone’s warranty. Dr.Fone is a one-stop solution for Android problems.
Also read:
- [New] Does Image Smoothing Streamline the Creative Process, In 2024
- [Updated] Mastering NVIDIA Screenshot Capture
- [Updated] YouTube SEO The Path to More Audience Engagement
- 2024 Approved Turning Views Into Cash Secrets to Successful Facebook Video Money-Making
- Brighten up Your Screen: Effective Techniques to Fix Image Discoloration on PCs
- How To Safely Eliminate Google Chrome's Critical Error Scam
- In 2024, Best Ways on How to Unlock/Bypass/Swipe/Remove Asus Fingerprint Lock
- In 2024, Full Tutorial to Bypass Your Motorola Moto G Stylus (2023) Face Lock?
- In 2024, How Can We Unlock Our HTC U23 Phone Screen?
- In 2024, Lock Your Motorola Moto G13 Phone in Style The Top 5 Gesture Lock Screen Apps
- Leading 8 GPT Directives for Diminishing Online Disturbances
- New Explore These 5 Pinnacle Platforms for Efficient MP3 File Tagging for 2024
- Title: In 2024, How to Remove a Previously Synced Google Account from Your Lenovo ThinkPhone
- Author: Peter
- Created at : 2025-03-02 01:20:15
- Updated at : 2025-03-03 09:46:02
- Link: https://android-unlock.techidaily.com/in-2024-how-to-remove-a-previously-synced-google-account-from-your-lenovo-thinkphone-by-drfone-android/
- License: This work is licensed under CC BY-NC-SA 4.0.