
In 2024, A Complete Guide To OEM Unlocking on Gionee
A Complete Guide To OEM Unlocking on Gionee F3 Pro
Android, known worldwide as a major player in phone operating systems, stands out for its flexibility and open-source nature. This allows users to customize their devices extensively. However, despite this openness, certain features and capabilities can still be locked or restricted, either by Google or the Gionee F3 Pro device manufacturer.
For those looking to truly unleash the full potential of their Android device, an OEM unlock is an essential step. This article will delve into the process of OEM unlocking on Android, guiding you through its benefits and how to safely perform it.
OEM lock might sound like technical jargon to many. However, it’s a key concept for those who wish to dive deeper into Android customization. OEM stands for Original Equipment Manufacturer. Unlocking in this context refers to removing restrictions made by the manufacturer on the Gionee F3 Pro device.
This process allows you to gain deeper access to the Gionee F3 Pro device’s software. Thus, OEM unlocking is often required for customizing or modifying the system at a more advanced level.
Why Enable OEM Unlock?
The primary reason to enable OEM unlocking is to gain the ability to root your device or install custom firmware, also known as ROMs. Rooting is the Android equivalent of jailbreaking. It allows users to access and modify the Gionee F3 Pro device’s software at the deepest level.
This can enable the installation of apps and software that require more permissions than what is typically available. On the other hand, custom ROMs can change your device’s interface. They can also add features not available in the stock version of Android.
Pros and Cons of OEM Unlocking
Here are some great things you can get when you allow OEM unlock.
- The most significant advantage is the ability to customize your device far beyond what’s possible with standard settings.
- Root access. It allows for rooting the phone enabling advanced features and apps.
- Custom ROMs. Users can install different versions of Android or entirely new operating systems.
On the other hand, here are some cons that you must consider before performing the process on your phone:
- Security risks. Root access can make your device more vulnerable to malware and hacking.
- Void warranty. OEM unlocking often voids the manufacturer’s warranty.
- Potential for bricking. Incorrect procedures can render the Gionee F3 Pro device unusable, known as ‘bricking’.
Understanding the Risks
It’s crucial to understand that OEM unlocking is not without its risks. It does open the door to several customizations and tweaks. However, it can also compromise the security of your device. There’s always a chance of bricking your phone, especially if the unlocking process isn’t followed correctly or an unstable custom ROM is installed.
Additionally, most manufacturers will void your warranty once you unlock the bootloader. This leaves you without support in case something goes wrong. So, in the next sections, you’ll be guided through the steps of OEM unlocking. You’ll also learn how to do it safely, ensuring you make the most out of your Android device.
Part 2: How To Enable OEM Unlock on Your Android Phone
Enabling OEM unlock can feel like stepping into uncharted territory. Still, it’s relatively straightforward if you follow the right steps. Before you start, it’s important to remember that the exact process can vary slightly depending on your device’s brand and model. However, the general steps are usually similar across most Android devices.
- Step 1: Before proceeding, ensure you back up all important data. Enabling OEM unlock may require a factory reset, which erases all data on the Gionee F3 Pro device.
- Step 2: Go to your phone’s Settings > About Phone. Then, tap on the Build number seven times. You should see a message that says you’re now a developer.
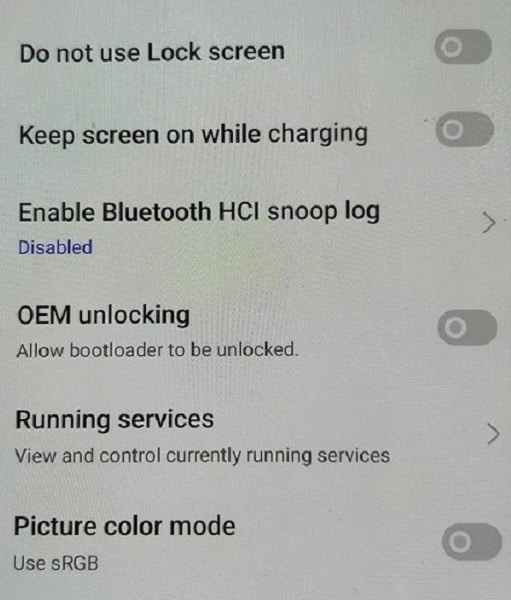
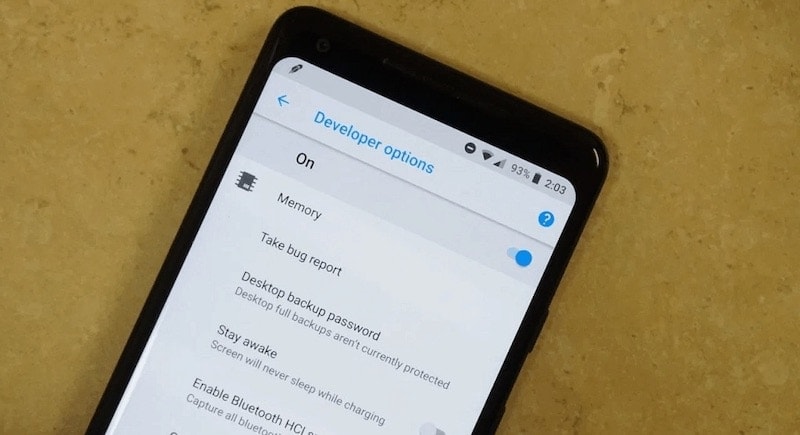
- Step 3: Find and select Developer options on Settings. Then, tap OEM unlocking. You might need to enter a PIN or password.
Here are some common links where you might find the needed PIN or password:
After these steps, your device’s bootloader is now unlocked, and you can proceed with rooting or installing custom ROMs. Remember that this is a significant change to your device’s system, and it should be done cautiously and ideally only if you’re comfortable with potential risks.
Part 3: What Can You Do After OEM Unlock?
Unlocking your phone’s OEM opens up a world of possibilities. It allows you to customize your device beyond what’s available in its factory settings. This newfound freedom, however, comes with its own set of responsibilities and risks. Here’s what you can do after having your phone OEM unlocked.

Root Your Device
Rooting is akin to having the master key to your device’s software. It allows you to gain superuser access, enabling modifications and access to system files that were previously restricted. With rooting, you can:
- Remove pre-installed apps or bloatware.
- Customize system settings and UI elements.
- Enhance performance or battery life through underclocking or overclocking the CPU.
Flash a Custom ROM
A custom ROM is a new operating system you can install on your device. This is one of the most popular reasons for OEM unlocking. Custom ROMs offer:
- The latest Android updates, even for older devices, are no longer supported by manufacturers.
- New features and customization options that aren’t available in the stock ROM.
- Potential performance improvements and unique user interfaces.
Enjoy High Customization
With an OEM unlocked device, the sky’s the limit regarding customization. You can:
- Install custom kernels for better performance and battery life.
- Use powerful apps that require root access for advanced device management.
- Customize everything from the boot animation to the layout of your UI.
However, it’s crucial to proceed with caution. Rooting and installing custom ROMs can void your warranty and, if not done correctly, can turn your device into an expensive paperweight (a state often referred to as “bricking”). Always use reliable sources for your custom ROMs and root-access apps.
Bonus: How To Unlock Your Android Screen When You Forgot Password
Forgetting the password to your Android phone can be a stressful experience. It locks you out of your device. It cuts your access to personal data, contacts, and essential apps. However, aside from OEM unlocking, learning the skill of screen unlocking is incredibly useful in such situations. It’s not just about regaining access. It’s about harnessing control over your device during forgetfulness or emergency.
Wondershare Dr. Fone’s Screen Unlock (Android) will save you in these situations. It’s designed to unlock your phone without requiring a factory reset. It saves your data from being erased. This feature supports unlocking patterns, PINs, passwords, and fingerprints, offering a comprehensive solution for regaining access to your device.
![]()
Dr.Fone - Screen Unlock (Android)
The Best UnlockJunky Alternative to Bypass FRP and Solve Your Screen Locks
- Remove all Android screen locks (PIN/pattern/fingerprints/face ID) in minutes.
- Bypass the FRP lock of Samsung without a PIN or Google account.
- Everyone can handle the lock screen without any tech knowledge.
- Provide specific removal solutions to promise good success rate.
4,008,671 people have downloaded it
How To Perform Screen Unlock With Dr.Fone
The process is straightforward. It involves connecting your device to a computer and running the Dr.Fone software. Then, you’ll follow simple on-screen instructions. Learn how to do those below:
- Step 1: Go to Toolbox > Screen Unlock. Connect your Android device with your PC.

- Step 2: Select Android on this page.

- Step 3: Select Unlock Android Screen.

- Step 4: Select your device brand.

- Step 5: Click Remove without Data Loss.

- Step 6: After confirming device details, type “000000” to execute the operation.

- Step 7: Follow the on-screen instructions for putting your device into download mode. Then, wait for the process to finish.

- Step 8: Once complete, click Done. If your device still isn’t accessible, click Try again.

Conclusion
In wrapping up, you’ve explored the ins and outs of “what is OEM unlock” in the Android world. It’s a key to opening up a trove of customizability on your Android device. It lets you tweak and tailor your phone to your heart’s content. But remember, with great power comes great responsibility.
Diving into OEM
How To Remove or Bypass Knox Enrollment Service On Gionee F3 Pro
In today’s digitally-driven work environment, many companies rely on Knox Enrollment Service to secure their employees’ phones and safeguard sensitive data. However, you might have a Knox-enrolled phone you wish to unlock for personal use.
This article will guide you through removing or bypassing the serviceon your phone. However, it’s important to note that this should ideally be done with your employer’s consent. For transitioning to personal use or other reasons, understanding how to remove or bypass Knox Enrollment Service can be crucial for some users.
Part 1: What Is the Knox Enrollment Service?
Knox Enrollment Service is an integral part of Samsung’s Knox, a toolbox of security features for enterprise-level management of mobile devices. This service is pivotal in how companies manage and secure their mobile devices, especially in a corporate environment.
What It Is
Knox Enrollment Service by Samsung is a tool businesses use to automatically enroll Samsung devices into their management systems when the Gionee F3 Pro device is connected to the internet. It’s designed for IT administrators to easily deploy, manage, and enforce policies across devices in their network, ensuring consistency and security.
What It Does
The service allows IT administrators to pre-configure settings and apps and manage other aspects of the Gionee F3 Pro device’s functionality. When a device is enrolled, it can be remotely controlled and monitored. The administrators can push updates, track device locations, remotely wipe data for security, and enforce specific compliance policies. This automation of device enrollment simplifies the setup process for both the IT department and the end-user.
Advantages
Of course, Samsung Knox would not be popular without any advantages. Here are some of them:
- Enhanced security. Knox Enrollment Service ensures corporate devices have robust security features. This helps in safeguarding sensitive data against unauthorized access.
- **Streamlined management.**It simplifies the Gionee F3 Pro device management, allowing administrators to configure devices without physical access.
- The service enables the customization of devices to fit specific business needs, including installing necessary applications and restrictions on unauthorized apps.
- Compliance Assurance. With the ability to have policies remotely, companies can ensure that all devices comply with corporate standards and regulations.
Disadvantages
However, it also has some disadvantages:
- **Restrictive for users.**For employees, this can mean reduced control over their devices. After all, certain functionalities might be restricted by the employer.
- Potential privacy concerns. The ability of IT administrators to monitor and control devices may raise privacy concerns among employees.
- Complexity in management. While it simplifies many aspects, managing many devices through Knox can become complex. This is particular in diverse environments with different user needs.
Knox Enrollment Service is a powerful tool for enterprise mobile management, offering enhanced security and simplified device management. However, it also introduces challenges, particularly regarding user autonomy and privacy. Understanding these advantages and disadvantages is crucial before removing or bypassing this service.
Part 2: How To Remove Knox Enrollment Service on Your Gionee F3 Pro
In most cases, an administrator can only effectively remove the Knox Enrollment Service through the Samsung Knox Portal. This typically requires cooperation from your employer.
Here’s a step-by-step guide to removing itfrom the Admin’s Portal:
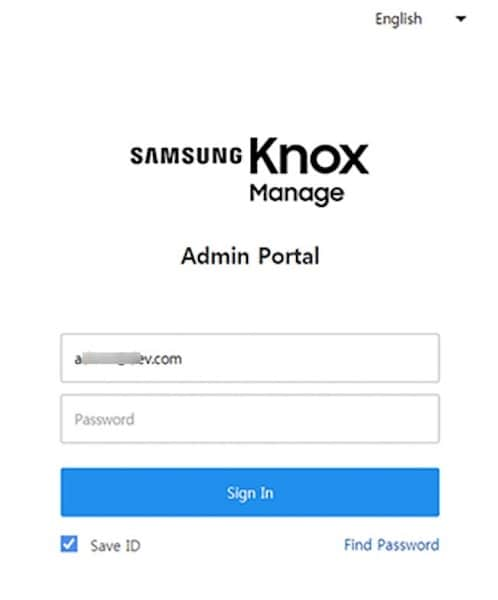
- Step 1: Sign in to the Samsung Knox Portal using administrative credentials.
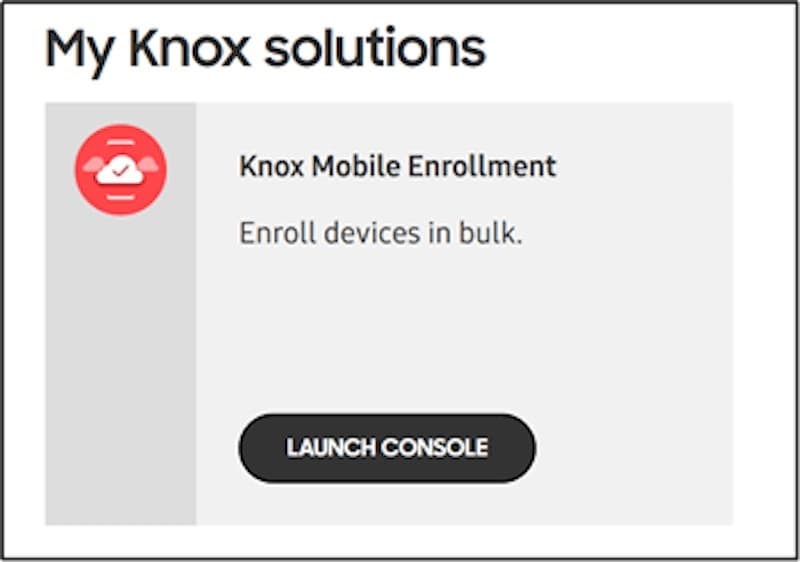
- Step 2: Navigate to Samsung Knox Mobile Enrollment, then click Devices.
- Step 3: Select the Gionee F3 Pro device in question and click Actions.
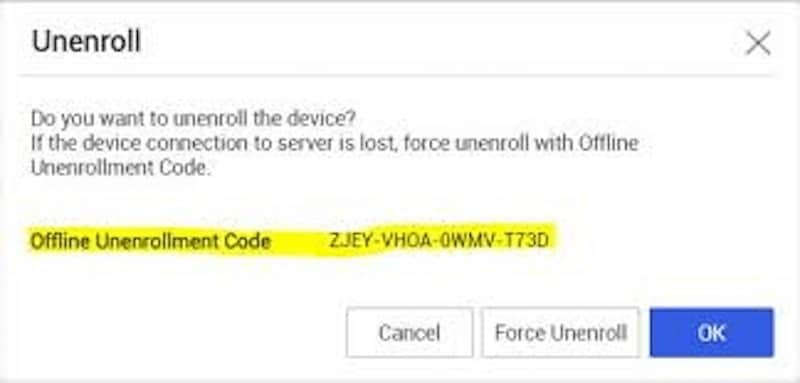
- Step 4: Choose the Clear Profile option to remove all profiles from the Gionee F3 Pro device. This action will disassociate the Gionee F3 Pro device from any existing Knox configurations.
After removing the Gionee F3 Pro device from Knox Enrollment via the admin account, you may still need to uninstall the Knox app from the Android device. This can usually be done through the Gionee F3 Pro device’s settings. Navigate to ‘Apps’ in the settings menu, locate the Knox app, and select ‘Uninstall’ or ‘Disable’. Be aware that this option might not be available on all devices, depending on how Knox was configured.
Rooting and Flashing a New ROM To Remove Knox Enrollment Service
For the more tech-savvy users, another method to bypass Knox Enrollment Service is by rooting the Gionee F3 Pro device and flashing a new ROM. This process involves gaining root access to the Gionee F3 Pro device’s operating system, which allows you to modify the software extensively. After rooting, you can flash a new ROM that doesn’t include the Knox software.
However, this method is risky and not recommended for the average user. It will void your warranty and potentially ‘brick’ your device, rendering it unusable. Furthermore, this action could notify your employer of your attempt to remove Knox, which could have professional repercussions. Proceed with this method only if you know the risks and consequences.
Removing Knox Enrollment Service from your phone is feasible but requires careful consideration, especially in a corporate context. Always ensure you have the necessary permissions and understand the risks of modifying your device’s software.
If You Can’t Use the Above Methods
If none of the above methods are feasible, and you find your phone locked or restricted due to Knox, read through the next section. It will provide additional insights on what to do next.
Part 3: How To Bypass a Locked Phone With a Professional Tool
When faced with a locked phone due to Knox security features, and if conventional methods don’t yield results, turning to a third-party tool can be a viable solution. One such tool known for its efficiency in bypassing phone locks is Wondershare Dr.Fone - Screen Unlock.
Wondershare Dr.Fone is a versatile software suite that tackles various smartphone issues, including unlocking screens. Its Screen Unlock feature is useful for bypassing security barriers without requiring extensive technical knowledge. It hosts several features, such as those you need for data recovery, system repairs, and other smartphone services.
Dr.Fone’s Screen Unlock Feature
The Screen Unlock feature in Dr.Fone is specifically designed to bypass screen locks. Often, you can use it for issues such as forgotten passwords or the like. The great thing is that it can also bypass those locks enforced by Knox. You can do all these without causing data loss or significant changes to your device’s system.
![]()
Dr.Fone - Screen Unlock (Android)
The Best UnlockJunky Alternative to Bypass FRP and Solve Your Screen Locks
- Remove all Android screen locks (PIN/pattern/fingerprints/face ID) in minutes.
- Bypass the FRP lock of Samsung without a PIN or Google account.
- Everyone can handle the lock screen without any tech knowledge.
- Provide specific removal solutions to promise good success rate.
4,008,669 people have downloaded it
How To Use Dr.Fone - Screen Unlock
- Step 1: Open Dr.Fone and select the Screen Unlock module under Toolbox. Connect your locked phone to the computer using a USB cable.
- Step 2: On the next pages, select Android > Unlock Android Screen.
- Step 3: Find the brand of your device.
- Step 4: Select Remove without Data Loss.
- Step 5: Enter “000000” to start the process after confirming device details.
- Step 6: Follow the instructions to put your device into Download Mode.
- Step 7: After the process is completed, click Done. Don’t be afraid to retry the process if it doesn’t work.
If you find yourself locked out of your phone due to Knox and unable to use conventional methods to regain access, Wondershare Dr.Fone offers a reliable and user-friendly alternative. Its Screen Unlock feature is designed to bypass such security features effectively, ensuring you can regain phone access with minimal fuss.
You May Also Interested:
Tutorial to Change Android IMEI without Root
8 Safe and Effective Methods to Unlock Your iPhone Without a Passcode
How to Unlock OPPO Phone Without Password?
Conclusion
In this article, you’ve explored the intricacies of the Knox Enrollment Service and the steps to remove or bypass it. Key takeaways include understanding what Knox is and its removal or bypass methods. However, securing authorization from your organization or phone provider is important before proceeding. This precaution is crucial to avoid potential complications.
For those facing a locked phone due to Knox and unable to follow conventional methods, Wondershare Dr.Fone emerges as a reliable solution. Its Screen Unlock feature offers a safe and efficient way to regain access to your device, ensuring you stay connected without compromising security.
Rootjunky APK To Bypass Google FRP Lock For Gionee F3 Pro
Factory Reset Protection (FRP) is a security feature built into Android devices running Android 5.1 Lollipop and later versions. It prevents someone from using your phone after a factory data reset without Google account login credentials. The FRP makes it much less attractive for thieves to steal Android phones, knowing they will need help to access them.
FRP automatically activates when you add a Google account to your Android phone. It links the Gionee F3 Pro device to your account, making it the “trusted owner.” Once activated, FRP becomes embedded in the phone’s system.
While Google FRP is a valuable security feature, it’s vital to acknowledge that there are legitimate situations where bypassing it might be necessary. These instances include forgotten Google account credentials, buying a second-hand device, and device issues. In these cases, tools like RootJunky can help you bypass FRP Lock. We’ll explore how to use RootJunky APK later, but first, let’s define what it is and its role in FRP bypass.

The RootJunky APK is a free Android application also called RootJunky SDL or RootJunky FRP Bypass tool. This app’s primary function is to bypass the Google Account FRP lock on Samsung devices. Rootjunky uses the weaknesses in Android’s setup process to create a new user account or switch existing ones, letting you bypass the FRP and regain control of your phone.
You can complete this process using the app by connecting your phone to a computer through an OTG cable. RootJunky can be helpfu l if you’ve forgotten your Google account password or bought a second-hand phone locked to someone else’s account. However, only use it if you have legitimate reasons to bypass FRP lock, like accessing your device after forgetting your Google account details.

Downloading the RootJunky FRP bypass tool from unofficial sources can introduce malware risks, so stick to trusted sources like the official website. Additionally, when exploring RootJunky, it is vital to keep the following in mind:
- Not all Android devices are susceptible to the methods used by RootJunky. It is necessary to check compatibility with your specific device model and Android version.
- Using FRP bypass tools like RootJunkycan potentially compromise the security of your device. Be cautious and proceed if you fully understand the risks involved.
- Bypassing FRP may involve data loss.
- Download RootJunky FRP bypass APK from a reliable source to minimize the risk of malware or viruses. You can check the APK file from official websites or trusted forums.
- Google constantly updates its security measures, so these tools may not always work effectively.
Part 2: How To Use RootJunky To Bypass Google FRP?
Here are the general steps to use the FRP Bypass APK RootJunky app to bypass Google FRP lock. But remember that specific steps may vary depending on your device and Android version:
- Step 1: On your computer, download the Rootjunky RealTerm program from the official Rootjunky website.

- Step 2: On your phone, download the Rootjunky APK (com.rootjunky.frpbypass-1.0.apk) file from the official website or other reputable sites.

- Step 3: Go to Settings > Security and tap Install unknown apps. Then, enable unknown sources to allow installation of apps from outside the Play Store. Connect your device to a Wi-Fi network.

- Step 4: On your Android phone, open a file explorer app and install the downloaded RootJunky APK file.
- Step 5: Connect your smartphone to your computer using a USB cable.
- Step 6: Launch the Rootjunky RealTerm program on your computer. Under the Display tab, check the Half Duplex option.
- Step 7: On your computer, go to Device Manager > Modems. Locate your device’s port name (e.g., COM3).
- Step 8: On the RealTerm program, enter the correct port number under the Ports tab, then click Change.

Step 9: Click Send to establish a connection. Enter the two commands:
at + creg? \ r \ n
atd1234; \ r \ n
Step 10: Once connected, the Rootjunky APK on your phone will provide on-screen instructions to bypass FRP.
Step 11: If prompted, perform a factory data reset of your device.
While RootJunky offers a free method for FRP bypass, it can be incompatible with your device’s brand, requiring technical knowledge, tedious, and potentially risky. If you are looking for a simpler, safer, and more user-friendly solution, Wondershare Dr.Fone might be a better fit for you. If you want to learn how to use this tool to bypass FRP lock with minimal technical expertise, then keep reading.
Part 3: Easier Tool Than RootJunky APK To Bypass Google FRP
Google FRP adds an extra layer of security after a device reset. However, regaining access to the smartphone can be challenging if you forget your Google account details, forget your lock screen, or just buy a used device. While methods like the FRP RootJunky app exist, using it can be complex or risky.
Consider exploring third-party options like Dr.Fone for a potentially easier and safer FRP bypass solution. Dr.Fone Screen Unlock tool helps remove the Android FRP lock without requiring a PIN or Google Account.
Why Use Dr.Fone - Screen Unlock?
Here are some of the key features of Dr.Fone - Screen Unlock:
- **User-friendly:**Fone boasts an intuitive interface, eliminating the need for technical expertise. Even beginners can navigate the process with ease.
- **Widespread Brand Compatibility:**Fone supports mainstream brands, such as Samsung, Xiaomi, Oppo, Redmi, Realme, and Vivo, catering to a broader user base.
- **Fast and Efficient:**Regain access to your device in minutes without wasting time on tedious procedures.
Step-by-step Guide to Removing FRP Lock With Dr.Fone - Screen Unlock
Ready to leave the hassle of using RootJunky and easily bypass the FRP lock? Download and install Dr.Fone on your computer, then follow these steps to learn how to bypass Google FRP on your device:
- Step 1: Launch Dr.Fone on your computer and connect it to your Android device. Choose Screen Unlock from the Toolbox in the main interface.
- Step 2: Choose Android as your device type. This will take you to the next screen, where you can select Remove Google FRP Lock to proceed.
- Step 3: Select your device’s brand from the list and click Start to continue.

Note:
The next steps may vary depending on the brand you selected.
- Step 4: Select the OS version of your device and click Start to continue.

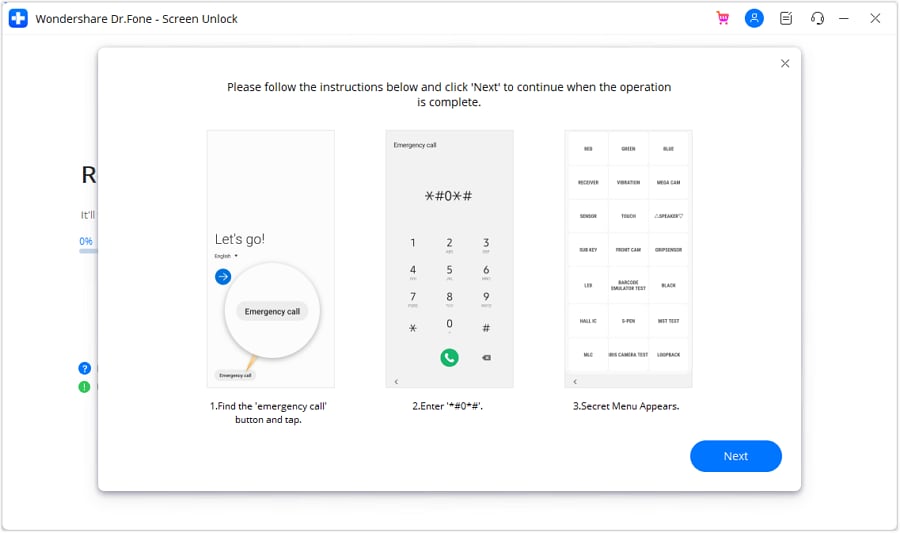
- Step 5: Access the secret menu on your phone using the on-screen instructions, then click Next to proceed to the next step.
- Step 6: When your Samsung prompts you to activate USB debugging, tap Allow. Then, on your computer screen, click Authorized to confirm.

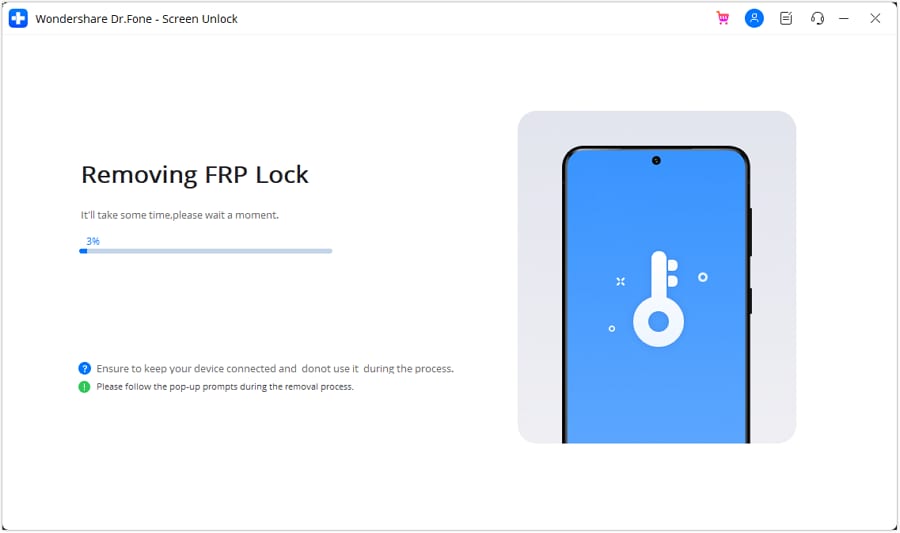
- Step 7: You will see the FRP lock being bypassed on your Android device on the next screen.
- Step 8: Click Done if the FRP lock removal was successful, otherwise, click Try Again to repeat the process.

That’s it! With Dr.Fone Screen Unlock, you can easily bypass Google FRP and regain access to your Android device, leaving the complexities of RootJunky behind.
Tips: Are you searching for a powerful FRP bypass tool? No worries as Dr.Fone is here to help you. Download it and start a seamless unlock experience!
Conclusion
Both RootJunky and Dr.Fone offer options for you to regain control of phones with Google FRP lock. FRP Bypass RootJunky tool excels with its free-to-use approach, perfect for tech-savvy users comfortable with APK installations. While requiring a paid subscription, Dr. Fone provides pre-rooted firmware installations and broader device compatibility, which is ideal for those seeking a more streamlined but supported experience.
The best choice boils down to your personal needs and budget. Remember, FRP bypass should only be utilized by rightful owners facing genuine lockouts. When used responsibly, these tools can help you access your phone after a factory reset even without your Google account credentials. Choose the tool that best fits your needs and proceed with caution. Use these tools responsibly and regain access to your device the right way.
Also read:
- [Updated] 2024 Approved Capture Every Moment Essential Ways for Google Meet Recordings
- [Updated] 2024 Approved Top 5 Tools for Viewing Insta Stories Unseen
- [Updated] Vertigo Ventures with GoPro Karma Technology for 2024
- 2024 Approved PixelPilot's Perspective Leading Screen Recording Tools of the Year
- 2024 Approved Thrifty PC Frame Buffer Tools
- Best Ways on How to Unlock/Bypass/Swipe/Remove Vivo T2 5G Fingerprint Lock
- Exploring FBCTA and Its Broader Effects
- How to Unlock Samsung Galaxy A24 PIN Code/Pattern Lock/Password
- In 2024, Complete Review & Guide to Techeligible FRP Bypass and More For Vivo Y36
- In 2024, Mastering Android Device Manager The Ultimate Guide to Unlocking Your Vivo X90S Device
- In 2024, Unleash Your Full Potential Top Ideas for Productive Podcast Sessions
- In 2024, Unveiling FB's Topest Latest Perks
- Pokemon Go Error 12 Failed to Detect Location On OnePlus Ace 2V? | Dr.fone
- Title: In 2024, A Complete Guide To OEM Unlocking on Gionee
- Author: Peter
- Created at : 2024-11-24 21:39:41
- Updated at : 2024-11-25 18:41:15
- Link: https://android-unlock.techidaily.com/in-2024-a-complete-guide-to-oem-unlocking-on-gionee-by-drfone-android/
- License: This work is licensed under CC BY-NC-SA 4.0.