
How to Use Google Assistant on Your Lock Screen Of Samsung Galaxy A14 5G Phone
How to Use Google Assistant on Your Lock Screen Of Samsung Galaxy A14 5G Phone
Android has undergone numerous changes to enhance user experience and security. One notable feature that was once present was the ability to unlock phones with voice Google Assistant. However, Google Assistant has removed this feature across all versions since 2021.
While this voice-unlocking feature is no longer available, there are still many things you can do with Google Assistant, even when the Samsung Galaxy A14 5G device is locked. This tool brings an added layer of convenience to your smartphone experience.
Let’s dig deeper into how you can use Google Assistant on the lock screen and make the most out of this tool in the following article.

Part 1. What You Can Do With Voice Google Assistant
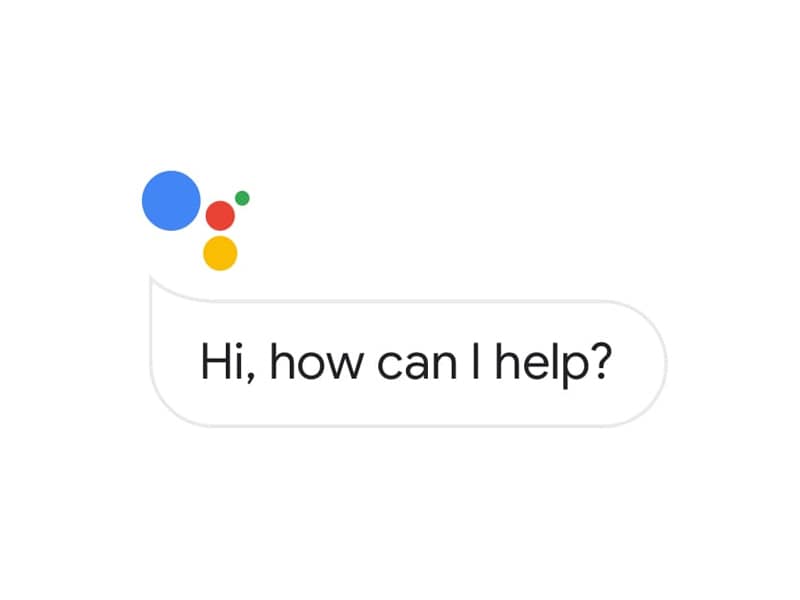
Google Assistant is a virtual assistant powered by artificial intelligence (AI) developed by tech giant Google. This application is readily available on most recent mobile phone models, especially those operating on Android 6.0 and newer versions.
Although you can no longer use the Google Assistant unlock feature, you can still perform a myriad of tasks using Google Assistant. These include:
- Getting the weather
- Setting alarms
- Playing music
- Sending texts
- Making a call
- Asking Google for information, etc.
Enable Google Assistant on Lock Screen: A Step-by-Step Guide
Now that you’re eager to try the potential of Google Assistant on your lock screen, let’s walk through the simple steps on how to enable this tool.
- Step 1: Open Google Assistant:
Look for “Google Assistant” and open the app.
- Step 2: Ask Google Assistant to open the settings.
You can ask, “Hey Google, open the Google Assistant settings,” and it will show you the Google Assistant settings.
- Step 3: Allow Google Assistant on the lock screen.
Locate the “Lock Screen” settings and make sure to switch on “Assistant responses on lock screen.”


Part 2. How To Use Google Assistant on Lock Screen
After you’ve successfully enabled Google Assistant on your lock screen, let’s see how to use Google Assistant to do certain tasks more efficiently and hands-free.
- Step 1: Wake Up Google Assistant
Start by waking up Google Assistant. You can do this by saying the wake word “Hey Google” or “OK Google.” If it doesn’t work, you can long-press the home button or use any dedicated gesture to activate Google Assistant.
- Step 2: Issue a Voice Command
Once Google Assistant is active, issue a voice command related to the task you want to perform. For example:
“Hey Google, what’s the weather today?”
“OK Google, set an alarm for 5 PM.”
“Hey Google, play my Spotify playlist.”
When you can still unlock with Google Assistant, you can ask it to “unlock my phone” or use any similar command.
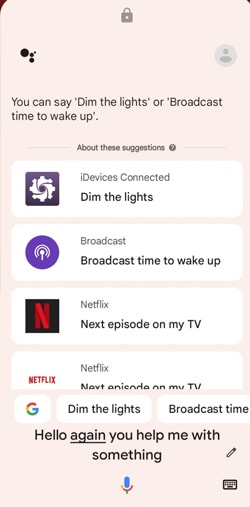
- Step 3: Interact with Responses
Google Assistant will then provide spoken responses and display relevant information on the lock screen. For instance, if you ask for the weather, it might verbally provide the current conditions and display a brief summary on your lock screen.

Part 3. Common Problems When Using Google Assistant
Unable to use Google Assistant to unlock phone is not the only drawback that users may have encountered in recent changes. Although Google Assistant on the lock screen presents a revolutionary way to interact with your phone, like any technology, it also comes with its share of challenges. Some of the common problems when using Google Assistant are:
- Misunderstandings and misinterpretations
One prevalent issue users encounter is Google Assistant misunderstanding or misinterpreting voice commands. This can be influenced by factors such as background noise, accent variations, or pronunciation differences.
- Limited context understanding
While Google Assistant is adept at understanding individual commands, it may struggle with complex, multi-step requests that rely heavily on context. Break down your tasks into simpler commands to enhance comprehension and execute it more accurately.
- Inability to execute certain tasks
Google Assistant’s capabilities are extensive, but there are instances where it may struggle to execute specific tasks. For example, it can’t execute tasks that involve interacting with certain third-party applications or services. You can’t also unlock phone with voice Google Assistant.

Tips to Make Voice Google Assistant Recognize Your Commands
One of the most infuriating problems with voice Google Assistant is that users often encounter difficulties in having their commands accurately recognized. To enhance the accuracy of voice recognition with Google Assistant, you can consider implementing the following tips:
- Speak Clearly and Naturally
Make sure that you speak in a clear and natural manner. Avoid mumbling or speaking too quickly. Enunciate your words, giving Google Assistant a better chance to interpret your commands accurately.
- Use Simple and Direct Phrases
Keep your commands simple and direct. Avoid unnecessary elaboration or complex sentence structures. Google Assistant is more likely to understand straightforward commands.
- Check Your Microphone
Ensure that your device’s microphone is in good working condition. Dirt or debris on your phone’s microphone can affect its performance. Clean the microphone area and try again.
- Quiet Environment
Background noise can interfere with voice recognition. Try to issue commands in a quiet environment to minimize any potential confusion caused by external sounds.

Part 4. How to Unlock Android Phone Screen Without Passcode
Now, you know that you can’t unlock phone via Google Assistant anymore. But what if you accidentally forget your phone’s passcode? Is there a reliable method to regain access to your Android device without the passcode?
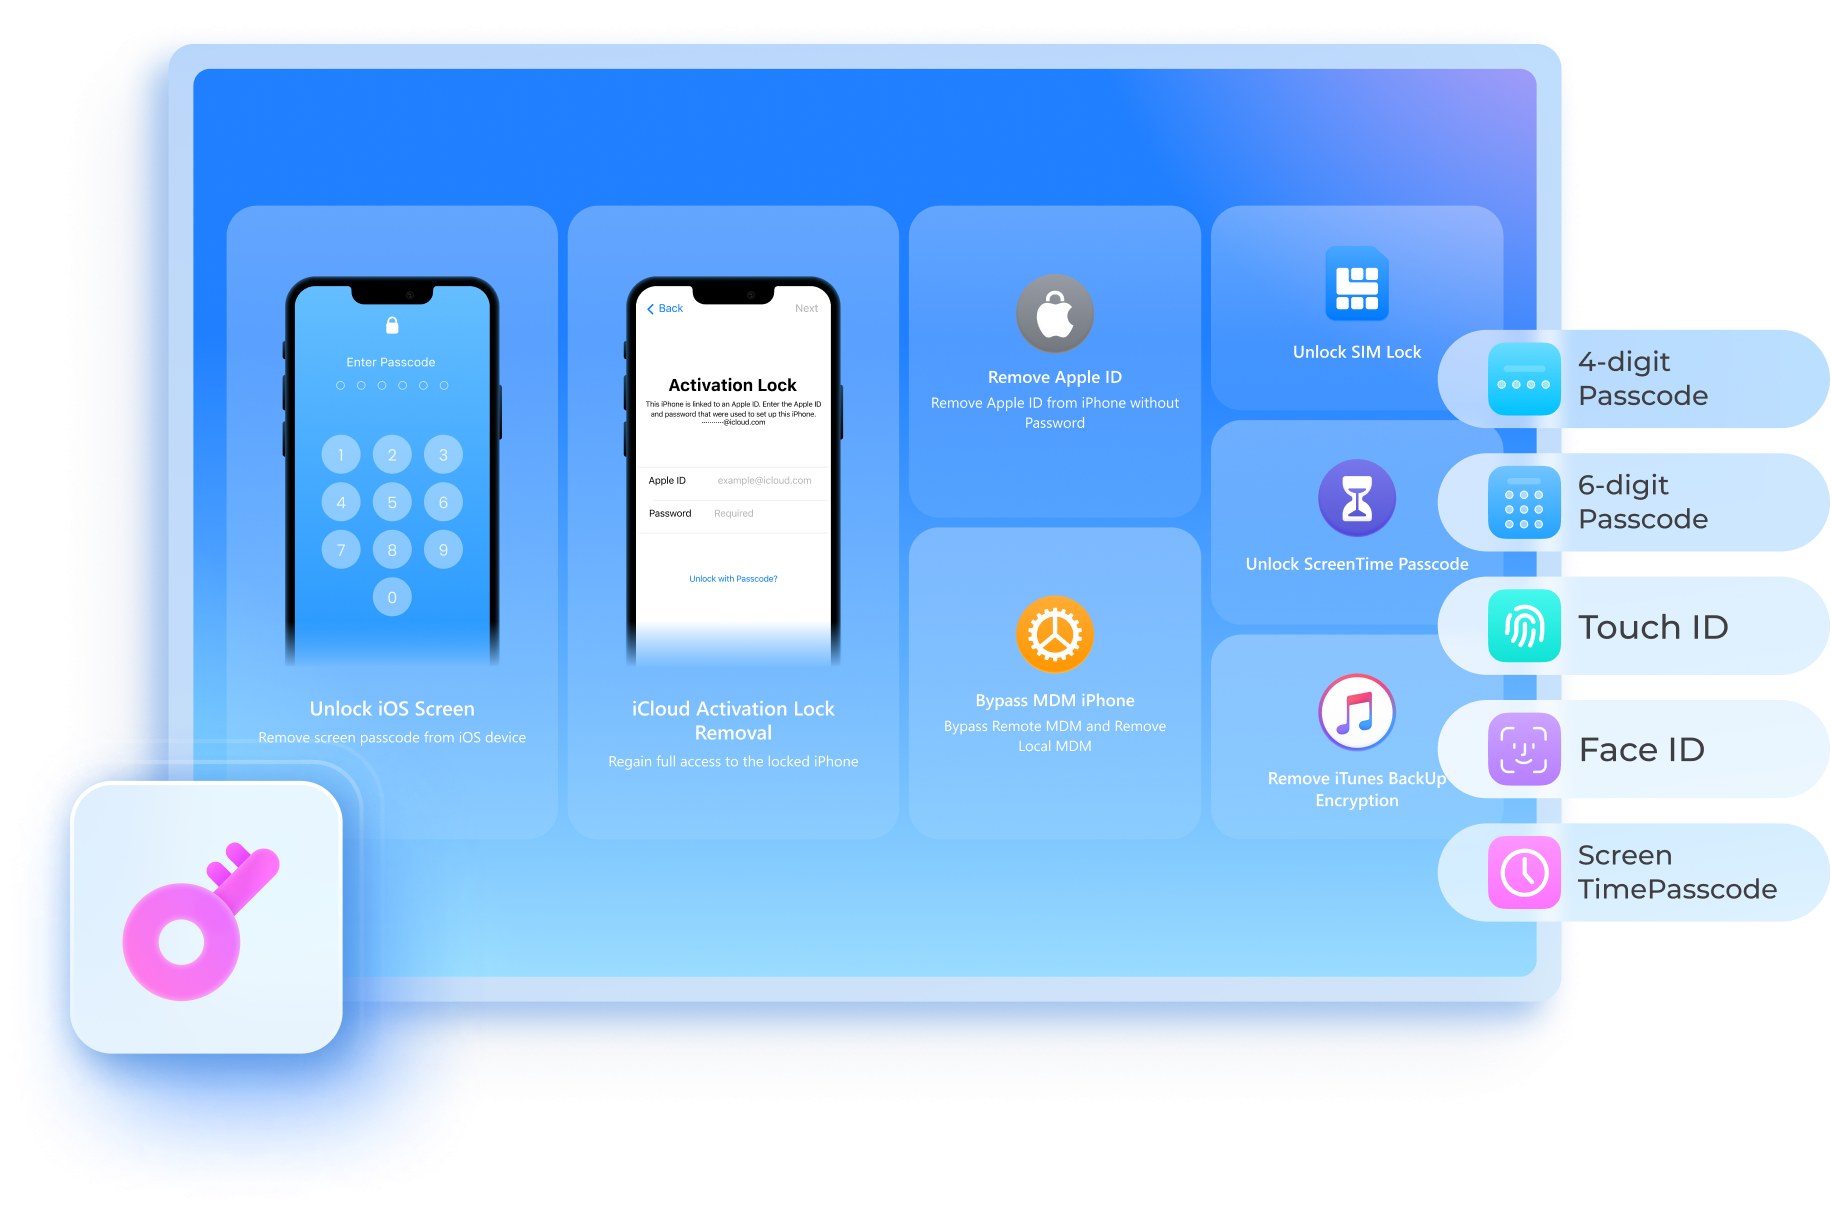
Fortunately, Wondershare Dr.Fone offers a straightforward solution for precisely such scenarios. It provides a simple and effective way to unlock your Android phone screen through Dr.Fone - Screen Unlock when the screen lock is forgotten or becomes inaccessible.
![]()
Dr.Fone - Screen Unlock (Android)
The Best UnlockJunky Alternative to Solve Your Screen Locks
- Completely unlinked from the previous Google account, it won’t be traced or blocked by it anymore.
- Remove all Android screen locks (PIN/pattern/fingerprints/face ID) in minutes.
- Compatiable with various Android models.
- Provide specific removal solutions to promise good success rate.
4,008,670 people have downloaded it
If you are wondering how to unlock your Android phone screen without a passcode with Dr.Fone – Screen Unlock, follow the steps below.
- Step 1: Launch the Screen Unlock Tool
Open the latest version of Wondershare Dr.Fone on your computer and connect your phone device using a USB cable. Once connected, navigate to the Toolbox > Screen Unlock to access Dr.Fone – Screen Unlock tool.

- Step 2: Select Android for your device type.
As the Dr.Fone Screen Unlock tool supports both Android and iOS, you will need to indicate the specific device you are using. Opt for the Android option if you are unlocking an Android device. Then, continue to choose “Unlock Android Screen” on the next screen.

- Step 3: Remove Screen Lock Without Data Loss
- In this step, you will be directed to select your device brand. Choose the Android device brand you are using and opt for “Remove without Data Loss” if you don’t want to lose your data.

- Step 4: Define Device Details
Next, make sure to check and confirm the Brand, Device Name, and Device Model to unlock your Android screen. Tick the checkmark that says you agree with the warning and are ready to proceed. Click “Next” to unlock your screen.

- Step 5: Confirm to Unlock Screen
Type “000000” continue by clicking Confirm.

- Step 6: Put Android in Download Mode
Dr.Fone will then guide you to put your Android device into Download Mode according to the model you have identified. After you have followed the instructions, Dr.Fone will automatically lead to the next screen to proceed the unlocking process.

After that, you can monitor the progress and wait for a few minutes until it shows “Unlocked successfully.”
You May Also Interested:
Unlocking Your Realme Phone Made Easy: Step-by-Step Guide
8 Safe and Effective Methods to Unlock Your iPhone Without a Passcode
Complete Guide to Unlock Mi Account Without Password In 2024
Conclusion
Google Assistant is a versatile virtual assistant that is designed to help you with a wide range of tasks and make your daily life more convenient. Accessible on most modern Android devices, it enables users to perform several tasks through voice commands.
However, if you are looking for ways to unlock phone with Google Assistant, this function is no longer available. Google Assistant unlock feature has been discontinued since 2021. But in case you’ve forgotten the screen lock passcode, you can use Wondershare Dr.Fone Screen Unlock tool to regain access to your Android phone. This tool facilitates the unlocking process without data loss, featuring a user-friendly learning curve.
How to Unlock Samsung Galaxy A14 5G Phone Pattern Lock without Factory Reset
Have you been locked out of your Android device and can’t seem to recall its pattern? Do you wish to learn how to unlock an Android phone pattern lock without a factory reset to access someone else’s device? If your answer is “yes”, then you have come to the right place. Lots of readers these days ask us about a foolproof way to learn how to unlock an Android phone pattern lock without a factory reset. To help you, we have decided to come up with an in-depth guide on the same. Read on and learn in 4 different ways.
Part 1: Unlock the Android Phone Pattern with Lock Screen Removal Tool
If you are locked out of the phone because forgot pattern lock, and fail to enter the phone after many times try with the word “phone has been locked”. No need to worry, there are many solutions to fix the issue. And Dr.Fone –Screen Unlock (Android) can be your first saver in the dilemma. It is a highly efficient pattern lock removal tool for over 2000+ mainstream android phones, like Samsung, Oneplus, Huawei, Xiaomi, Pixel, etc.
Except for pattern locks unlocking, it works for the PIN, fingerprints, Face ID, and Google FRP bypassing as well. It’s helpful even if you don’t know the OS version of your devices. So, now follow the below steps to unlock the pattern and regain access to your locked phone in minutes.
![]()
Dr.Fone - Screen Unlock (Android)
Get into Locked Phones within Minutes
- Pattern, PIN, password, fingerprints & face screen lock can all be unlocked.
- Easily remove the lock screen; No need to root your device.
- Everybody can handle it without any technical background.
- Provide specific removal solutions to promise good success rate
4,008,669 people have downloaded it
Step 1. Download Dr.Fone –Screen Unlock on your PC or Mac.

Step 2. Connect your Android phone to the computer using a USB cable. Next, click the “Unlock Android Screen“ from the interface.
Step 3. Choose the model version according to your android phone. For people who don’t know the operating system version, tick the circle “I can’t find my device model from the list above”.

Step 4. Enter and download the recovery package as the instructions show on the PC or Mac.
Step 5. It will be finished when the recovery package downloading is completed. Then, click “Remove Now“.

Once the whole progress is over, you can access your Android device without entering any password and view all your data on the Samsung Galaxy A14 5G device with no limits.
 safe & secure
Part 2: How to unlock the Android phone pattern lock without resetting using a Google account?
If you have an older Android device, then you can simply move past its lock by taking the assistance of your Google account. All you need is access to the same Google account that is linked to your device. Though, this technique will only work on devices running on Android 4.4 and earlier versions. To learn how to remove pattern lock on Android without a factory reset, follow these steps:
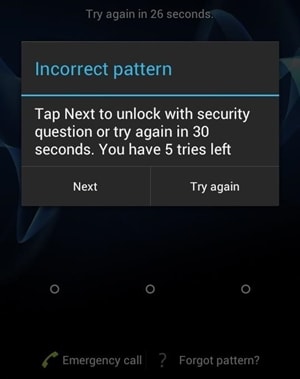
Step 1. Simply provide any pattern on the Samsung Galaxy A14 5G device. Since the pattern would be wrong, you will get the following prompt.
Step 2. Tap on the “Forgot Pattern” option located at the bottom of the screen.

Step 3. This will provide different ways to access your phone. Select the Google Account details and tap on the “Next” option.
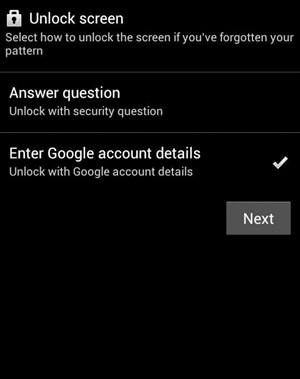
Step 4. Sign in using the credentials of the Google account that is linked to your device.

Step 5. Great! Now you can simply provide (and confirm) the new pattern for your device.
After following these instructions, you would be able to learn how to unlock an Android phone pattern lock without factory reset or causing any harm to your device.

Part 3: How to unlock Android phone password without factory reset - Android Device Manager
The Android Device Manager, which is now known as “Find My Device” is one of the best ways to locate your Android device remotely. Besides that, you can also use the interface to ring your device or change its lock from anywhere. All you need to do is access its interface from any other device and log-in with your Google credentials. You can follow these steps to learn how to unlock the Android pattern lock without factory reset.
Step 1. Log in to Android Device Manager (Find My Device) using your Google credentials.
Android Device Manager website: https://www.google.com/android/find .
Step 2. From the interface, you can select the Android device that is linked to your Google account.
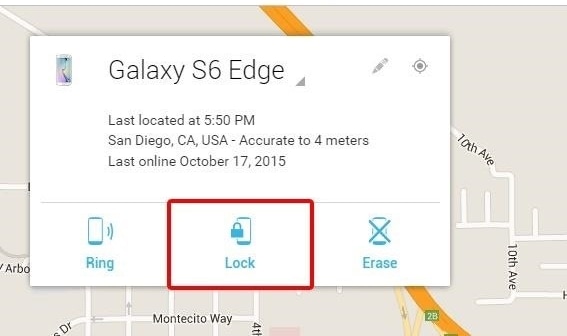
Step 3. You will get options to ring it, lock it, or erase it. Select the “Lock” option to proceed.
Step 4. This will launch a new pop-up window. From here, you can provide a new lock screen password, confirm it, and also set an optional recovery message or phone number (in case your device has been lost).
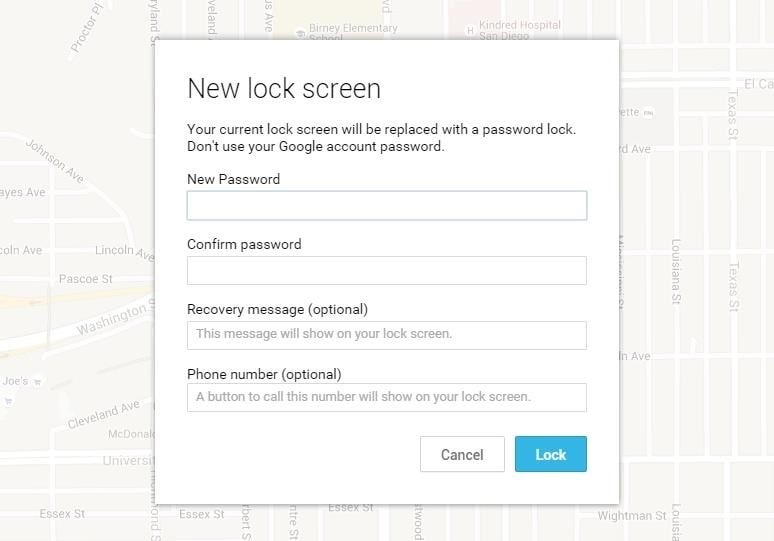
Step 5. Confirm your choice and save it to remotely change the lock screen password on your device.
In the end, you would be able to learn how to unlock an Android phone pattern lock without a factory reset after following these above-mentioned steps.

Part 4: How to unlock Android phone pattern lock without factory reset using ADB?
By using Android Debug Bridge (ADB), you can also learn how to unlock the Android pattern lock without a factory reset. Though, this is a more time-consuming and complicated process than other alternatives like Dr.Fone. Nevertheless, you can learn how to remove pattern lock on Android without factory reset using ADB with these instructions:
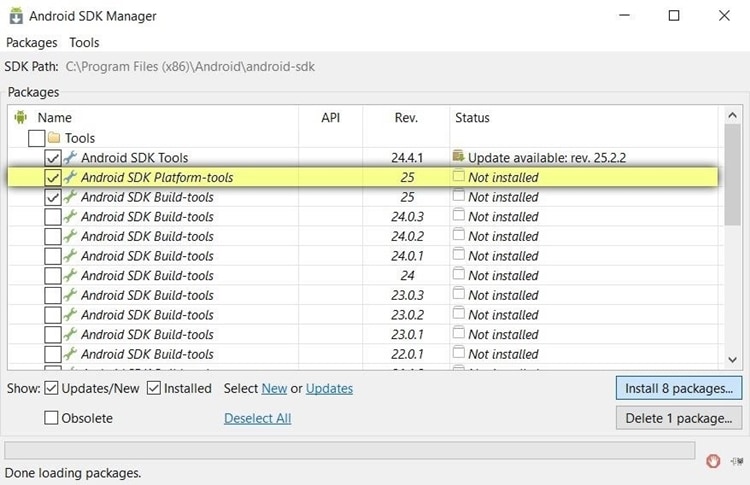
Step 1. To start with, you need to download ADB on your system. This can be done by visiting the Android Developer’s website https://developer.android.com/studio/command-line/adb.html .
Step 2. Afterward, launch the installer and download all the essential packages on your system.
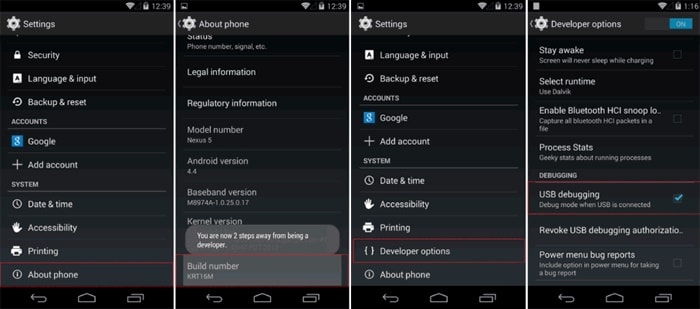
Step 3. Now, connect your phone to the system. Make sure that its USB debugging feature is on.
Step 4. To do this, go to Settings > About Phone and tap the “Build Number” option seven consecutive times. This will enable the Developer Options on your device.
Step 5. Go to Settings > Developer Options and turn on the feature of USB debugging.
Step 6. After connecting your device to the system, launch the command prompt in the installation directory on your respective ADB.
Step 7. Type the command “ADB shell rm /data/system/gesture.key” and press enter.
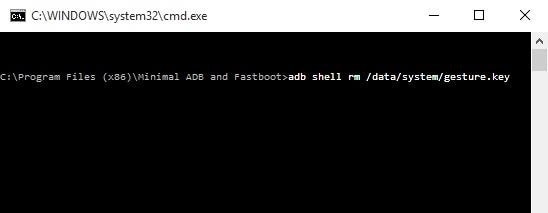
Step 8. Simply restart your device and access it the usual way, without any lock screen pattern or pin.
Conclusion
Now when you know how to unlock the Android phone pattern lock without a factory reset, you can easily access your device in a trouble-free way. Out of all the provided options, Dr.Fone - Screen Unlock (Android) is the best alternative. It provides a fast, secure, and reliable way to unlock your device without causing any harm or removing its content. Go ahead and give it a try and share these solutions with your friends and family as well.
How To Track IMEI Number Of Samsung Galaxy A14 5G Through Google Earth?
When losing your phone, having a reliable tool at your fingertips can make all the difference. That tool is IMEI tracking, your secret weapon for locating your lost or stolen device. IMEI is a unique number that every mobile device possesses. It’s like a fingerprint for your phone.
Now, the question is, is it possible to track an IMEI number through Google Earth? This question has sparked much debate on the internet, so this article aims to find it out. Keep reading and learn the secrets of Google Earth IMEI trackers.
Part 1: How To Track Your Samsung Galaxy A14 5G on Google Earth
This Google Maps IMEI number tracking issue has caused quite a buzz and controversy on the internet. It has raised many concerns regarding the safety and privacy of every smartphone user. To tell you the truth, Google Earth lacks IMEI location data and does not provide such capabilities. Thus, there is no truth in tracking IMEI numbers through Google Earth.
However, if you have access to a cell phone’s GPS coordinates or the location of a cell tower to which it is linked, you can use Google Earth to follow its location.
How To Locate a Smartphone Using Google Earth
Many current smartphones include GPS receivers that allow them to pinpoint their exact location. If you know the phone’s GPS coordinates, you can plug them into Google Earth to see where it is on the map.
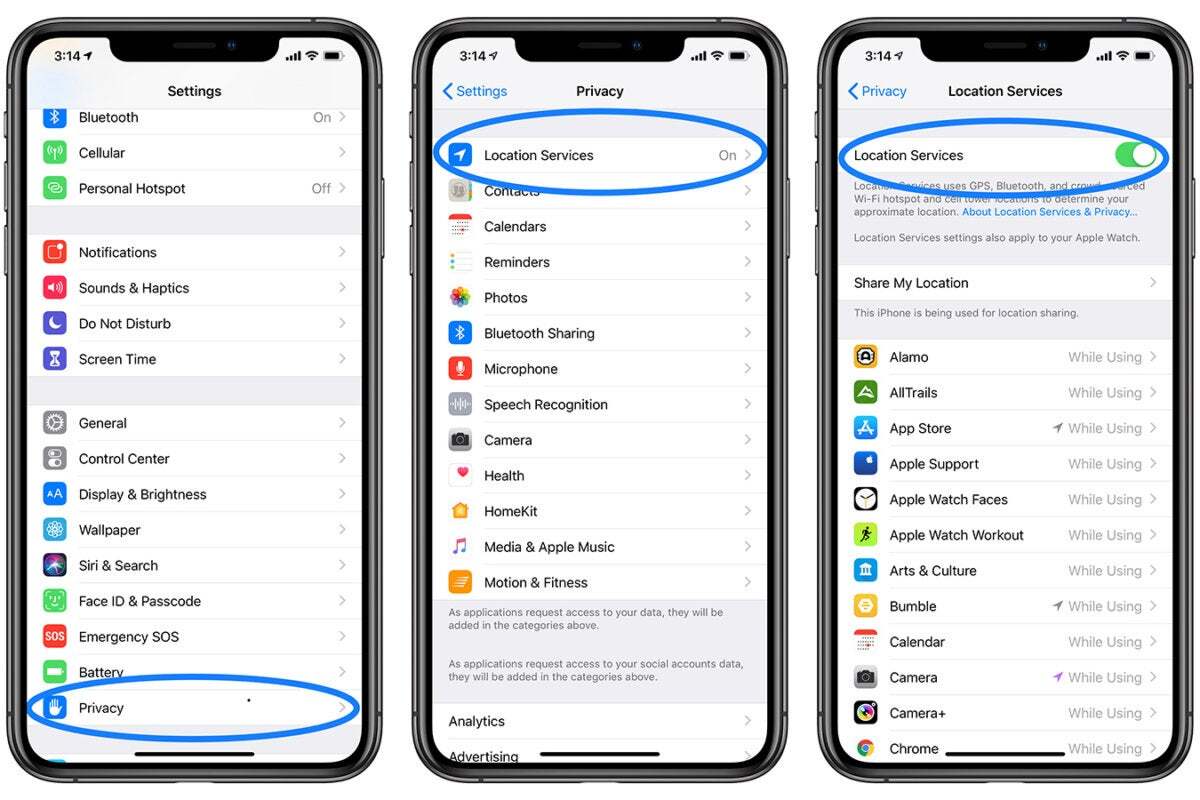
- Step 1: This process won’t be possible if your location services are not enabled on your phone. To do this, navigate to Settings, then Location on Android, and Settings > Privacy > Location Services on iOS.
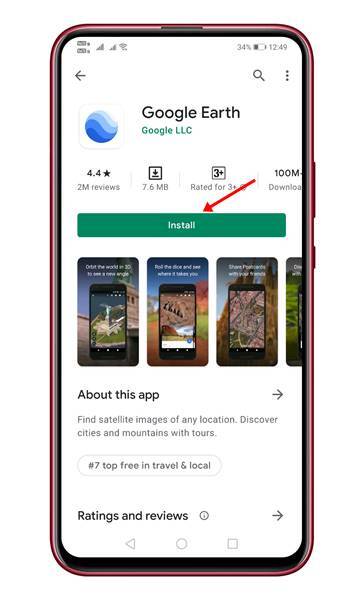
- Step 2: Google Earth can be downloaded and installed on your computer or mobile device. It works with Windows, macOS, Android, and iOS. Download it from your device’s Google Earth website or the app store.
- Step 3: Sign in to Google Earth using the Google Account linked to the phone you want to track. This step is required to acquire location data and monitor IMEI numbers using Google Earth.
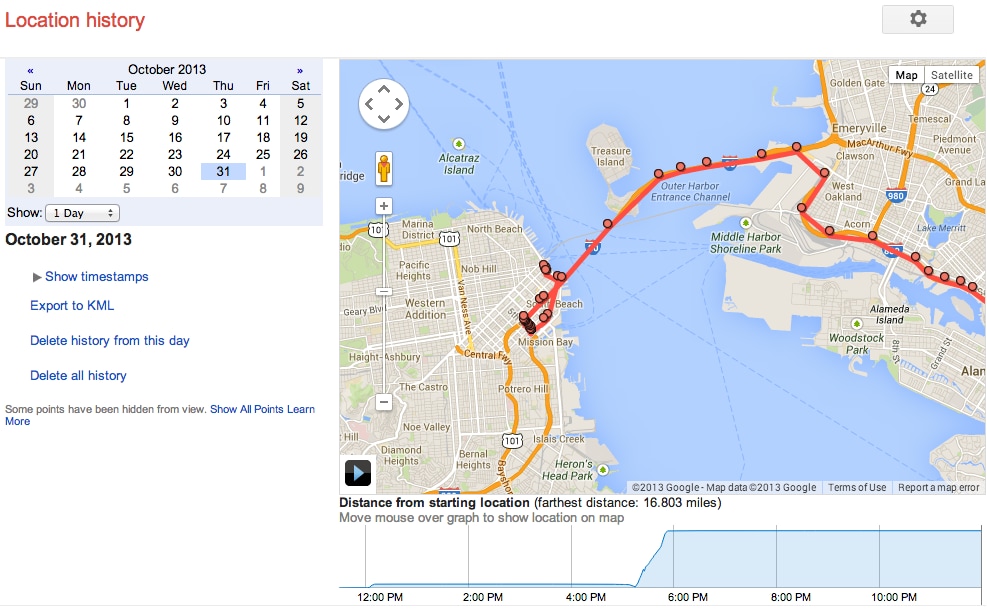
- Step 4: Launch Google Earth on your computer or mobile device, then select Your timeline from the Google Maps menu. The operation will take you to the Google Maps Timeline page.
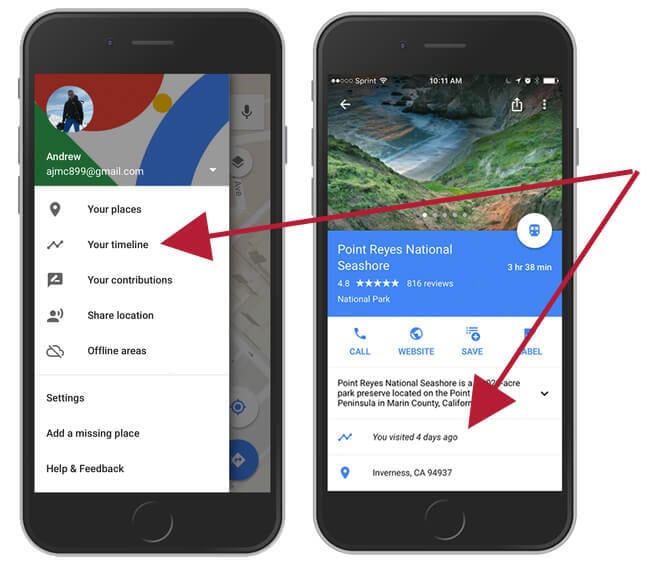
- Step 5: Select the day you wish to see the phone’s location history. Choose the Samsung Galaxy A14 5G device you want to track from the dropdown menu if you have numerous devices linked to the same account. The timeline displays the selected device’s location history for the set date. Examine the locations visited, the routes taken, and the time spent at each spot. For further information, select a certain location or time.
Note: Google Earth does not support real-time location tracking by default. You can use the Find My Device function on Android or Find My on iOS instead if you want to track your phone’s real-time location.
Part 2: Google Earth Alternatives: Track Phone Using IMEI Number
Now that you know the truth behind tracking an IMEI number through Google Earth, let’s talk about other ways to track your phone using your IMEI number. This section will discuss some of your other options when it comes to IMEI number location tracking.
Parental Control Software
### Method 1: Using a Third-Party AppIf you have the IMEI number of the stolen device, you can track the phone using IMEI for free utilizing various tools available online.
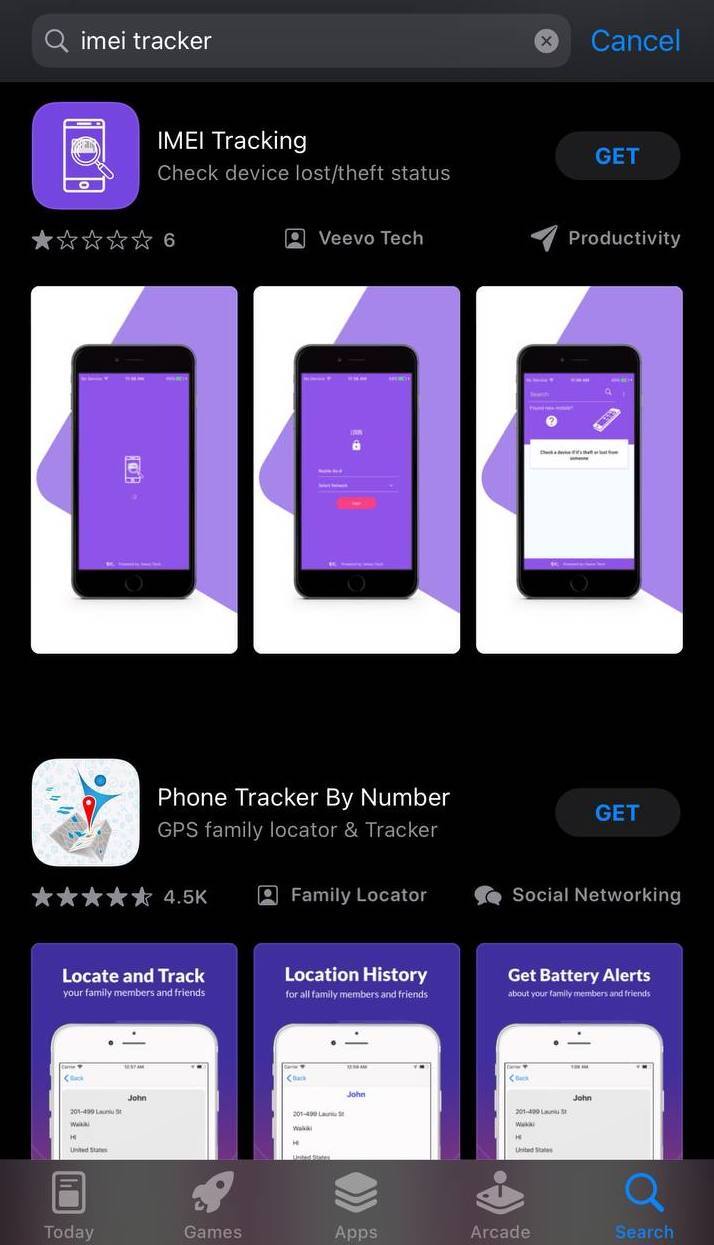
- Step 1: In the app store, search for “IMEI tracker” and download the IMEI tracking app you wish to install on your phone.
- Step 2: Open the app and follow the in-app guide on how to use it.
Note: Most of the apps require authorization access to your phone. Some also provide a feature where you may send an SMS or a command to get the lost phone’s location.
Method 2: Online IMEI Tracking
In certain situations, an online platform is preferable to a mobile app. For your convenience, a free online platform for tracking a phone using its IMEI number is featured below:
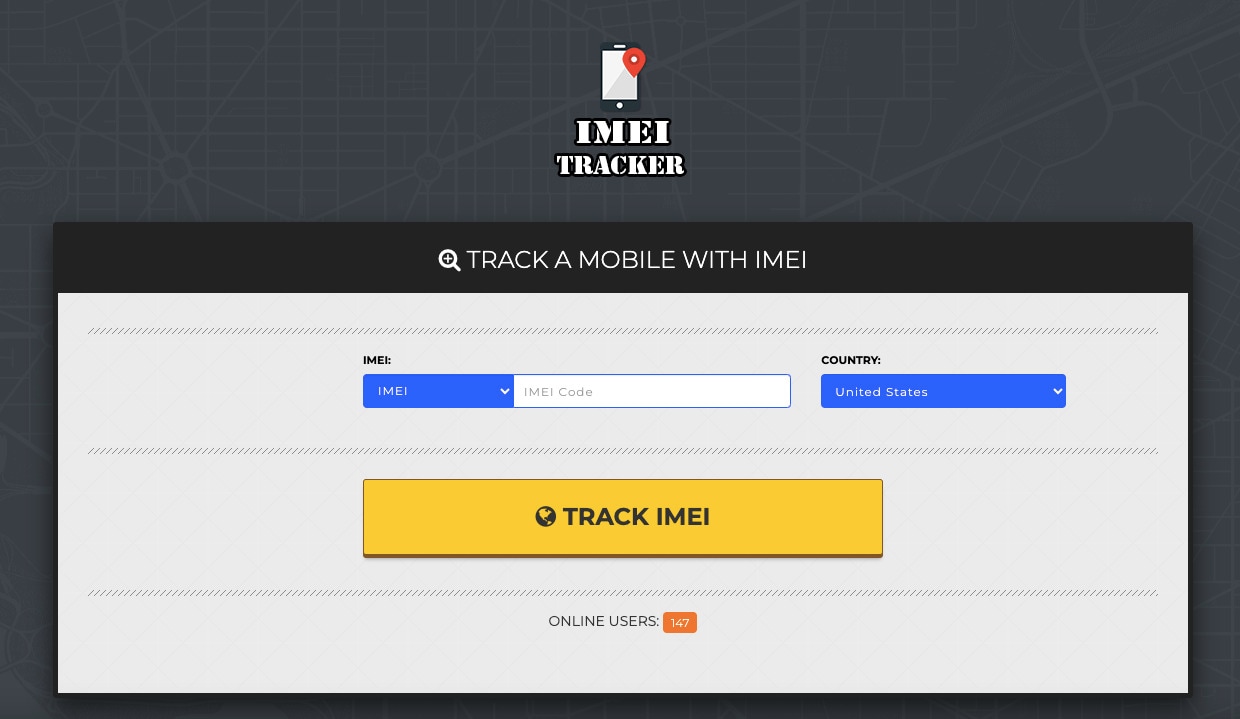
IMEI TRACKER
The online IMEI TRACKER is simple to use. After searching an IMEI tracker in Google and opening its website, please enter a valid IMEI code in its search bar and specify the country where your cell phone was first registered. After that, you have to wait for a few moments, and then you may view the phone’s location status and determine whether it is lost or stolen.
Pros and Cons of IMEI Trackers: Apps and Online Platforms
Now that you know there are still methods to track a phone using an IMEI number, it’s also important to weigh their pros and cons. See the list presented below:
Pros
Check out the advantages of using IMEI trackers below:
- **Lost or Stolen Device Recovery.**The primary benefit of an IMEI tracker is its ability to help locate a lost or stolen mobile device. That can be crucial for recovering your valuable device.
- **No Need for Special Apps.**Unlike many other tracking methods, IMEI tracking doesn’t require any special apps or software to be installed on the Samsung Galaxy A14 5G device you want to track. It relies on the unique IMEI number of the Samsung Galaxy A14 5G device.
- IMEI Tracker is compatible with many mobile devices, including smartphones and feature phones. It’s not limited to a specific operating system or brand.
Cons
Below are the drawbacks of using IMEI trackers:
- **Privacy Concerns.**IMEI tracking can raise privacy concerns, as it involves tracking the location of a mobile device. It’s essential to use this technology responsibly and only for legitimate purposes.
- **Internet and Network Dependency.**IMEI tracking depends on the Samsung Galaxy A14 5G device being connected to the internet or a mobile network. If the Samsung Galaxy A14 5G device is turned off, in airplane mode, or disconnected, tracking may be impossible.
- **Inaccuracies in Remote Areas.**IMEI tracking can be less accurate or even unavailable in remote or rural areas with poor network coverage.
In summary, an IMEI tracker can be a valuable tool for locating lost or stolen mobile devices with its location accuracy and compatibility with various devices. However, it comes with limitations related to privacy and network dependency.
Bonus: An Effective Method for Other iPhone Issues Like Locked Screens
In the previous sections, this article delved into IMEI tracking, which helps you accurately locate your lost or stolen phone. However, imagine this scenario: you’ve found your long-lost iPhone, but there’s a problem. You can’t remember the password, PIN, or pattern to unlock it. So this time, let’s go over one of the most common issues smartphone owners encounter: being locked out of their devices.
Introducing Wondershare Dr.Fone – Screen Unlock (iOS): Your iPhone Savior
There are numerous scenarios where one may forget the passcode on their iOS device. While many people dismiss their phones as useless, there are ways to unlock iPhones correctly. And that’s where Dr.Fone - Screen Unlock (iOS) comes to the rescue. It’s like the locksmith for your phone’s digital lock.
Why Dr.Fone - Screen Unlock Is Your Go-To Solution
Let’s discuss why Dr.Fone - Screen Unlock is a game-changer in unlocking phone, especially when using your IMEI number.
- **User-Friendly Interface.**Fone - Screen Unlock boasts an interface designed with you in mind. You don’t need to be a tech guru to use it. The steps are straightforward, making the whole process hassle-free.
- **Wide Compatibility.**One of the best things about Dr.Fone - Screen Unlock is its compatibility with various mobile devices. It doesn’t matter if you’re using an Android or iOS device; this tool has you covered. It’s like having a universal key to open many locks.
- **Safe and Secure.**Security is a top priority when it comes to your phone. Dr.Fone - Screen Unlock ensures that your data remains safe during unlocking. Your personal information won’t be compromised.

Step-by-Step Guide
Now, let’s dive into how to use Dr.Fone - Screen Unlock to unlock your phone easily :
- Step 1: After downloading and installing Wondershare Dr.Fone on your PC, click Toolbox, click Screen Unlock, then choose iOS. In the window that appears, click the Unlock iOS Screen button.


- Step 2: On the next screen, select Start to begin the unlocking procedure for the iOS device. Make sure that your device’s battery levels are enough.
- Step 3: After that, you should set your iDevice into Recovery Mode. Follow the on-screen instructions to put your iDevice into the appropriate mode for your model. If Recovery Mode does not work, click the Try DFU Mode button at the bottom to access the instructions for entering the iDevice into DFU mode.

- Step 4: After the user successfully enters their iDevice into Recovery Mode, the platform automatically recognizes the Device Model and shows it in the appropriate section. Modify the model and select the System Version to meet your needs if necessary. After that, select Start to begin unlocking your device’s screen.

- Step 5: The following screen reveals the status of the iOS firmware download on the platform. If you want to stop the procedure, click the Stop button. In cases when the iOS firmware is downloading slowly on the platform, utilize the Copy button to copy the URL for manually downloading the iOS firmware.
- Step 6: After successfully downloading the iOS firmware, it is confirmed and displayed on the next screen. Continue by clicking the Unlock Now button to begin the unlocking procedure.
- Step 7: A prompt window displays on the screen, asking for procedure confirmation. Enter the indicated code and tap Unlock to proceed with the final result.

- Step 8: The next screen displays the unlocking iOS device’s progress bar. Keep in mind that the Samsung Galaxy A14 5G device must be connected at all times; otherwise, it will brick.
- Step 9: Once the iDevice has been successfully unlocked, click the Done button to complete the process. If your iDevice is still locked, click Try Again to restart the process.

Conclusion
This article explored the incredible world of IMEI tracking, a powerful tool for locating lost or stolen phones. You’ve learned that your IMEI number is capable of helping you pinpoint your device’s location, but tracking IMEI numbers through Google Earth is impossible.
But that’s not all. This article also introduced and divulged an amazing and reliable tool for unlocking an iPhone. So, the next time you’re in a tight spot with a locked screen, remember that Dr.Fone - Screen Unlock (iOS) is the best software you should get your hands on.
- Title: How to Use Google Assistant on Your Lock Screen Of Samsung Galaxy A14 5G Phone
- Author: Peter
- Created at : 2024-07-16 09:07:27
- Updated at : 2024-07-17 09:07:27
- Link: https://android-unlock.techidaily.com/how-to-use-google-assistant-on-your-lock-screen-of-samsung-galaxy-a14-5g-phone-by-drfone-android/
- License: This work is licensed under CC BY-NC-SA 4.0.