
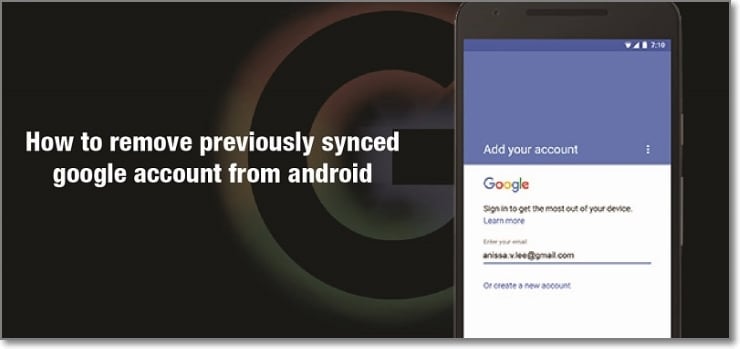
How to Remove a Previously Synced Google Account from Your Lava Agni 2 5G
How to Remove a Previously Synced Google Account from Your Lava Agni 2 5G
The setting up process of a new Android phone requires you to add a Google account that saves all activities and data of the phone like search history, details of online shipping, play store purchases, and more. Once the account is set, it cannot be changed till you delete everything from your phone. Moreover, with the introduction of FRP lock, even a factory reset will not remove the synced Google account.
So, now what if you want to sell your phone or have purchased a second-hand device that is still associated with the previous owner’s Google account? No, worries as there are workarounds available that will help you remove your previously synced google account from your Android device.
Keep reading to know more in detail about how to bypass previously synced google accounts.
Heres a full guide on how to remove google account from android, click to know more!
Part 1: Remove Previously Synced Google Account from Android Phone Without Phone Reset
In this part, we will discuss the methods that can be used for removing the previously synced account from your Android phone without a phone reset.
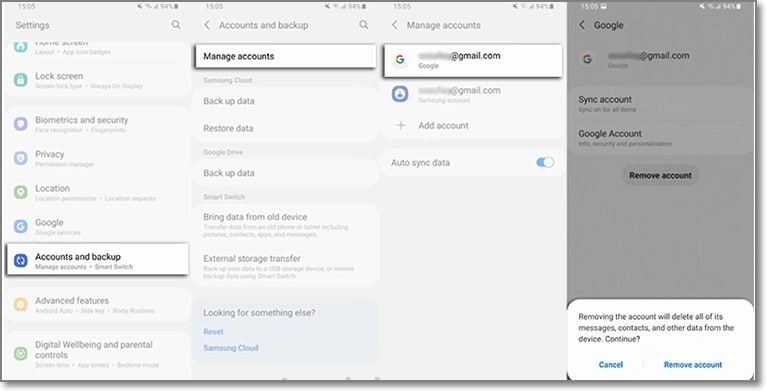
Method 1: Removing Google Account using the Android Settings Menu
If you just plan to reset your phone, maybe because of the lag caused by the phone cache, and you know the inconvenience of Google FRP as a protection mechanism, then you can remove Google FRP through the Settings menu.
The steps for this method are listed below.
- Step 1: On your Android phone go to the Settings option and choose Accounts & Backup.
- Step 2: Select the Manage Accounts option now and the list of the associated Google Devices will appear.
- Step 3: Choose and click on the Google Account that you want to remove and a pop-up message will appear to inform you that all the account data will be deleted with this action.
To confirm the removal of the account, click on the Remove account button.
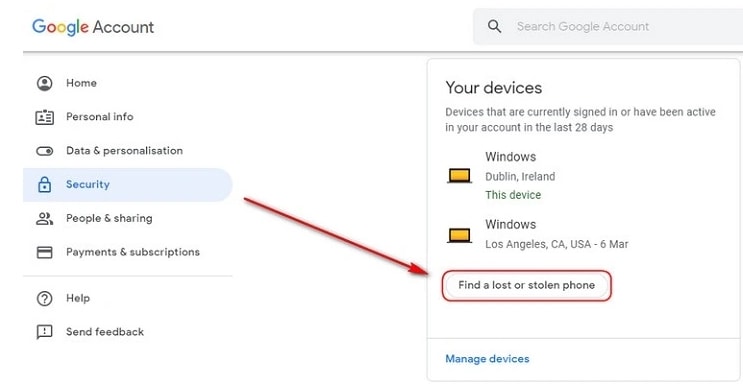
Method 2: Remove the Google account from the Android phone using the computer
There is another method using which you can remotely remove the Google account associated with your phone. The steps for the method are listed below.
- Step 1: Using another device or a PC, sign in to your Google account that was previously synced on this device and choose the Security option.
- Step 2: Next scroll down and then tap on the Your devices option and choose to Manage devices.
- Step 3: You will now see the list of devices linked to your Google account. Next, tap on Find a lost or stolen phone and then select the Remove option present next to Account access.
- Step 4: You will be again asked if you want to delete the account. Select the Remove option.
- Step 5: The account will be removed successfully and the confirmation message will appear.
Note: This method will actually sign out you from the Google account and will not delete it permanently. To again get access to the account, a notification will appear on your phone to enter the password.
Part 2: How to Disable Factory Reset Protection to Bypass Google Account Verification After Factory Reset
The Factory Reset Protection (FRP) is a security feature for the Android device that allows factory reset only after the associated Google ID and password are entered correctly. With multiple accounts and passwords to remember there is quite a possibility that you may forget your Android phone Google account details and here the need to bypass Google account verification arises.
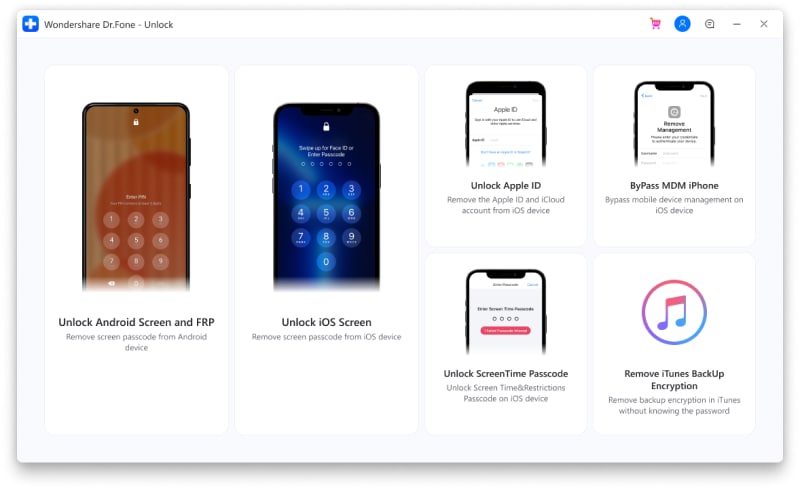
Though there are multiple tools available we recommend Dr. Fone - Screen Unlock (Android) as the best and the most reliable option. Using this excellent Windows and Mac-based software, FRP lock on all popular Android devices including Samsung, LG, HTC, and others. The tool is simple to use and requires no technology. There is also an option where you can unlock your device if you do not know the OS version.
![]()
Dr.Fone - Screen Unlock (Android)
Get into Locked Phones within Minutes
- 4 screen lock types are available: pattern, PIN, password & fingerprints.
- Easily remove the lock screen; No need to root your device.
- Everybody can handle it without any technical background.
- Provide specific removal solutions to promise good success rate
4,008,669 people have downloaded it
Steps to remove FRP lock using Dr. Fone-Screen Unlock (Android)
Step 1: Download, install and run the software on your system, and from the main interface choose the Screen Unlock option. Make sure that your phone is connected to WiFi.

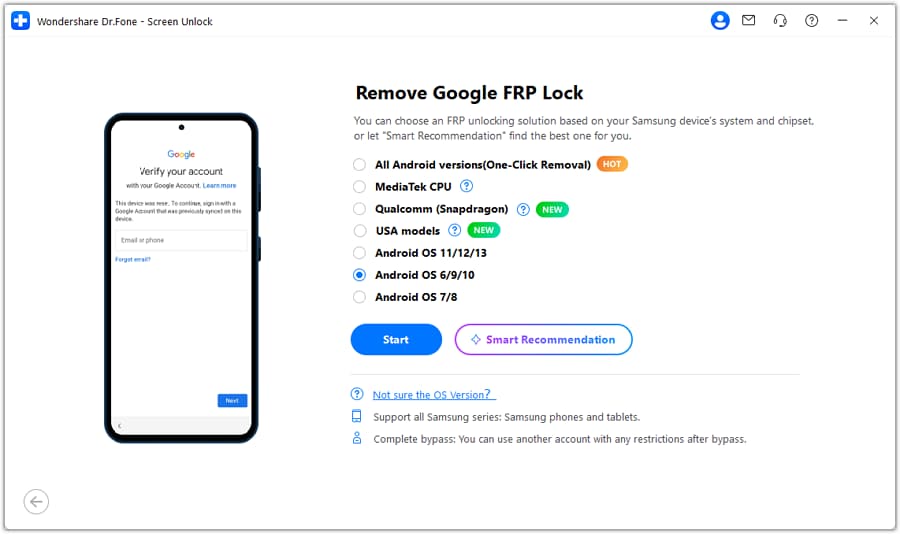
Step 2: Next, choose Unlock Android Screen/FRP and then select the Remove Google FRP Lock option.
Step 3: Next, choose the OS version of your device from the given options, and then using a USB cable, connect your phone to your system.
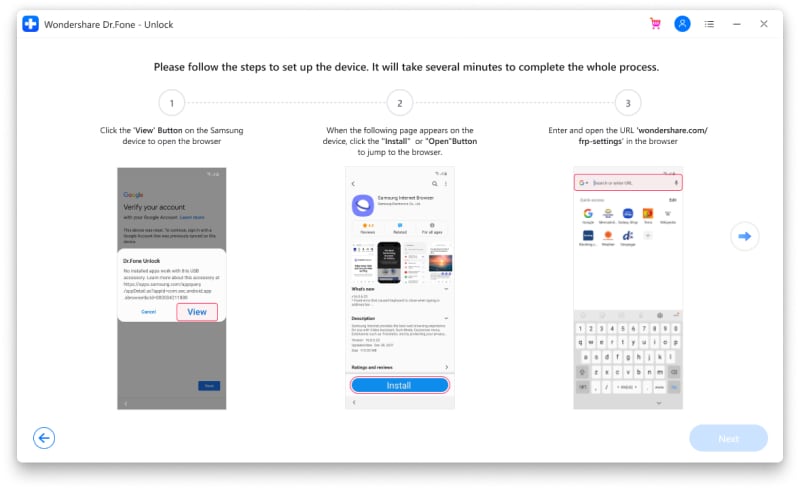
Step 4: After the Lava Agni 2 5G device is connected, the Lava Agni 2 5G device information will appear on the software for you to confirm and the notification for the same will be sent to your Android phone.
Step 5: Now follow the notifications for removing the FRP lock and in the browser enter drfonetoolkit.com.
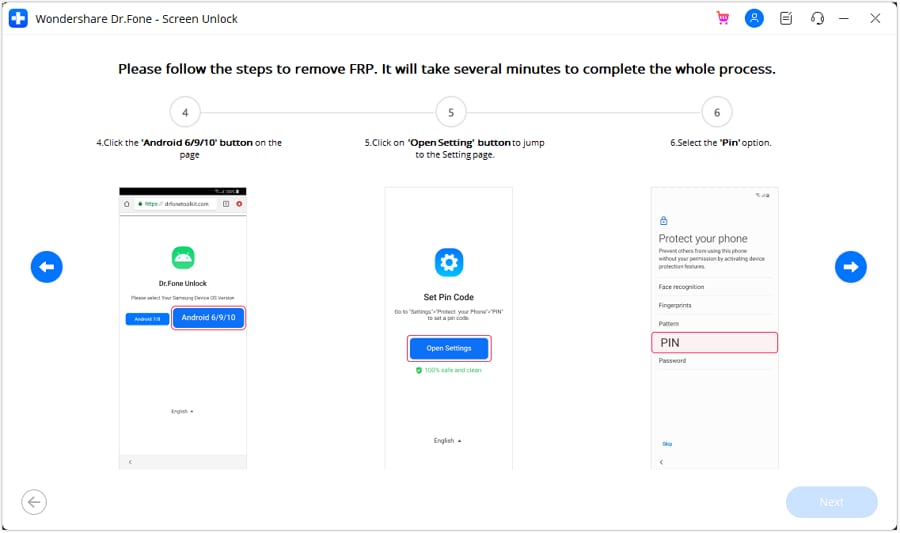
Step 6: Next, click on the Android 6/9/10 button, choose Open Settings and select the PIN option to set a PIN to be used in the further steps.
Step 7: Keep following the steps as they appear till you reach the Google Account Sign-In page. Here click on the Skip option that will successfully remove and bypass the Google Account.

The above given are the brief steps for the FRP bypass process. To learn about the entire process in detail, check Dr.Fone-Screen Unlock (Android) guide .
Part 3: Hire a Remote FRP Removal Service to Bypass ZTE/Motorola After Factory Reset
To bypass the FRP lock on your ZTE, Motorola, and Samsung device, there is also an online service called UnlockJunky.com that claims to remove the FRP lock and previously linked account on your Android device within 5-15 minutes. This is a paid service that also claims that if they are unable to remove the lock, they will refund the amount to their customers.
So, if you cannot sign in with a Google account that was previously synced, you can give this, method a try.
Step 1: Open the official service page Unlockjunky on your browser.
Step 2: Next, choose the Lava Agni 2 5G device’s brand, model, and unlock type from their respective drop-down menus. Click on Unlock Now button after entering the details.
Step 3: Now you need to initiate the order by providing the details asked and completing the payment.
Step 4: Next, the software needs to be downloaded and installed on your system, and using a USB cable, connect your phone to your computer.
Step 5: Connect with one of the support provider members through the live chat and they will help you remove the FRP lock on your Android phone.
With the steps above, you can remove the account previously synced on this device.

Limitations of using the Unlockjunky method:
- This is a paid service.
- Works only with Motorola, ZTE, and Samsung devices.
- There is no surety that the service will work for removing the FRP lock on your devices.
- If you have to remove the FRP lock from multiple devices, a separate payment for each device has to be done.
Conclusion
Above we have listed several ways to remove a previously synced Google account on your Android device. The best of all the listed solutions is Dr. Fone - Screen Unlock (Android) as it supports bypassing FRP lock on multiple Android devices in a hassle-free manner. Once the license is purchased, you can unlock as many numbers of devices as you want without any worries.
How to Show Wi-Fi Password on Lava Agni 2 5G
Since the invention of Android OS in 2008 by Andy Rubin, our world has faced a dramatic change. Android seems to be controlling a considerably high portion of our life. We have bought many gadgets that use this amazing OS and most of which are phones. But how much can you do with your Android phone? Developers are always making it more interesting to use this interface.
Most of the time, we use Android phones, we get faced with the need to access the internet. The Wi-Fi capability of these Android gadgets makes it super easy for us to surf the web. Throughout using Wi-Fi, we connect to a number of them. This could be at school, a sub-way café, the gym, buses, hospitals, hotels, towns, and the list is endless. A password secures most of this. Needless to say, our brain is weak to store all these passwords for future use, especially if you would want to connect with a different gadget you have recently bought or even your laptop. In this article, we will introduce you to how to find wifi password on rooted and also unrooted Android devices.
Part 1: Show Wifi Password on Rooted Android Device
What is Rooting?
First of all, what does rooting mean? You have probably used a Windows computer or even Linux. For the case of Windows, when installing a new program or software, it always prompts a dialog box saying, “Administrator permission required to run this program.” If you don’t have the administrator permission, you won’t install the program. In Android, this is called rooting. In simple terms, it means having the root permission to your phone. Some Android apps will require you the root permission, e.g., flashing your ROM. In this part, we will explain how you can show the Wi-Fi password on your Android with root.
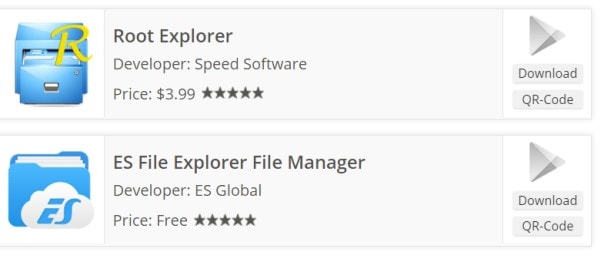
To find the Wi-Fi passwords on your Android phone, you need to have an app to explore files which also supports a root user. In this case, ES FileExplorer or Root Explorer will come in handy. However, it turns out that the latter is offered at $3. Let’s use the free ES File Explorer.
Steps of getting Wi-Fi password on Android with root
In only four steps, we, at this moment, learn how we can find the password of a Wi-Fi on an Android phone.
Step 1: Install the ES File Explorer
Download the ES File Explorer from your play store, install it, and open it.

Step 2: Enable Root Explorer
The root explorer needs to be enabled so that you can reach the root folders of the Wi-Fi passwords you need. By default, the root feature in this ES explorer is not enabled. To enable it, just tap on the list menu on the top left corner.:
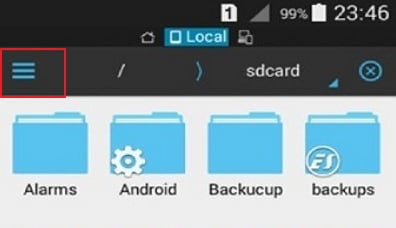
This will drop down a list of controls. Scroll down and find the Root Explorer option and enable it.

Step 3: Get the passwords’ file.
Go back to ES file explorer, and this time, find the folder named data.
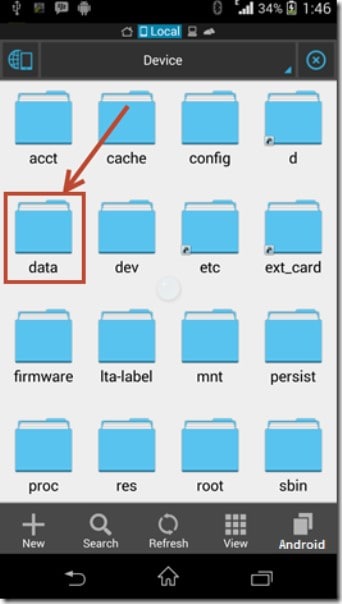
When this folder opens, find another one named misc. Open it and find another one named wifi. Here, find a file named wpa_supplicant.conf.

Step 4: Retrieve the wifi password on Android
Make sure that you don’t edit anything in the file. You might mess up with important data and fail to access the Wi-Fi(s) in the future.
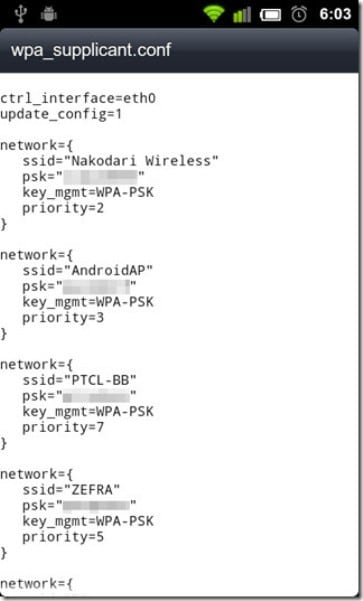
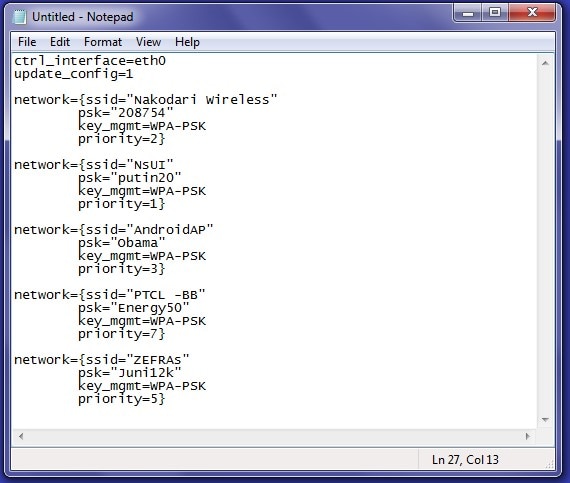
As you can see above, we have found the Wi-Fi passwords on the android device. On each network profile, we have the name of the network represented by name (ssid=”{the name}”), the network’s password represented by psk, the network’s access point represented by key_mgmt=WPA-PSK and its priority represented by priority.
Part 2: Show Wifi Password on Android without Root
What if I don’t have root access to my Android, can I still see Android Wi-Fi password? The short answer is yes. However, this is a bit involving but simple. You don’t need to be a computer guru to do it, but you need to have a computer and some internet access of course. The key thing is to find a way through which we can fetch the password file from the phone without using a root access protocol in the Android. This is made possible by some little programming insight using the Windows Command prompt.
Steps to show Wi-Fi password on Android without root
Step 1: Access the Developer authority
To access the files that Android uses to run passwords, you must first become a developer. This is very simple.
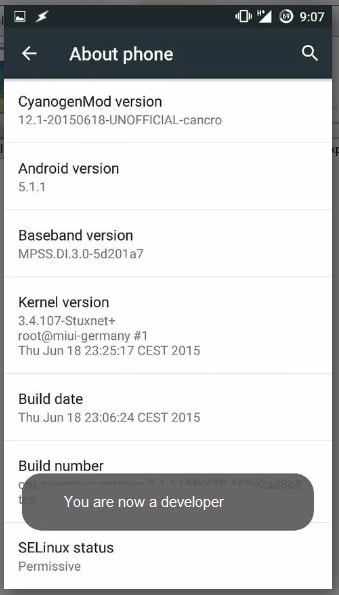
Get your Android phone and go to settings. Scroll down and find “About phone.” Tap on it and scroll down again to find Build number.

Tap on this “build number” 5 to 6 times until a message pops up, saying, “You are now a developer”.
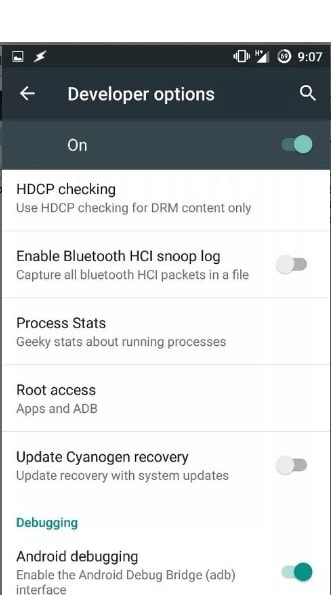
Step 2: Enable the debugging.
Go back to Settings. Scroll down for developer options. Turn on the button for “Android/USB debugging”.
Step 3: Install ADB drivers.
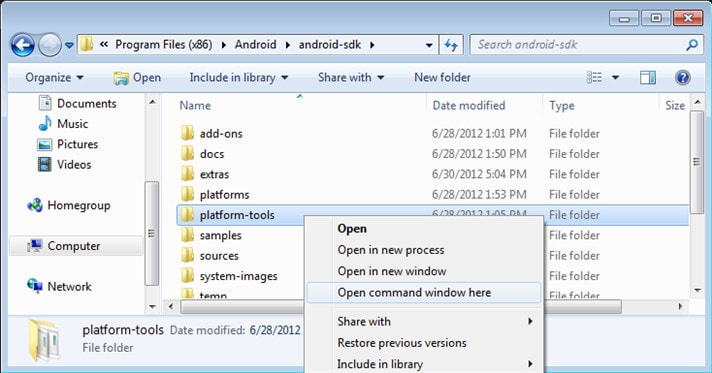
Now, open your Windows desktop. Download and install ADB drivers. (Use this download link adbdriver.com ). You need to download and install platform tools (minimal ADB and fastboot) from http://forum.xda-developers.com/... Now open the folder where you’ve installed the above tools. By default, it is in the Local disc C\windows\system32\platform_tools location. However, you might want to locate them by searching on the windows search engine. You have to hold the Shift key and right-click inside the folder to click on”Open Command Window Here.”
Step 4: Test the ADB
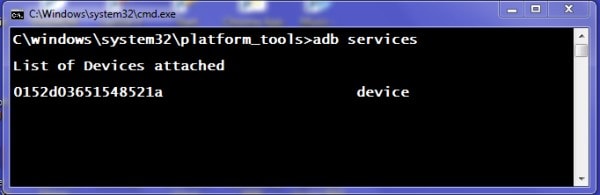
Here, we would like to test whether the ABD is working properly. To do this, connect your phone to the PC using a USB. In the command prompt, type adb services and then press enter. If it’s working properly, you should see a device on this list.
Step 5: Find the Android wifi password.
Now, it is time to type the given command in the command prompt and type: adb pull /data/misc/wifi/wpa_supplicant.conf c:/wpa_supplicant.conf. This will fetch the file from your phone to the local disc C drive of the PC.
Step 6: Get the wifi passwords.
Lastly, open the file with a notepad, and there you go.
Now you learned how to show the wifi password on your Android device.
Lock Your Lava Agni 2 5G Phone in Style: The Top 5 Gesture Lock Screen Apps
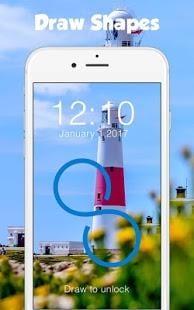
Ever wondered, if there was an easier and more interesting way to unlock and open your devices and apps without boring PINs/Passwords that you tend to forget? Worry not, gestures are here! Imagine the joy when you can unlock your phone by just waving your hand over it, or instead of getting access through confusing patterns or lengthy PINs, you can just get in by drawing an alphabet! So let’s go through some gesture lock screen apps for Android phones.
Gestures in Android
Gestures have become an iconic piece of the entire mobile operating system and experience, giving all Android users the joy of using our gestures for functions in our mobile phones We will be discussing 5 gesture lock screen apps, but let us first talk about the existence of gestures in Android.
- • Two-finger swipe down
- • Press and hold on notifications
- • Triple-tap to zoom in
- • Tap and hold on menus
- • Double-tap to wake
- • Press and hold Power Off Button
These gestures gave Android developers an idea of creating apps, to make use of new gestures for not only in-phone functionality but also for the most basic smartphone function of locking and unlocking.
Why do we need these gesture apps? –Would you not want to control your phone’s notification bar by just waving your hand over the screen, when it’s not reachable? These apps are not only fun but also useful and efficient. So, now let us discuss 5 Android gesture lock screen apps.
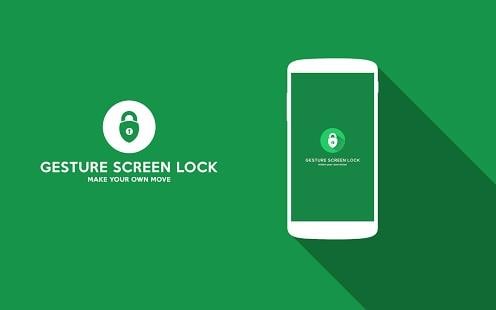
1) Gesture Lock Screen
A top-rated app in the Google Play Store, for gestures, the Gesture Lock Screen is a wonderful gesture app that locks and unlocks Android lock screens. Rated 4/5 stars in the Google Play Store, this app was developed by Q Locker.
Gesture Lock Screen is an all-in-one gesture app that locks the screen as well as provides you with other good features. The app allows you to draw anything or gesture to unlock your phone; you can draw letter, signatures, various shapes, whatever you want to unlock your device! This app gives you the convenience to unlock your phone through fingerprints, gestures, and recover passwords as well.
• Gesture – you can easily add/change gestures, it can be a single or a multiple stroke gesture as well. For maximum accuracy, this app features gesture sensitivity. If you want a unique lock screen, this app is ideal!
• Customization – This app is highly customizable, so let your creative tech ideas fly! App notifications are available for Android 4.3 and above. Unread notifications will appear on the lock screen, and you can easily hide any confidential notifications.
With over 40,000 5/5 ratings and 5,00,000-10,00,000 installs, this app proves to be the top gesture app for locking your phone.
Download this app from here - https://play.google.com/store/apps/details?id=qlocker.gesture&hl=en
2) Magic Unlock
Magic Unlock app, developed by zonep.ro, is designed with the main aim of responding to hand movement. The future is here!The app detects the movements of your hand, preferably horizontal or vertical, through the phone’s proximity sensor and then opts to unlock the screen. Technology, I tell you!
Firstly, the lock screen security needs to be turned off. You can do this by going to Settings on your phone, then click on Security, then “Screen Lock” and change the lock type to swipe or slide. Now, fire up this app and turn on the magic unlock option. Tada! Now you are all set to unlock your device via air gesture.
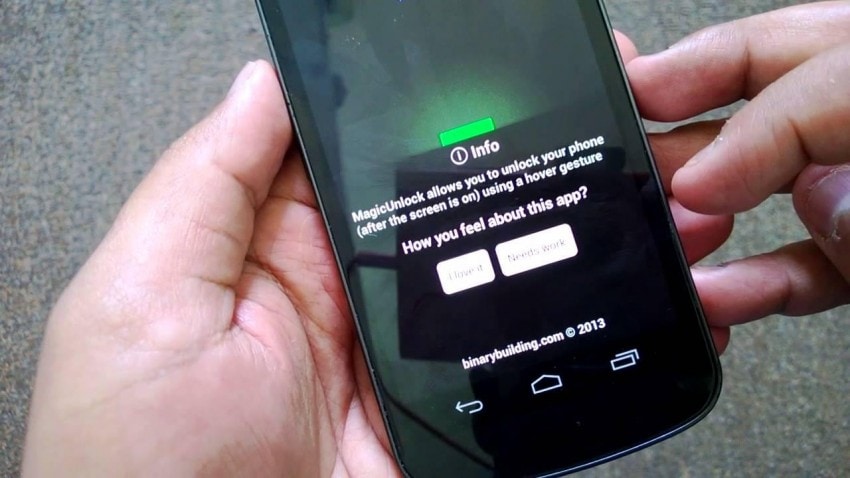
The app was released early 2017, but Magic Unlock has already received 50,000-100,000 installs and has a 4.2/5 rating in the Play Store, giving you all the more reason to install it. The app requires Android 4.1 and above.
Download the app from here - https://play.google.com/store/apps/details?id=com.binarybuilding.magicunlock&hl=en
3) Gesture Magic
Another app that uses gesture to lock/unlock the screen is the Gesture Magic app, developed by Apps2all. Compatible with most Android devices, this app is very easy for you to use.
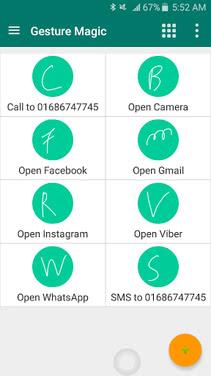
The app already suggests you with predetermined gestures to unlock the screen and open the specific apps. How convenient!
Features – Don’t we all love apps that do not just stick to their main purpose but also come with extra features? This app allows you to launch apps, make calls, send text messages, and quickly access all applications with ease, everything with the help of gestures! This app needs to use the Lava Agni 2 5G device Administrator permission in order to work.
Launched on 17th August 2017, the app has already fetched 100,000-500,000 installs and has maintained a 4/5-star rating, proving why it’s worth using despite being a new-comer.
Download this app from here - https://play.google.com/store/apps/details?id=com.gesture.action&hl=en
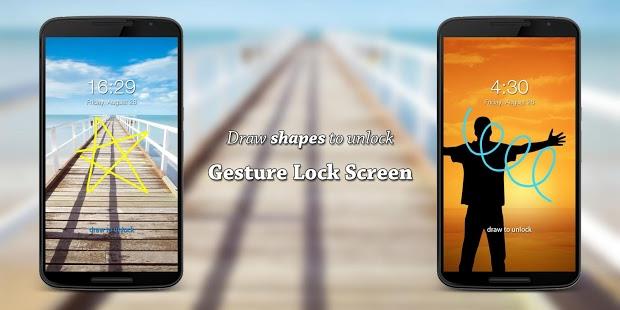
4) Gesture Lock Screen
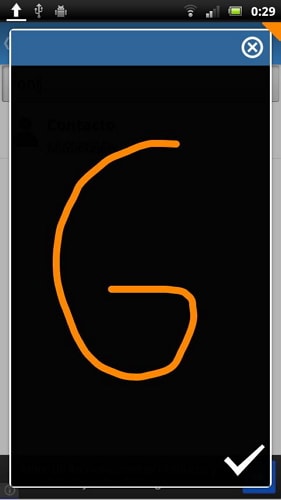
Developed by Prank App, Gesture Lock Screen is a wonderful app that allows to securing your Android phone with letters, signatures or a pull-down gesture. This is an intelligent gesture screen-lock app that detects and adjusts to the letters that are created every time and stored as lock screen passwords. You can be creative with this app as well; hearts, circles, triangles, squares, make any shape, letter, number and save it as the gesture lock.

Gesture Lock Screen is designed to allow you to launch any personal application through your personalized gesture, so you do not have to worry about anyone meddling with the contents of your phone. The app comes with the following range of features:
• Create any kind of password – letters, shapes, numbers, signatures, etc.
• App notifications appear on the lock screen itself - unread texts, calls, app notifications, etc.
• Double tap the notification, draw the gesture to unlock and open the app – privacy, finally!
• Supports both single as well as multiple stroke gesture.
With a 4.4/5-star rating in the Play Store, and with 5,000-10,000 downloads in a span of 2 months of its launch. The app works on Android 4.1 and above.
Download it from - https://play.google.com/store/apps/details?id=com.vasu.gesturescreenlock&hl=en
5) Gestos – Gestures
Developed by Imaxinacion, Gestos-Gestures is an amazing gesture screen-lock app, designed with the main aim of providing you with fluency and speed as you perform actions on your device. This app aims to give you the facility of accessing various functions by drawing an easy gesture on the lock screen.
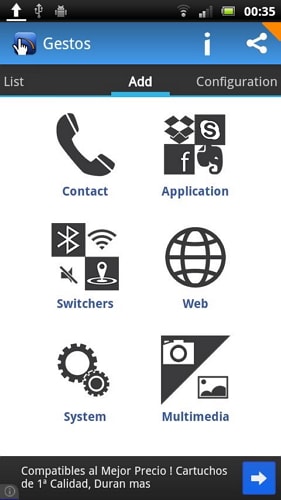
Gestos allows you to – call contacts, enable or disable settings like Wi-Fi, Bluetooth, GPS, etc, run various system options, lock or unlock your device, and access websites as well.
Talking about configuration, Gestos is a well-designed app that can be activated by just a double-touch on your home screen. Its sensitivity can be adjusted according to what you prefer, a permanent notification toggle floating button is available as well!
Maintaining a 4.1/5-star rating in the Play Store, Gestos has had 100,000-500,000 installs.
Download it from here - https://play.google.com/store/apps/details?id=com.imaxinacion.gestos&hl=en
As Android reaches new heights every year, gestures are getting more and more enhanced, as their functionalities increase as well. Gestures have always been an exciting feature in Android phones and a convenient one as well. They are practical and fun to use, and the apps mentioned above are some of the best gesture-lock apps amongst the vast number of such apps in the Google Play Store. If you want to make your tasks easier by using gestures on your phone, feel free to try some of the mentioned apps here.
Also read:
- [New] 2024 Approved From Capture to Share Streamlining Logitech Webcam Recordings
- [New] 2024 Approved Overwatch Video Captures – Done Right, Made Simple
- [New] Blend Into Black Premiere Pro Trick for 2024
- [Updated] The Pillars of Profitable Digital Marketing
- 2024 Approved Top-Grossing YouTube Titans
- Enhance Your Online Presence: Professional Live Streaming Features of ManyCam
- From Emoji Financial Advice to Cybersecurity Scandals: How Activision's Hack Resonates & The Future of Employment Amidst the Rise of AIs Such as ChatGPT
- How To Activate and Use Life360 Ghost Mode On Realme 10T 5G | Dr.fone
- How to Unlock Asus ROG Phone 8 Pro Pattern Lock if Forgotten? 6 Ways
- In 2024, How to Bypass FRP from Oppo Find X7?
- In 2024, How To Fix OEM Unlock Missing on Motorola Moto G Stylus 5G (2023)?
- In 2024, How to Remove Forgotten PIN Of Your Motorola Moto G13
- In 2024, Pattern Locks Are Unsafe Secure Your Motorola Moto G73 5G Phone Now with These Tips
- In 2024, Remove the Lock Screen Fingerprint Of Your Sony
- In 2024, Top 4 SIM Location Trackers To Easily Find Your Lost Sony Xperia 1 V Device
- Living Life in Full Bloom | Free Book
- The Top 5 Android Apps That Use Fingerprint Sensor to Lock Your Apps On Lava Storm 5G
- Unlock Your Asus ROG Phone 7 Ultimates Potential The Top 20 Lock Screen Apps You Need to Try
- Unlock Your Lava Yuva 3 Pros Potential The Top 20 Lock Screen Apps You Need to Try
- Title: How to Remove a Previously Synced Google Account from Your Lava Agni 2 5G
- Author: Peter
- Created at : 2025-01-21 16:01:23
- Updated at : 2025-01-23 16:04:37
- Link: https://android-unlock.techidaily.com/how-to-remove-a-previously-synced-google-account-from-your-lava-agni-2-5g-by-drfone-android/
- License: This work is licensed under CC BY-NC-SA 4.0.