
How To Change Samsung Galaxy A14 5G Lock Screen Clock in Seconds
How To Change Samsung Galaxy A14 5G Lock Screen Clock in Seconds
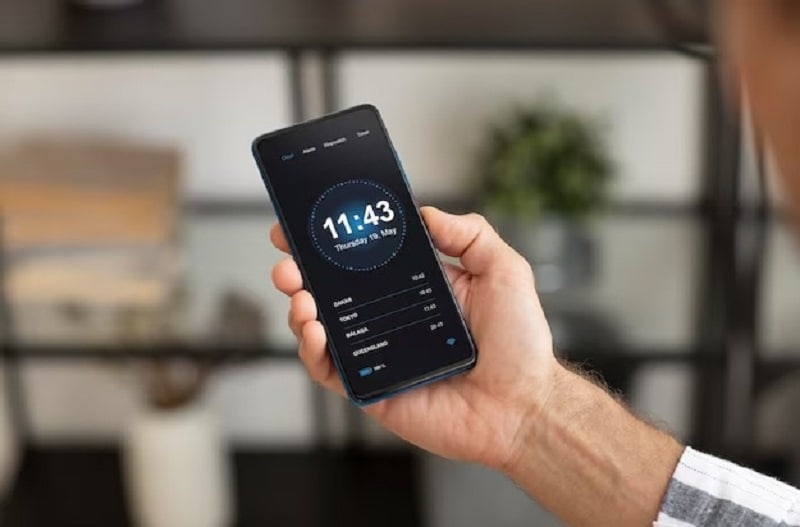
The initial glimpse of your phone often involves the lock screen. This essential feature is customizable based on your Android device. With the advent of Android 12, a double-line clock has stirred some controversy among users. It’s because the Android lock screen clock veered from the one-line design of the previous version.
The larger clock style appears when there’s no notification. It will only switch to the old one-line format when a notification pops up. Discover how to change the lock screen clock on your Android and tweak its appearance. Explore the article to learn more.
Part 1. How Do I Put a Clock on My Android Lock Screen?
Android devices running version 12 or later come with the clock feature activated by default. Take note that its appearance may change under specific circumstances. It can change when there are unread notifications visible on the lock screen.
For devices running Android 11, changing the lock screen clock is still available. In some instances, you can even customize its style by following these simple steps:
- Step 1: For users with Android 11 or older, go to Settings > Lock screen & security. Depending on your phone model, tap Lock screen or Security.

- Step 2: Go to Customize Lock screen > Clock. Next, customize or activate the lock screen clock.
Note
The exact names of settings may change depending on the manufacturer and version of Android. But the navigation should be similar.

Part 2. How To Change Lock Screen Clock on Android [5 Methods]
Currently, there isn’t an official method to change the lock screen clock on Android 12. However, there are several workarounds you can do. Let’s explore these techniques and see which works best for you.
Method 1: Change Your Wallpaper
In Android 11, adjusting your wallpaper is accessible through the Android Settings menu.
- Step 1A: Navigate to the “All Apps” screen and select Settings. For Samsung Galaxy devices on Android 11, access the Wallpaper option within the settings menu.

In Android 12, the process remains consistent.
- Step 1: Locate the Wallpaper & style button within the Settings menu**.**

- Step 2: Follow the provided instructions to transform your lock screen experience. Replace the oversized clock with dynamic, changing wallpapers.
Method 2: Turn Off the Always-On Display
An alternative to avoid the Android lock screen clock is disabling the Always-on Display (AOD).
- Step 1: Access the Settings menu on your Android device. Scroll down and choose Lock screen > Always On Display.

- Step 2: Toggle off to deactivate the Always On Display.
_Note_
While this won’t alter the lock screen clock itself, it will turn off the display. It will prevent the constant presence of the lock screen clock. Instead, the clock will only become visible when you press the power button.
Method 3: Disable the Double-Line Clock
Originally, there was no provision to change the lock screen clock in Android 12. With the release of a new update, Google introduced an option to deactivate the clock, bringing relief to users. Follow the steps below to disable the double-line clock on your Android.
- Step 1: Go to Settings > Display. Next, choose Lock screen.

- Step 2: Toggle the Double-line clock off.
_Note_
If you want to display a digital or analog clock, open the _Clock_ app. Tap the _three dots_ > _Settings_ > _Style_****.
Method 4: Turn On Screensaver
An alternative method to modify the Android lock screen clock involves activating Android’s screen saver. There are options where it’s more pleasing than the default lock screen clock. If you want to change the lock screen clock, follow the steps.
- Step 1: Open the Clock app and tap the three dots in the upper-right corner. Select Screensaver and toggle it on.

- Step 2: If you want to customize the screensaver clock’s appearance, go to Settings > Display > Screensaver. Choose analog, digital, or night mode.
Method 5: Keep Unread Notifications
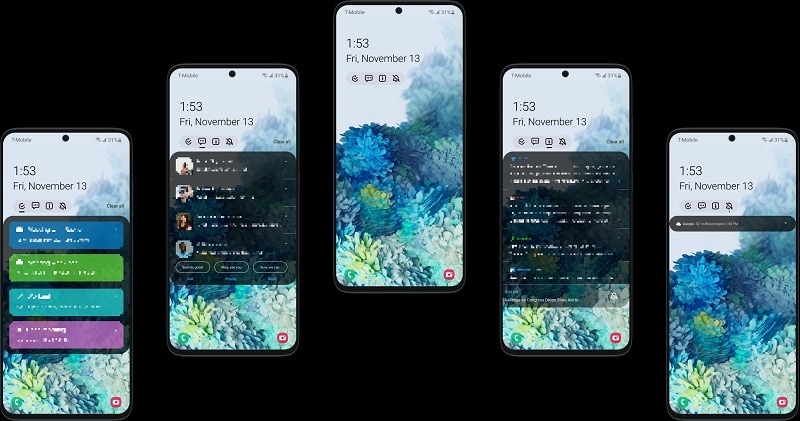
To avoid adjusting your Android device settings, you can make the lock screen clock smaller by maintaining unread notifications. The clock occupies less space when there are unread notifications. It shifts back to the top-left corner when you receive a new notification. Simply leave notifications unread to keep the clock smaller.
Bonus
For users who prefer not to have a lock screen clock, follow these steps:
- Step 1: Open Settings > Lock screen or Security & lock screen.
- Step 2: Look for Clock and FaceWidgets or a similar option. Disable or toggle off the Clock or Show clock setting. Save changes, and your lock screen should no longer display the clock.
Part 3. An Exception: Change the Lock Screen Clock on Samsung Phones
Changing the lock screen clock on Samsung phones is similar to the general Android process. However, the steps are quite different, offering Samsung users a unique customization experience. If you wish to personalize your lock screen clock, here’s how:
- Step 1: Go to Settings > Lock screen or Lock screen & security. Choose Customize lock screen > Clock, Clock style, or Lock screen clock.

- Step 2: Choose between different styles, such as digital, analog, or others. Some Samsung models offer extra settings like color, size, and more to enhance your lock screen further. Select the one that suits your taste.
If you’d rather remove the lock screen clock on your Samsung device, follow these steps:
- Step 1: Go to Settings > Lock screen or Lock screen & security.Choose Customize lock screen > Clock, Clock style, or Lock screen clock.
- Step 2: Disable or toggle off this setting to remove the clock from your lock screen.
If you ever find yourself locked out of your Android device due to a mishap while changing your lock screen clock or any other reason, don’t fret. Wondershare Dr.Fone– Screen Unlock - Android can effortlessly bypass the lock screen and unlock your device without a hassle.
Read More About Android Lock Screen:
9 Ways to Bypass Samsung Lock Screen without Data Loss [2024]
How To Easily Unlock Nokia Screen: 4 Effective Methods
How to Change Lock Screen Wallpaper on Android
Part 4. How To Unlock Accidentally Locked Android Screen
Accidentally locking yourself out of your Android device can be a stressful experience. Dr.Fone provides a hassle-free solution to unlock your Android screen without losing any data. Whether you’ve locked yourself out or forgot your PIN, Dr.Fone ensures a straightforward and secure unlocking process. Here’s a step-by-step guide to using the tool:
![]()
Dr.Fone - Screen Unlock (Android)
The Best UnlockJunky Alternative to Bypass FRP and Solve Your Screen Locks
- Completely unlinked from the previous Google account, it won’t be traced or blocked by it anymore.
- Remove all Android screen locks (PIN/pattern/fingerprints/face ID) in minutes.
- Compatiable with various Android models.
- Provide specific removal solutions to promise good success rate.
4,008,670 people have downloaded it
- Step 1: Download and install Dr.Fone on your computer. Launch the program after installation and go to Toolbox > Screen Unlock.

- Step 2: Choose Android in the next window and click on Unlock Android Screen.

- Step 3: Choose your device brand and click Remove without Data Loss. Select the Brand, Device Name, and Device Model of your smartphone. Once done, toggle the checkmark on I agree with the warning, and I am ready to proceed button.

- Step 4: Follow the on-screen instructions. Once they’re done, Dr.Fone will automatically proceed with the unlocking process. There will be a new screen showing the completion if done correctly. If it fails, click on Try again. Otherwise, click Done to finish.


What Else Can Dr.Fone Do for Android Owners?
Dr.Fone Screen Unlock for Android is a comprehensive tool that goes beyond unlocking screens. It also provides a range of features to address various Android device-related issues, such as:
Bypass Factory Reset Protection (FRP)
You can bypass Factory Reset Protection on your Android device with Dr. Fone. It allows you to set it up without the original Google account credentials.
Unlock Samsung/LG without data loss
Whether you own a Samsung or LG device, Dr.Fone allows you to unlock your phone without compromising any data stored on the Samsung Galaxy A14 5G device.
Supports 2000+ Android models
Dr.Fone is compatible with a vast array of Android models. It supports over 2000 devices, making it a versatile solution for Android users.
Conclusion
Knowing how to change the lock screen clocks on your Android offers a personalized touch. Android 12 users can effortlessly adjust settings, while Android 11 and older versions require a manual setup. Samsung owners, meanwhile, enjoy a similar but unique customization process. Follow the steps outlined above for those seeking to remove the lock screen entirely.
On the other hand, if you accidentally lock yourself out of your smartphone, Dr.Fone is a go-to solution, ensuring a smooth unlocking process. Whether tweaking your Android lock screen clock or facing accidental lockouts, explore these methods to tailor your Android experience.
Bypassing Google Account With vnROM Bypass For Samsung Galaxy A14 5G
Encountering the need to bypass a Google account can be crucial nowadays. This is especially true during device resets or when locked out due to forgotten credentials. Such a need also arises when users encounter factory resets , buy a second-hand device, or forget their login details. In such scenarios, specialized tools like vnROM Bypass come into play. They offer solutions to bypass Google’s verification process.
This article will provide a detailed review of vnROM Bypass, exploring its efficacy and usability. Additionally, alternatives to this tool will be examined. The aim is to provide users with a comprehensive understanding towards this tool and guide them to use. Ultimately, we will determine the best options for bypassing Google account security.
Part 1. A Comprehensive Introduction to vnROM Bypass and What It Does?
The vnROM Bypass tool is crafted to bypass Google account verification on Android devices. Its primary utility lies in scenarios where users face an FRP lock after a factory reset or forgotten login credentials. The tool operates through the exploitation of Android OS weaknesses. It empowers users to reclaim entry to their devices without needing the Google account details.
The tool provides a straightforward and user-friendly interface. This makes it relatively easy for users to navigate and perform the necessary steps for bypassing the FRP lock . Moreover, it offers compatibility with a range of Android devices. The app specifically targets those running on Android OS versions 5.0 to 8.1.
How To Download vnROM Bypass
Downloading vnROM FRP Bypass involves obtaining the tool from reputable sources online. The following are the steps you need to follow to download vnROM Bypass:
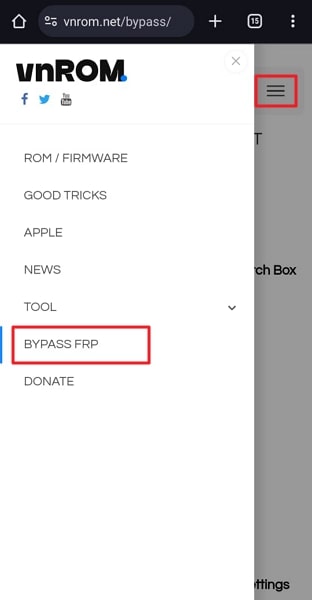
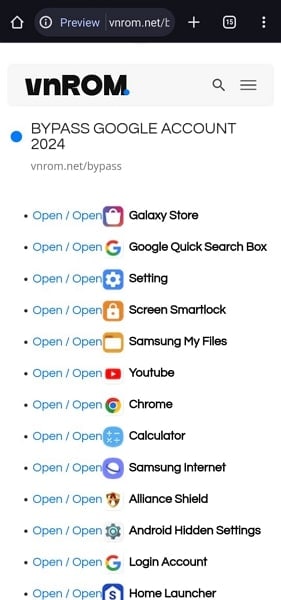
- Step 1. On your Android device, open a web browser and visit the vnROM official website. Now tap the three lines icon from the top left corner and press “Bypass FRP.”
- Step 2. You will be guided to the vnROM Bypass tool, and by tapping “Download,” the download process begins. Ensure you have enabled installations from unknown sources on your device before moving forward.
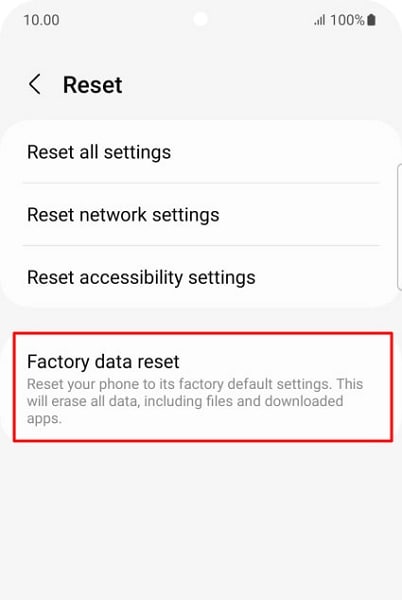
- Step 3. After you’ve downloaded the tool, proceed with its installation. Once installed, open the “Settings” app and find the “General Management” option. Now select the “Reset” option and head to the next step.

- Step 4. Following this, choose “Factory Data Reset.” Confirm the choice by hitting the “Reset” button and afterward restart your device and input your Google account information.
Steps To Use vnROM Bypass
Using the vnROM Bypass on your devices turns out to be a simple procedure. Below are the steps for utilizing the vnROM Bypass:
- Step 1. Access vnROM’s official website via your browser and download the APK file onto a USB drive. This APK serves as the primary application for initiating the bypass. Power up the locked phone and follow the on-screen instructions to set up the mobile device. During the setup process, connect the USB drive to your phone using an OTG cable when prompted to verify your account.
- Step 2. Install the vnROM bypass APK from the USB drive onto the Samsung Galaxy A14 5G device. Once the APK is installed, navigate to the Samsung Galaxy A14 5G device’s “Settings” menu and perform a factory reset. Upon completion of the factory reset, the Samsung Galaxy A14 5G device will automatically restart. Proceed to set up your phone without providing your Google account credentials.
vnROM Bypass offers a solution for bypassing FRP lock on certain Android devices. Yet, it comes with several notable limitations that necessitate exploring alternative options. The following are some of the limitations of vnROM Bypass:
1. Limited Compatibility
vnROM Bypass primarily supports Android versions 5.0 to 8.1 (Lollipop to Oreo). Hence, it fails to function on devices operating on more recent Android versions. Android 9 through 14 users might encounter compatibility issues and inefficacy when utilizing this tool.
2. Security Risks
Using bypass tools like vnROM Bypass can potentially expose devices to security risks. One significant factor contributing to this situation is the absence of an official website for the tool. Furthermore, it has not received updates for quite a while. This makes it a potential security risk for newer Android models.

3. Functional Restrictions
This tool has not received updates for some time, so its proper functionality cannot be guaranteed. It seems primarily compatible with older Android devices running on versions 5 through 8.1. Moreover, serious concerns exist about the tool’s effectiveness, even for older devices.
4. Complexity and Reliability Issues
The bypass process using vnROM Bypass can be complex. For users unfamiliar with such tools, it could lead to potential errors. The reliability of the tool’s effectiveness varies across different devices and firmware versions. This results in inconsistent outcomes.
Part 3. Listing Some Quick APK Alternatives of vnROM Bypass
In situations requiring the bypassing of FRP lock via APK services, several alternatives to vnROM Bypass exist. They offer unique functionalities and capabilities catering to different user preferences. The following notable alternatives provide users with different approaches to bypassing Google account locks:
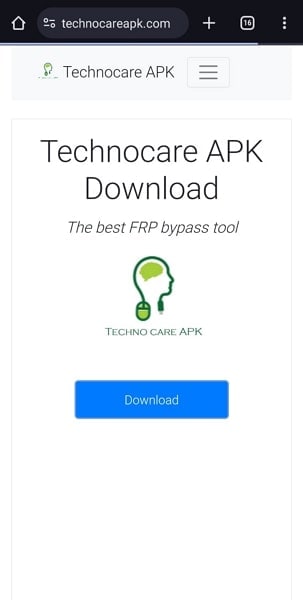
1. Technocare APK
Technocare APK offers a simplified approach to bypassing Google account verification. This tool specializes in bypassing FRP (Factory Reset Protection) locks. It aids users in regaining access to their devices without the original Google account credentials. Its ease of use and compatibility with many Android devices make it notable.
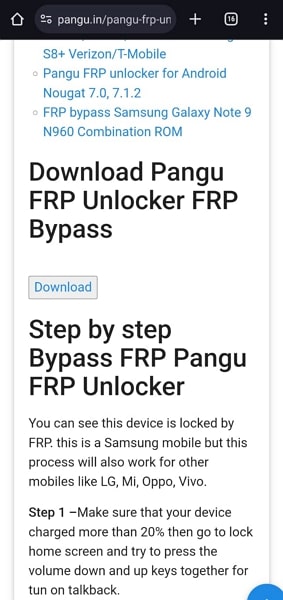
2. Pangu FRP Bypass APK
Pangu FRP Bypass APK provides an effective solution for bypassing Google account verification. This tool bypasses FRP locks caused by factory resets or forgotten credentials. It offers a straightforward process to bypass the FRP lock. The tool’s compatibility with various Android versions makes it a suitable choice. This app is especially handy for users encountering Google account lock issues.
3. Realterm FRP Bypass APK
Realterm FRP Bypass APK offers an alternative method to bypass Google account verification. It does so by leveraging Realterm software. This tool assists users in overcoming FRP locks and gaining access to their Android devices. Yet, it’s important to note that Realterm FRP Bypass might need more technical know-how. This is the case for successful implementation compared to other alternatives.
4. Wondershare Dr.Fone - Screen Unlock (Android)
Wondershare Dr.Fone distinguishes itself as an extensive and easily navigable utility. Crafted to bypass Google account verification and unlock Android devices, it excels as a user-friendly tool. With its intuitive interface, this software assists users in bypassing various screen locks. These include PIN, pattern, password, and Google account locks. Dr.Fone’s effectiveness lies in its compatibility with various Android devices and OS versions.
This guarantees an increased likelihood of bypassing Google account verification successfully. Furthermore, it bypasses the Android FRP lock without requiring a PIN or Google account. Moreover, it supports well-known Android brands such as Samsung, Huawei, LG, Xiaomi, and others. However, Wondershare Dr.Fone – Screen Unlock does not come as an APK but offers a comprehensive platform.

 safe & secure
Part 4. [Effective Alternative] Wondershare Dr.Fone Making Google Account Bypass Easy
Do you own an Android with version higher than 8.1? Or do you have a specific Android brand which cannot be bypassed by vnROM Bypass? At such a stage, you might feel stuck with the need to bypass your Google account. While there seems to be no way, Dr.Fone - Screen Unlock (Android) emerges as the perfect remedy in such a situation. This intuitive toolkit provides a comprehensive system of bypassing FRP lock.
With its diversified OS support, it offers better functionality than tools like vnROM Bypass. Along with that, you can also find dedicated support for a huge variety of Android brands. This provides versatility in bypassing Google FRP (Factory Reset Protection) locks. Its intuitive interface makes it accessible even to users with limited technical expertise.
![]()

Dr.Fone - Screen Unlock (Android)
The Best UnlockJunky Alternative to Bypass FRP and Solve Your Screen Locks
- Remove all Android screen locks (PIN/pattern/fingerprints/face ID) in minutes.
- Bypass Android FRP lock without a PIN or Google account.
- Everyone can handle the lock screen without any tech knowledge.
- Provide specific removal solutions to promise good success rate.

4,008,669 people have downloaded it
Step-by-Step Guide To Bypass Google FRP Account in Dr.Fone
Dr.Fone makes bypassing Google FRP lock a breeze and effortless process. Here are the detailed steps you need to follow to complete this procedure:
How To Bypass FRP on Samsung Devices?
- Step 1. Samsung Device Connection and Google FRP Lock Removal Setup
To begin, initiate Wondershare Dr.Fone on your computer and connect the Samsung device. Next, navigate to “Screen Unlock” in “Toolbox”, and on the next screen, opt for “Android”. Select “Remove Google FRP Lock” on the following screen. Afterward, select “Samsung” and proceed by clicking the “Start” button.
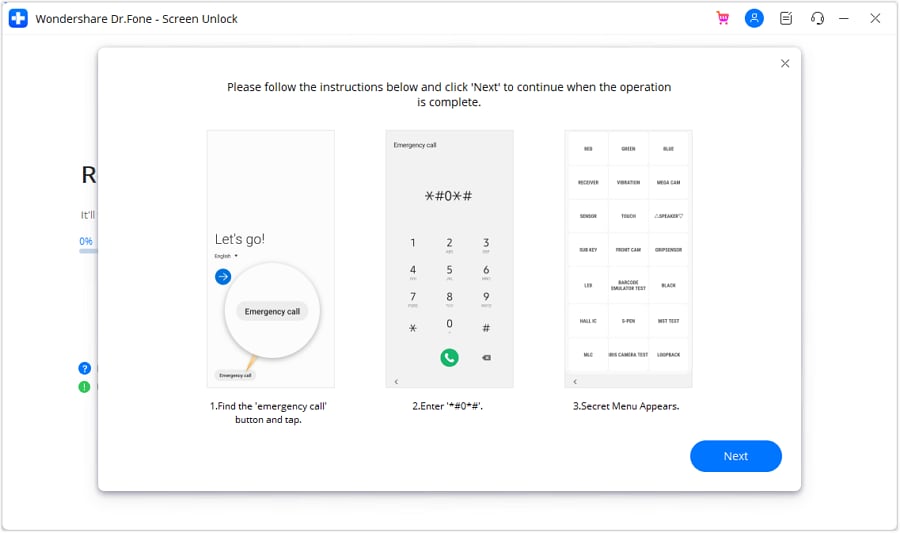
- Step 2. OS Version Selection and Hidden Menu Access
Choose the Android OS version on your Samsung device. If you want to use the quickest way to remove Google Lock, opt for the “All Android versions (One-Click Removal)” option. Now, click “Start”, locate and tap the “Emergency Call” button on your Android device. Then input #0# to access a hidden menu and click “Next”.

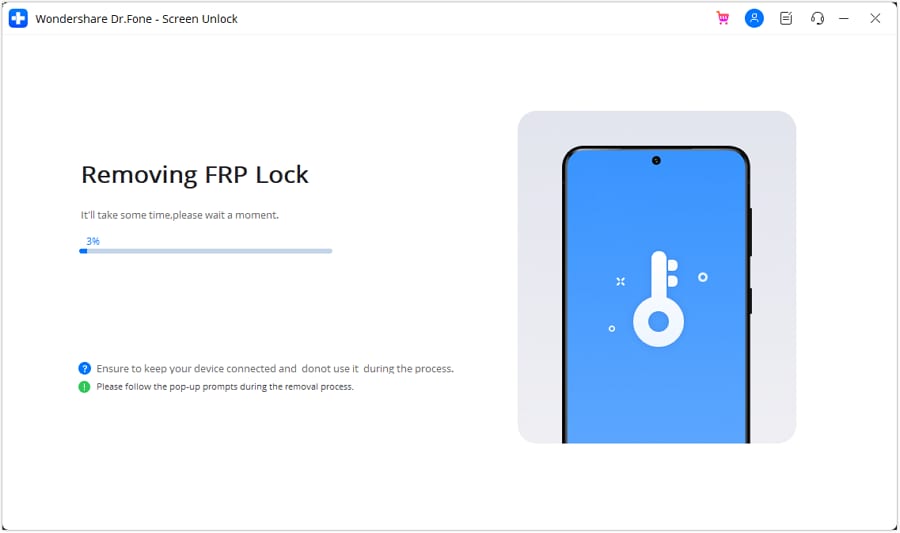
- Step 3. Authorization and FRP Lock Removal Confirmation
Next, an activation prompt for USB debugging will appear on your Android screen. Upon allowing this on your Samsung device, click “Authorized.” Subsequently, the following screen on your computer will indicate the removal of the FRP lock from your Android device. A prompt window will confirm completion once the FRP lock removal is successful. Click “Done” to conclude the process.

safe & secure
How To Bypass FRP on Xiaomi/Redmi/OPPO/RealMe/Vivo Devices?
Dr.Fone got you covered if you use a device other than a Samsung device. You can follow these steps to bypass FRP lock on Xiaomi/Redmi/OPPO/RealMe/Vivo Devices:
- Step 1: Unlocking FRP on Android Devices Using Wondershare Dr.Fone
Open Wondershare Dr.Fone on your computer, navigate to the Toolbox and click Screen Unlock. To bypass the FRP lock, opt for the Android option once the screen appears. Then, choose ‘Remove Google FRP Lock’ from the provided options. Next, select your specific Android phone brand from the options displayed on the screen.
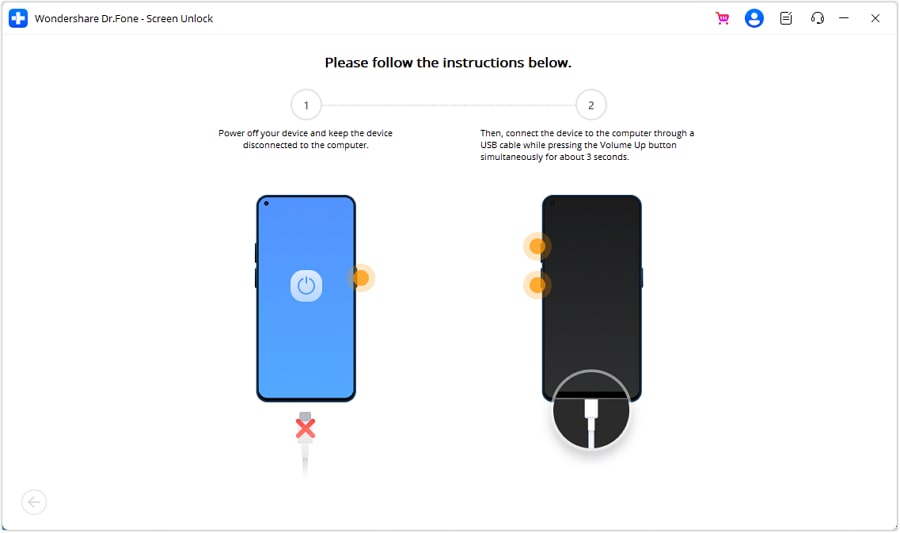
- Step 2: FRP Lock Removal Initialization
Upon selecting your device brand, Dr.Fone initiates the download of the necessary driver. Once downloaded, turn off your device and connect it to the computer. While connecting, press the Volume Up and Down buttons for approximately 3 seconds. The FRP lock removal process will commence and may take a few minutes. Once the lock is removed, simply tap “Done” to finalize the process.
Conclusion
In summary, this article explored bypassing Google account verification on Android devices. We explored vnROM Bypass, highlighting its functionalities and limitations. Additionally, we presented various APK alternatives, emphasizing the need for a more effective solution. Wondershare Dr.Fone - Screen Unlock (Android) emerged as a standout option for its support for all Android versions and user-friendly interface.
Rootjunky APK To Bypass Google FRP Lock For Samsung Galaxy A14 5G
Factory Reset Protection (FRP) is a security feature built into Android devices running Android 5.1 Lollipop and later versions. It prevents someone from using your phone after a factory data reset without Google account login credentials. The FRP makes it much less attractive for thieves to steal Android phones, knowing they will need help to access them.
FRP automatically activates when you add a Google account to your Android phone. It links the Samsung Galaxy A14 5G device to your account, making it the “trusted owner.” Once activated, FRP becomes embedded in the phone’s system.
While Google FRP is a valuable security feature, it’s vital to acknowledge that there are legitimate situations where bypassing it might be necessary. These instances include forgotten Google account credentials, buying a second-hand device, and device issues. In these cases, tools like RootJunky can help you bypass FRP Lock. We’ll explore how to use RootJunky APK later, but first, let’s define what it is and its role in FRP bypass.

The RootJunky APK is a free Android application also called RootJunky SDL or RootJunky FRP Bypass tool. This app’s primary function is to bypass the Google Account FRP lock on Samsung devices. Rootjunky uses the weaknesses in Android’s setup process to create a new user account or switch existing ones, letting you bypass the FRP and regain control of your phone.
You can complete this process using the app by connecting your phone to a computer through an OTG cable. RootJunky can be helpfu l if you’ve forgotten your Google account password or bought a second-hand phone locked to someone else’s account. However, only use it if you have legitimate reasons to bypass FRP lock, like accessing your device after forgetting your Google account details.

Downloading the RootJunky FRP bypass tool from unofficial sources can introduce malware risks, so stick to trusted sources like the official website. Additionally, when exploring RootJunky, it is vital to keep the following in mind:
- Not all Android devices are susceptible to the methods used by RootJunky. It is necessary to check compatibility with your specific device model and Android version.
- Using FRP bypass tools like RootJunkycan potentially compromise the security of your device. Be cautious and proceed if you fully understand the risks involved.
- Bypassing FRP may involve data loss.
- Download RootJunky FRP bypass APK from a reliable source to minimize the risk of malware or viruses. You can check the APK file from official websites or trusted forums.
- Google constantly updates its security measures, so these tools may not always work effectively.
Part 2: How To Use RootJunky To Bypass Google FRP?
Here are the general steps to use the FRP Bypass APK RootJunky app to bypass Google FRP lock. But remember that specific steps may vary depending on your device and Android version:
- Step 1: On your computer, download the Rootjunky RealTerm program from the official Rootjunky website.

- Step 2: On your phone, download the Rootjunky APK (com.rootjunky.frpbypass-1.0.apk) file from the official website or other reputable sites.


- Step 3: Go to Settings > Security and tap Install unknown apps. Then, enable unknown sources to allow installation of apps from outside the Play Store. Connect your device to a Wi-Fi network.

- Step 4: On your Android phone, open a file explorer app and install the downloaded RootJunky APK file.
- Step 5: Connect your smartphone to your computer using a USB cable.
- Step 6: Launch the Rootjunky RealTerm program on your computer. Under the Display tab, check the Half Duplex option.
- Step 7: On your computer, go to Device Manager > Modems. Locate your device’s port name (e.g., COM3).
- Step 8: On the RealTerm program, enter the correct port number under the Ports tab, then click Change.

Step 9: Click Send to establish a connection. Enter the two commands:
at + creg? \ r \ n
atd1234; \ r \ n
Step 10: Once connected, the Rootjunky APK on your phone will provide on-screen instructions to bypass FRP.
Step 11: If prompted, perform a factory data reset of your device.
While RootJunky offers a free method for FRP bypass, it can be incompatible with your device’s brand, requiring technical knowledge, tedious, and potentially risky. If you are looking for a simpler, safer, and more user-friendly solution, Wondershare Dr.Fone might be a better fit for you. If you want to learn how to use this tool to bypass FRP lock with minimal technical expertise, then keep reading.
Part 3: Easier Tool Than RootJunky APK To Bypass Google FRP
Google FRP adds an extra layer of security after a device reset. However, regaining access to the smartphone can be challenging if you forget your Google account details, forget your lock screen, or just buy a used device. While methods like the FRP RootJunky app exist, using it can be complex or risky.
Consider exploring third-party options like Dr.Fone for a potentially easier and safer FRP bypass solution. Dr.Fone Screen Unlock tool helps remove the Android FRP lock without requiring a PIN or Google Account.
Why Use Dr.Fone - Screen Unlock?
Here are some of the key features of Dr.Fone - Screen Unlock:
- **User-friendly:**Fone boasts an intuitive interface, eliminating the need for technical expertise. Even beginners can navigate the process with ease.
- **Widespread Brand Compatibility:**Fone supports mainstream brands, such as Samsung, Xiaomi, Oppo, Redmi, Realme, and Vivo, catering to a broader user base.
- **Fast and Efficient:**Regain access to your device in minutes without wasting time on tedious procedures.
Step-by-step Guide to Removing FRP Lock With Dr.Fone - Screen Unlock
Ready to leave the hassle of using RootJunky and easily bypass the FRP lock? Download and install Dr.Fone on your computer, then follow these steps to learn how to bypass Google FRP on your device:
- Step 1: Launch Dr.Fone on your computer and connect it to your Android device. Choose Screen Unlock from the Toolbox in the main interface.
- Step 2: Choose Android as your device type. This will take you to the next screen, where you can select Remove Google FRP Lock to proceed.
- Step 3: Select your device’s brand from the list and click Start to continue.
Note:
The next steps may vary depending on the brand you selected.
- Step 4: Select the OS version of your device and click Start to continue.
- Step 5: Access the secret menu on your phone using the on-screen instructions, then click Next to proceed to the next step.
- Step 6: When your Samsung prompts you to activate USB debugging, tap Allow. Then, on your computer screen, click Authorized to confirm.

- Step 7: You will see the FRP lock being bypassed on your Android device on the next screen.
- Step 8: Click Done if the FRP lock removal was successful, otherwise, click Try Again to repeat the process.
That’s it! With Dr.Fone Screen Unlock, you can easily bypass Google FRP and regain access to your Android device, leaving the complexities of RootJunky behind.
Tips: Are you searching for a powerful FRP bypass tool? No worries as Dr.Fone is here to help you. Download it and start a seamless unlock experience!
Conclusion
Both RootJunky and Dr.Fone offer options for you to regain control of phones with Google FRP lock. FRP Bypass RootJunky tool excels with its free-to-use approach, perfect for tech-savvy users comfortable with APK installations. While requiring a paid subscription, Dr. Fone provides pre-rooted firmware installations and broader device compatibility, which is ideal for those seeking a more streamlined but supported experience.
The best choice boils down to your personal needs and budget. Remember, FRP bypass should only be utilized by rightful owners facing genuine lockouts. When used responsibly, these tools can help you access your phone after a factory reset even without your Google account credentials. Choose the tool that best fits your needs and proceed with caution. Use these tools responsibly and regain access to your device the right way.
- Title: How To Change Samsung Galaxy A14 5G Lock Screen Clock in Seconds
- Author: Peter
- Created at : 2024-07-16 09:06:11
- Updated at : 2024-07-17 09:06:11
- Link: https://android-unlock.techidaily.com/how-to-change-samsung-galaxy-a14-5g-lock-screen-clock-in-seconds-by-drfone-android/
- License: This work is licensed under CC BY-NC-SA 4.0.