
Downloading SamFw FRP Tool 3.0 for Vivo Y02T
Downloading SamFw FRP Tool 3.0 for Vivo Y02T
FRP (Factory Reset Protection) is a security feature for Android devices to prevent unauthorized access after a factory reset. SamFw FRP Tool is a popular solution for bypassing FRP on Samsung devices. Downloading the tool is crucial for users locked out of their devices.
The page discusses and evaluates its effectiveness with a comprehensive review. After that, you’ll see considering another option is wise, and the article will also recommend an alternative. Stay tuned for our insights. For now, you can download the SamFw FRP Tool for free and explore its features. Read on to learn more.
Part 1. A Detailed Introduction of SamFw FRP Tool
For many Samsung users, encountering a Google FRP lock can be a frustrating experience. A user recently reached out, saying:
“I’m facing a Google FRP lock issue on my recently acquired Samsung Galaxy S23 from eBay. Has anyone successfully used SamFw to bypass FRP without the previous owner’s account credentials?”
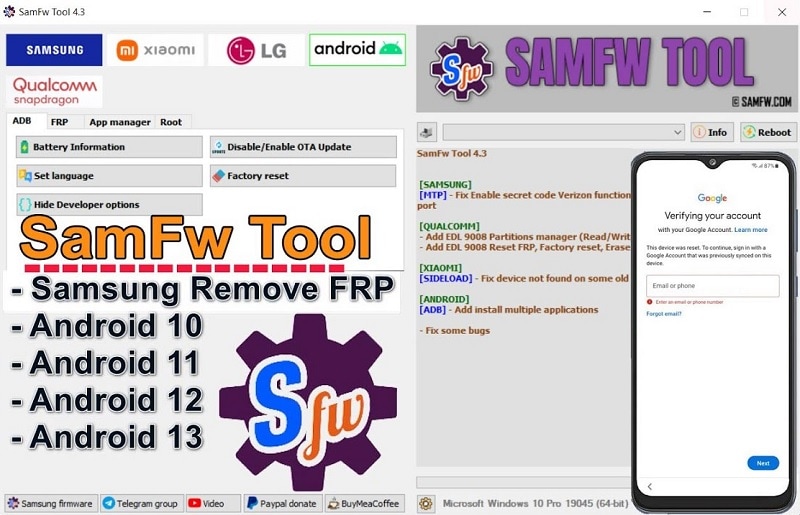
SamFw FRP Tool is designed to unlock Samsung devices afflicted by Google FRP locks. The tool aims to provide a solution for bypassing FRP without the previous owner’s credentials. It is beneficial for their Samsung devices to be locked out due to a factory reset.
Key Features of SamFw FRP Tool
Explore the essential features of the SamFw FRP Tool. Learn its key features for efficient Android device security solutions.
- Unlock Samsung without data loss
SamFw FRP Tool can unlock Samsung devices without causing any data loss during the process. It ensures that your personal information and files remain intact.
- Remove various Android locks
The tool can also remove other Android security measures. It can bypass pins, passwords, facial IDs, patterns, and fingerprints.
- Wide compatibility
SamFw FRP Tool supports a broad range of Android versions. It’s compatible with Android 5 to the latest Android 13.
- User-friendly FRP bypass
SamFw FRP Tool offers a straightforward solution to remove Google FRP locks. Its intuitive interface makes the process accessible for beginners.

How To Use SameFw FRP Tool
Here’s a comprehensive guide to help you bypass FRP using the Sam FRP bypass tool.
- Step 1: Download the SamFw FRP tool on your computer. Install the app and launch it afterward. Connect your Samsung to your computer.
- Step 2: Choose your device’s brand and click the Remove FRP button. Your phone screen will then display a notification requesting USB debugging permission. Tap OK to proceed.

- Step 3: Allow the process to complete. Upon completion, your device will automatically reboot as part of the FRP removal process. The reboot signals that the process bypassed the FRP lock. Close the pop-up and enjoy unrestricted access to your device.

Note
It’s important to note that the _SamFw FRP Tool_ is only compatible with Windows OS. Users with Mac or Linux systems may need to explore alternative solutions for FRP bypass.
If you’re seeking a reliable and flexible alternative to the SamFw FRP tool, Wondershare Dr.Fone - Screen Unlock (Android) is the best choice. Its proven track record and various compatibilities offer a seamless solution for Android devices. In addition, it makes it easy to work on FRP lock without a PIN or Google Account. Let’s explore further below.
Part 2. Best SamFW FRP Tool Alternative: Wondershare Dr.Fone
Wondershare Dr.Fone - Screen Unlock (Android) is the go-to choice for many users seeking efficient FRP bypass methods. The app is available for Windows, Mac, and Linux, adding to its versatility. Here are some reasons why it’s the best alternative to the SamFw FRP Tool.

- Versatile lock screen removal. Dr.Fone excels in removing various Android lock screen types. It offers a comprehensive solution for users facing different security challenges.
- Pin and Google Account bypass. The tool bypasses FRP without the need for a PIN or Google Account. It provides a hassle-free experience for users.
- Fast unlock process. Dr.Fone ensures a swift unlocking process. With the ability to remove the lock screen within less than 5 minutes, it minimizes inconvenience.
- Extensive device compatibility. Supporting over 2000+ Android models, Dr.Fone Screen Unlock - Android boasts extensive compatibility. It’s a versatile and reliable choice for users with various devices.
How To Bypass FRP With Dr.Fone - Screen Unlock (Android)
Dr.Fone - Screen Unlock (Android) is the ultimate alternative to the SamFw FRP Tool. Follow the steps outlined to bypass FRP without complications using the platform.
- Step 1: Download and install Dr.Fone - Screen Unlock (Android) on your computer. Launch the program, and select Toolbox > Screen Unlock from the main menu. Click Android as the Vivo Y02T device type to continue.

- Step 2: Connect your Android device to the computer using a USB cable. Choose the Remove Google FRP Lock option.

- Step 3: Choose your Android device type and click Start to proceed to the next window. Afterward, choose All Android versions (One-Click Removal) if you don’t know the OS version of your phone. Click the Start button again to continue.

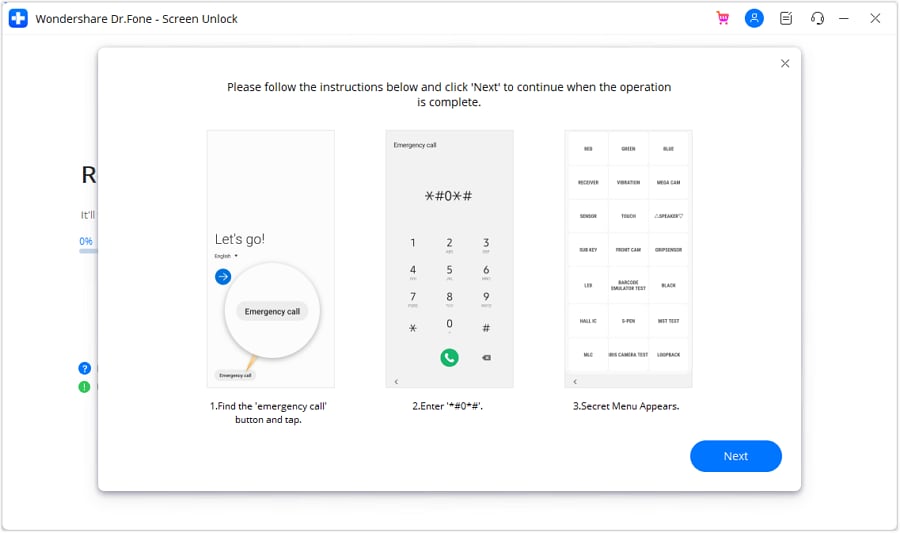
- Step 4: Next**,** follow the on-screen instructions. Locate the Emergency Call button on your Android and tap it. Dial “*#0*#” for a secret menu. Click Next in the app. Your Android will prompt the USB debugging option. Tap Allow on your phone, then click Authorized on your computer.

- Step 5: Dr.Fone will confirm the removal of the FRP locks from your Android device. After successful removal, the prompt window indicates completion. Click Done upon successful execution. If issues persist, retry the process with the Try Again option.

Part 3. Side-by-Side Comparison Between SamFw Tool and Dr.Fone
Choosing between SamFw Tool and Dr.Fone - Screen Unlock (Android) shouldn’t be hard. Here’s a concise side-by-side comparison evaluating their ease of use, speed, compatibility, features, and more.
| SamFw FRP Tool | Wondershare Dr.Fone | |
|---|---|---|
| Ease of Use | User-friendly interface, suitable for beginners | Intuitive design, making it accessible for all users |
| Unlock Speed | Efficient FRP bypass speed varies by device | Swift unlocking process, often under 5 minutes |
| Compatibility | Windows-only, limited OS compatibility | Wide compatibility with Windows and Mac, extensive Android device support |
| FRP Bypass Capability | Effective FRP removal, especially for Samsung devices | Bypasses FRP without a PIN or Google Account, versatile lock screen removal |
| Additional Features | Removes various Android lock screen types | Pin and Google Account bypass, extensive device compatibility |
Read More About FRP Bypass:
Top 5 Huawei Bypass FRP Tools for PC That Actually Work
Bypass FRP OPPO All Series like a Pro With/Without PC
Ways to Remove FRP Lock on Motorola Phones without a PC
Conclusion
SamFw FRP Tool is a viable option for users with FRP lock issues, particularly on Samsung devices. Its interface and effectiveness in removing FRP are noteworthy features. However, limitations arise with its Windows-only compatibility, which may impact user experience.
In comparison, Dr.Fone - Screen Unlock (Android) is a great alternative. Its design, fast unlocking process, and compatibility make it a versatile and reliable choice. The tool’s ability to bypass FRP without a PIN or Google Account adds to its appeal. Test both apps to see which one works best for your needs.
Tips: Forget your device password and can’t get access to it? No worries as Dr.Fone is here to help you. Download it and start a seamless unlock experience!

How to Show Wi-Fi Password on Vivo Y02T
Since the invention of Android OS in 2008 by Andy Rubin, our world has faced a dramatic change. Android seems to be controlling a considerably high portion of our life. We have bought many gadgets that use this amazing OS and most of which are phones. But how much can you do with your Android phone? Developers are always making it more interesting to use this interface.
Most of the time, we use Android phones, we get faced with the need to access the internet. The Wi-Fi capability of these Android gadgets makes it super easy for us to surf the web. Throughout using Wi-Fi, we connect to a number of them. This could be at school, a sub-way café, the gym, buses, hospitals, hotels, towns, and the list is endless. A password secures most of this. Needless to say, our brain is weak to store all these passwords for future use, especially if you would want to connect with a different gadget you have recently bought or even your laptop. In this article, we will introduce you to how to find wifi password on rooted and also unrooted Android devices.
Part 1: Show Wifi Password on Rooted Android Device
What is Rooting?
First of all, what does rooting mean? You have probably used a Windows computer or even Linux. For the case of Windows, when installing a new program or software, it always prompts a dialog box saying, “Administrator permission required to run this program.” If you don’t have the administrator permission, you won’t install the program. In Android, this is called rooting. In simple terms, it means having the root permission to your phone. Some Android apps will require you the root permission, e.g., flashing your ROM. In this part, we will explain how you can show the Wi-Fi password on your Android with root.
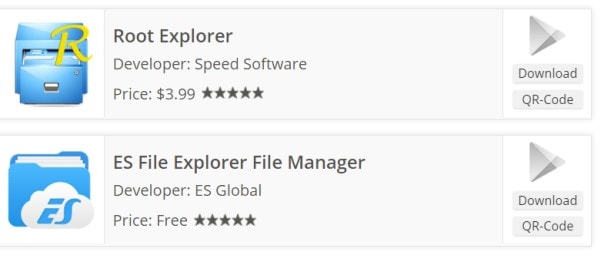
To find the Wi-Fi passwords on your Android phone, you need to have an app to explore files which also supports a root user. In this case, ES FileExplorer or Root Explorer will come in handy. However, it turns out that the latter is offered at $3. Let’s use the free ES File Explorer.
Steps of getting Wi-Fi password on Android with root
In only four steps, we, at this moment, learn how we can find the password of a Wi-Fi on an Android phone.
Step 1: Install the ES File Explorer
Download the ES File Explorer from your play store, install it, and open it.

Step 2: Enable Root Explorer
The root explorer needs to be enabled so that you can reach the root folders of the Wi-Fi passwords you need. By default, the root feature in this ES explorer is not enabled. To enable it, just tap on the list menu on the top left corner.:
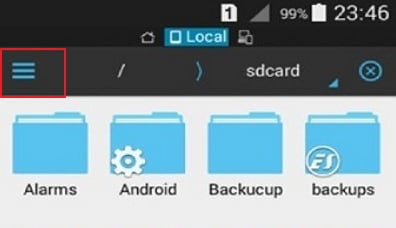
This will drop down a list of controls. Scroll down and find the Root Explorer option and enable it.

Step 3: Get the passwords’ file.
Go back to ES file explorer, and this time, find the folder named data.
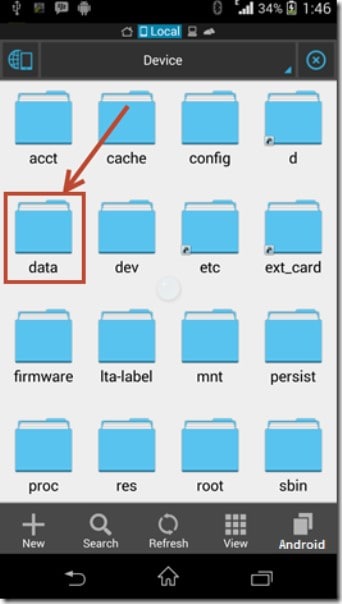
When this folder opens, find another one named misc. Open it and find another one named wifi. Here, find a file named wpa_supplicant.conf.

Step 4: Retrieve the wifi password on Android
Make sure that you don’t edit anything in the file. You might mess up with important data and fail to access the Wi-Fi(s) in the future.
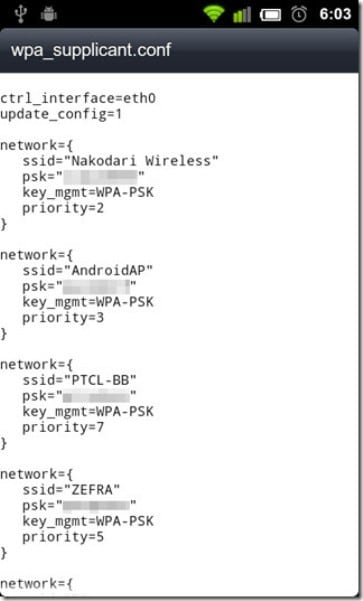
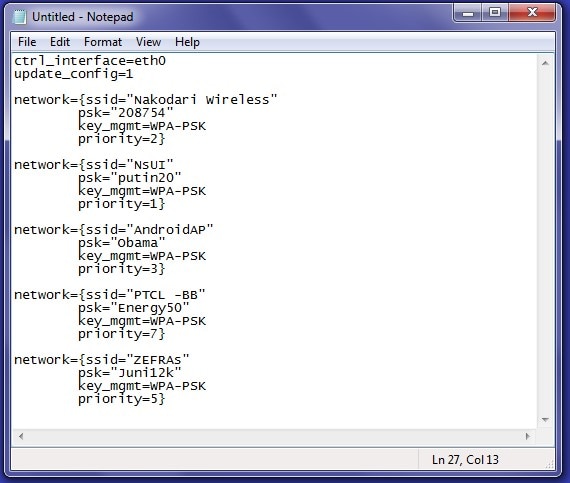
As you can see above, we have found the Wi-Fi passwords on the android device. On each network profile, we have the name of the network represented by name (ssid=”{the name}”), the network’s password represented by psk, the network’s access point represented by key_mgmt=WPA-PSK and its priority represented by priority.
Part 2: Show Wifi Password on Android without Root
What if I don’t have root access to my Android, can I still see Android Wi-Fi password? The short answer is yes. However, this is a bit involving but simple. You don’t need to be a computer guru to do it, but you need to have a computer and some internet access of course. The key thing is to find a way through which we can fetch the password file from the phone without using a root access protocol in the Android. This is made possible by some little programming insight using the Windows Command prompt.

Steps to show Wi-Fi password on Android without root
Step 1: Access the Developer authority
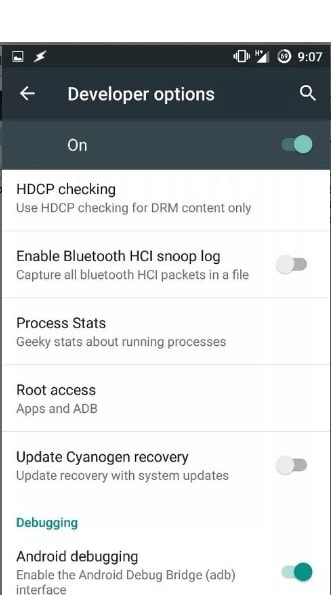
To access the files that Android uses to run passwords, you must first become a developer. This is very simple.
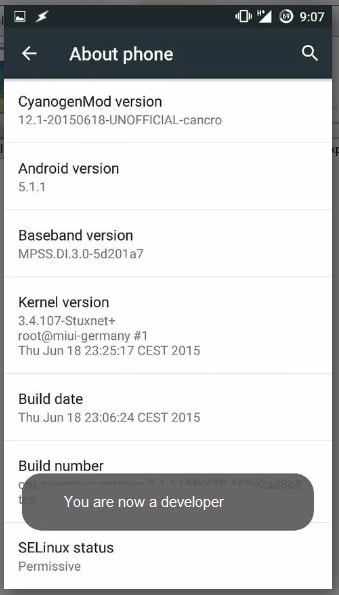
Get your Android phone and go to settings. Scroll down and find “About phone.” Tap on it and scroll down again to find Build number.

Tap on this “build number” 5 to 6 times until a message pops up, saying, “You are now a developer”.
Step 2: Enable the debugging.
Go back to Settings. Scroll down for developer options. Turn on the button for “Android/USB debugging”.
Step 3: Install ADB drivers.
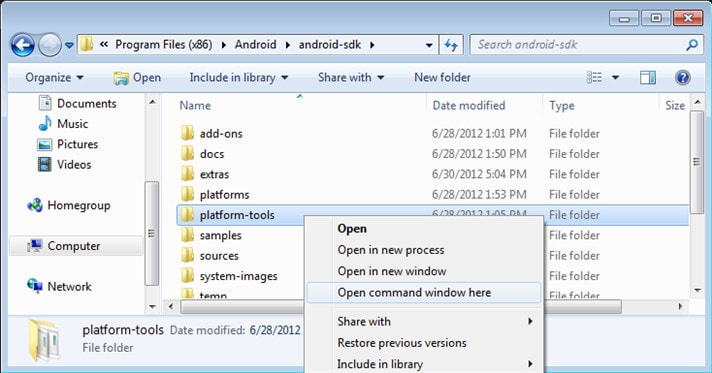
Now, open your Windows desktop. Download and install ADB drivers. (Use this download link adbdriver.com ). You need to download and install platform tools (minimal ADB and fastboot) from http://forum.xda-developers.com/... Now open the folder where you’ve installed the above tools. By default, it is in the Local disc C\windows\system32\platform_tools location. However, you might want to locate them by searching on the windows search engine. You have to hold the Shift key and right-click inside the folder to click on”Open Command Window Here.”
Step 4: Test the ADB
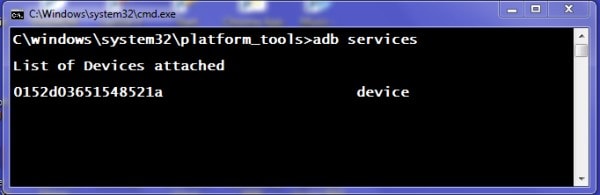
Here, we would like to test whether the ABD is working properly. To do this, connect your phone to the PC using a USB. In the command prompt, type adb services and then press enter. If it’s working properly, you should see a device on this list.
Step 5: Find the Android wifi password.
Now, it is time to type the given command in the command prompt and type: adb pull /data/misc/wifi/wpa_supplicant.conf c:/wpa_supplicant.conf. This will fetch the file from your phone to the local disc C drive of the PC.
Step 6: Get the wifi passwords.
Lastly, open the file with a notepad, and there you go.
Now you learned how to show the wifi password on your Android device.
How To Easily Unlock Vivo Screen?
If you’ve ever had a Vivo phone, then you know that their screens are locked by default. It can be a pain if you want to access your messages or change your background image quickly. If you just set your Vivo password, screen lock code, pattern lock, or PIN last night or a few days ago, you are most likely to forget it.
The result is that you have locked out of your phone, and you have to reset your device’s password. But fortunately, there’s an easy way to unlock your Vivo screen without entering any passwords. You can have your phone up and running in a few simple steps without contacting customer service.
So don’t wait any longer - read on for instructions on how to unlock the Vivo phone pin code.
Let’s get started!
## 4 Easy Ways To Unlock Vivo Screen
Like most people, you probably lock your Vivo phone as soon as you turn it on. It’s a good way to keep your phone safe from prying eyes and accidental button presses. But what happens when you forget your phone’s passcode? Or worse, what if your phone gets locked by a malicious app?
There are a few different ways to unlock your Vivo phone. We’ll show you how to do it.
Method 1. Google Find My Device (Without Password/Pin/Pattern)
If you’re like me, you’ve probably tried a million different ways to unlock your Vivo phone, only to be frustrated by the results. Luckily, there’s an easy way to unlock your Vivo phone using Google’s Find My Device feature.
Google will use your location, phone information, and connection log to find your Nokia.
Follow these steps to unlock the Vivo lock screen password without losing data:
- Step 1: Sign into your Google account and navigate the Find My Device website.

- Step 2: Sign in with your Google account, which you used on your locked Vivo phone.
- Step 3: The Android Device Manager dashboard will show your locked Vivo with three options: Ring, Lock, and Erase.
- Step 4: Simply click on “Lock”.
- Step 5: Enter a password that is not your Google account password in the “New Password” field.
- Step 6: Type the new password in the “Confirm password” field. This password lock will replace the current lock screen.
- Step 7: You can leave the “Recovery message” field empty or type anything in it.
- Step 8: Enter another phone number in the “Phone number” field, although this is optional.
- Step 9: Choose “Lock” after entering your password and filling out the optional fields if you wish.
- Step 10: If the process is successful, you will receive the unlock code within a few seconds.
- Step 11: Navigate to the “Screen Settings” menu after unlocking your device.
- Step 12: Use a new password; you can use the temporary password if you want.
You can use it to unlock your Vivo if you have activated the Android Device Manager or Google Find My Device before your phone was locked.
A few conditions, however, must be met for this to work
- You must turn on your Vivo phone.
- Before locking your phone, you must activate Google Find My Device or Android Device Manager.
- You must have your Vivo GPS turned on to use it.
- You must be connected to WiFi on your device to log into your Google account.
- Your phone needs to be set to location.
Method 2. Unlock Vivo Lock Screen With Hard Reset
If you perform a hard reset on your Vivo lock screen, all data, and user information will be erased, including your screen lock, password, pattern lock, and PIN.
Follow the steps below if you want to know how to unlock the Vivo phone keypad with the hard reset, follow the steps below.
- Step 1: Turn off your Vivo phone.
- Step 2: Press the “Volume down” and “Power key” buttons simultaneously for a few seconds.
- Step 3: Press the “Volume Up” and “Power” buttons for a few additional seconds once the screen darkens.
- Step 4: Release all buttons and keys if you did step 3 correctly. Once you release all buttons, you’ll see a dark screen with options.
- Step 5: Choose “Wipe data/factory reset” from the menu, using “Volume Up” to scroll up, “Volume Down” to scroll down, and “Power” to select.
- Step 6: From the Android Recovery screen, select the “Yes” option by pressing the “Volume Down” button and the “Power” key.
- Step 7: With the “Power” key, select “Reboot system now” from the next display.
Your Vivo is now password, pattern lock, screen lock, and PIN-free after a hard reset.
Method 3. Unlock With Answer Security Questions
You can reset the Vivo pattern lock using Google security questions without losing data.
Follow the steps below on how to unlock the Vivo phone pin code:
- Step 1: Power on your Nokia.
- Step 2: Press “Forgot pattern” several times until you see “Forgot password”.
- Step 3: Click on “Forgot pattern” to access the unlock screen.
- Step 4: Enter your Google account details or answer questions to unlock the screen. Select “Answer question”.
- Step 5: Enter your exact security answers and tap the “Unlock” button.
- Step 6: Choose “YES” from the “YES” or “NO” menu, and the password field will appear.
- Step 7: Change your password or PIN.
- Step 8: You will see your Vivo unlocked soon.
Method 4. Unlock the Keypad With a Security Code
You could reset your Vivo lock screen phone using the default security code, even if you haven’t set any security code. Here’s how to quickly unlock the Vivo lock screen security code.
- Step 1: Shut down your device.
- Step 2: Press these buttons in the following sequence on a classic phone.
Call button (green button) + Asterisk key (*) + Three (3)
- Step 3: Your screen displays a Formatting message when you press these keys.
- Step 4: Wait for the formatting to complete before releasing the keys.
o 12345.
Conclusion
If you have a classic-style keypad phone or an Android device, unlocking a locked Vivo phone keypad is not easy. However, we believe that every problem has a solution. You can unlock Vivo Android phones using any of the methods listed above.
Tips: Wondershare Dr.Fone is a tool that helps you keep your important data safe. It can back up all the important information on your Vivo phone, like photos, music, videos, contacts, and more and is compatible with over 8000 Android devices. The backup process is easy and only takes a few clicks. You can also restore your backup to any device you want, and choose which data you want to restore. This is a great way to make sure you never lose your important Vivo data!
- Title: Downloading SamFw FRP Tool 3.0 for Vivo Y02T
- Author: Peter
- Created at : 2024-07-16 11:33:39
- Updated at : 2024-07-17 11:33:39
- Link: https://android-unlock.techidaily.com/downloading-samfw-frp-tool-30-for-vivo-y02t-by-drfone-android/
- License: This work is licensed under CC BY-NC-SA 4.0.