
Delete Gmail Account With/Without Password On Oppo A18
Delete Gmail Account With/Without Password On Oppo A18
Email accounts have proven their worth in digital devices beyond sending emails. Lately, Android devices have only operated with a Gmail account. This is because most of the data, such as contact information, messages, and other details, are saved across the storage space offered with the email. Against all recognizable uses of Gmail accounts, users look for ways how to delete Gmail accounts.
To this day, it is known that Gmail accounts can be removed with or without a password. However, one should know that if they consider deleting their Gmail account, they won’t be able to send or receive emails. With that, let’s proceed to reveal all essential methods that can be used to delete a Gmail account permanently. This article will also focus on a perfect tool that assists in making the process easier.

Part 1. Synopsis: Things To Know Before Deleting Gmail Account
Although the process of deleting a Gmail account sounds basic, there are many pointers connected to it. For that, this part is putting up a discussion on the important things that a user should know before they delete their Gmail account permanently:
- No Going Back: If you delete a Gmail account, the process is irreversible. All details and information will be lost, and the email won’t be trackable ever again.
- Cannot Reset Passwords if Connected: If the Gmail account is connected to any other service, make sure that you remember their passwords. Since the account will be deleted, you cannot reset their passwords.
- Access to Other Services: Although you are deleting your Gmail account, you can still access Google Photos, Google Drive, and other services.
- Lookout For Emails: Ensure that the emails in your account are saved. You can easily download them anywhere before deleting the Gmail account.
Part 2. Delete Your Gmail Account Using Your Password: Desktop Solution
For the first method, we will discuss how to delete a Google account with your password. You will use your computer for this process and access the Google Account services. The service helps you save all your essential Gmail data before you remove it. To understand how it makes it possible, look through the steps provided below:
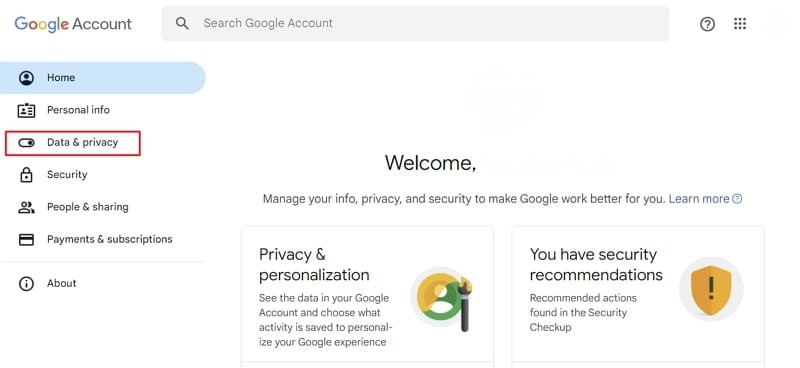
- Step 1. Access the website https://myaccount.google.com/ on your desktop browser and log in with your credentials. Proceed to the “Data & privacy” section from the left panel.
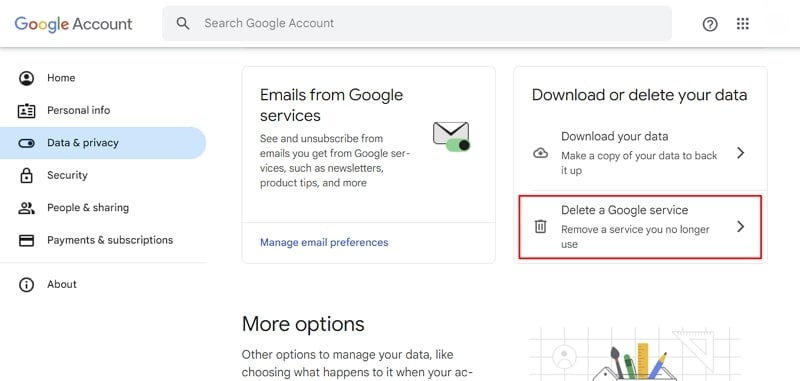
- Step 2. On the following window, scroll down and look for the “Delete a Google service” option. Accessing this would allow you to delete your Gmail account permanently.
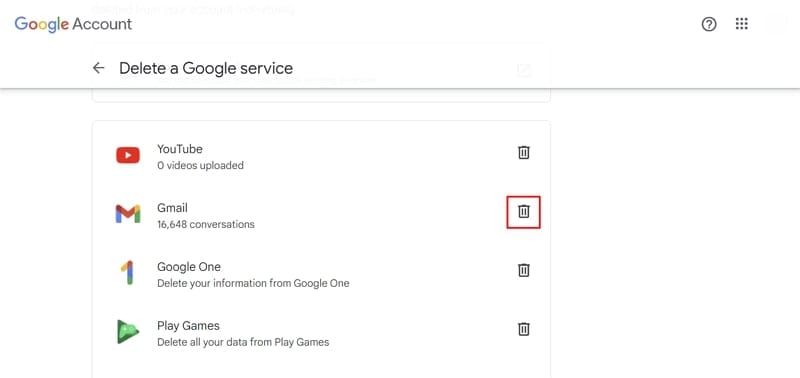
- Step 3. You will be led to a new screen where you need to provide your password credentials again. On successfully providing your password, look for the “Gmail” option on the next screen. Click the “Trash” icon to continue deleting the Gmail account.
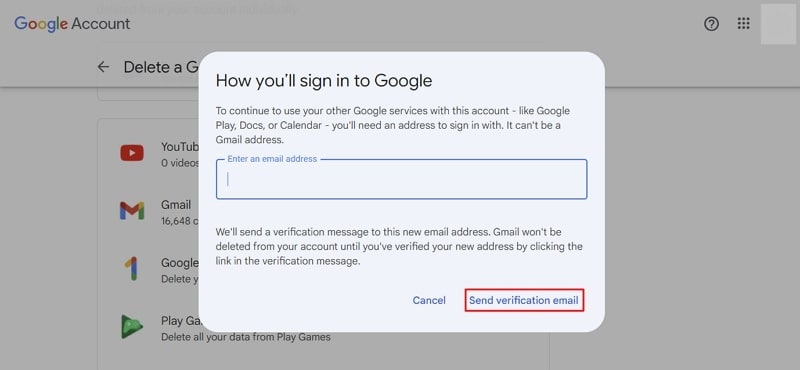
- Step 4. A new pop-up window opens, demanding another email address that can help connect to other Google services. Provide the email address and continue to click “Send verification email .” The Gmail account won’t be deleted until the user verifies the email sent to the new address.
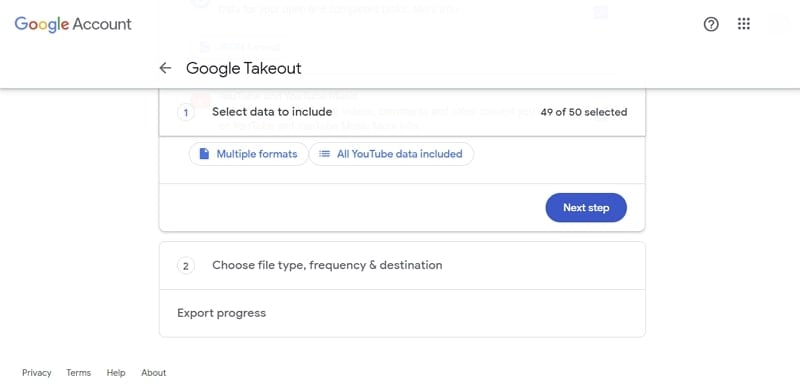
- Step 5. For those who want to save their email data, look for the “Download your data” option in the same window. This leads you to the Google Takeout window, where you need to select the data to include. After selecting the data, define the file type, frequency, and destination for exporting all important data.
Part 3. Delete Your Gmail Account From Your Smartphone: Android & iOS
If you use a smartphone device and want to delete your Gmail account from that particular device, you are at the right place. The following methods will help you understand how to delete Gmail from your Android and iOS devices:
Android Devices
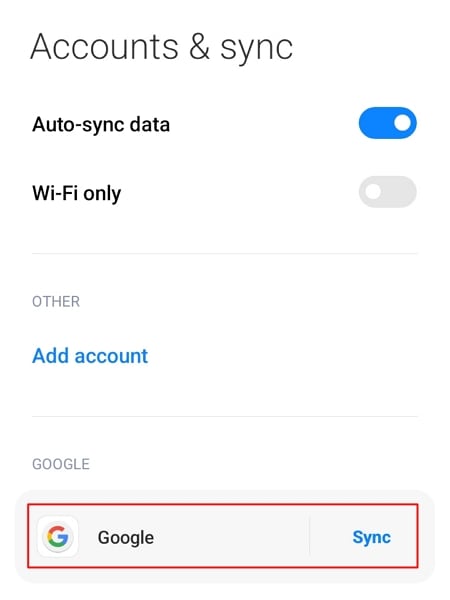
- Step 1. Look for “Settings” on your Android and continue to the “Accounts & sync” option in the list. As you proceed into the next window, look for the Google account and select it.

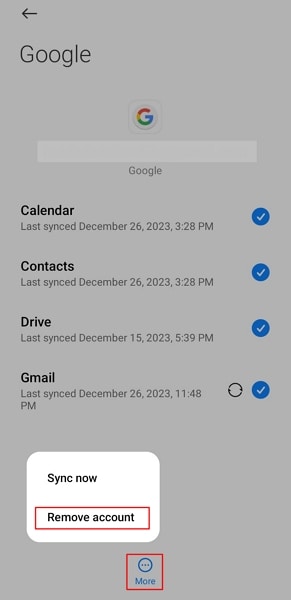
- Step 2. Select the “More” option at the bottom on the following screen. Choose the “Remove account” option in the pop-up menu and provide your credentials to execute the deletion of your Gmail account.
iOS Devices
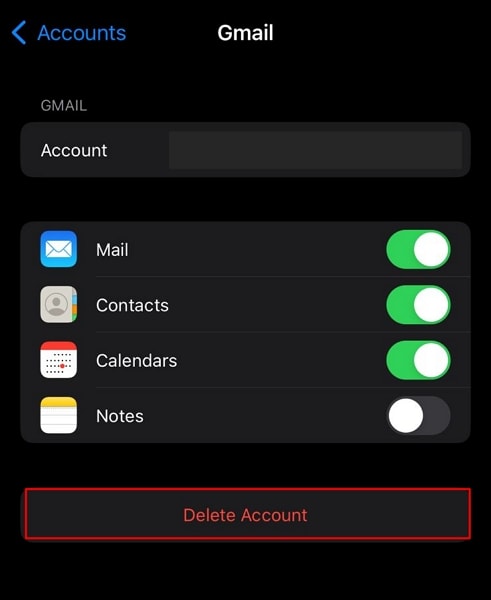
- Step 1. Open your iPhone’s “Settings” app and scroll down to the “Mail” option. You will find the “Accounts” option on the following screen, which you need to tap to proceed.
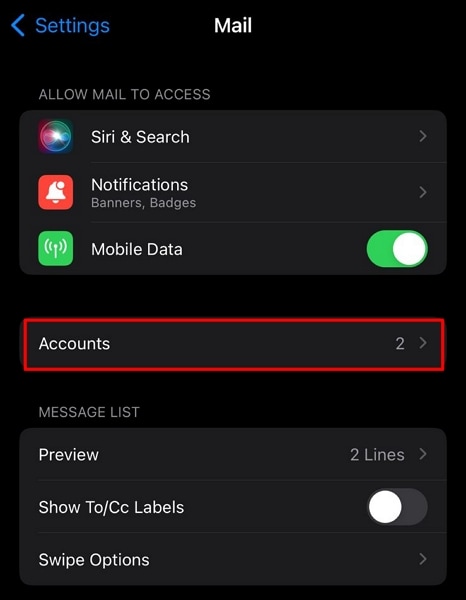
- Step 2. Discover the option of “Gmail” in the list of signed-in accounts and continue to the next screen. Select “Delete Account” to remove the account from your iOS device.
Part 4. Don’t Know Password of Device? Reset To Delete Gmail Account
What if you’ve forgotten the password to your smartphone device, and you have to delete your Gmail account permanently? In such cases, you are left with the option of accessing the Oppo A18 device’s Recovery Mode and factory resetting the Oppo A18 device, where possible. To know how it is done flawlessly, look through the steps provided next:
Android Devices
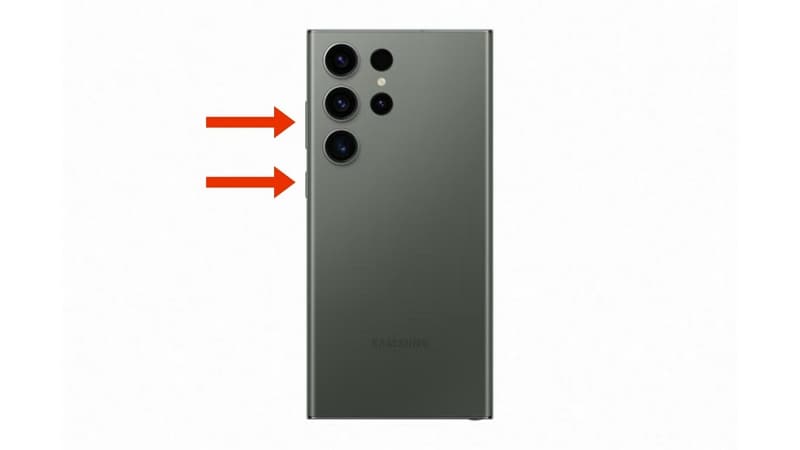
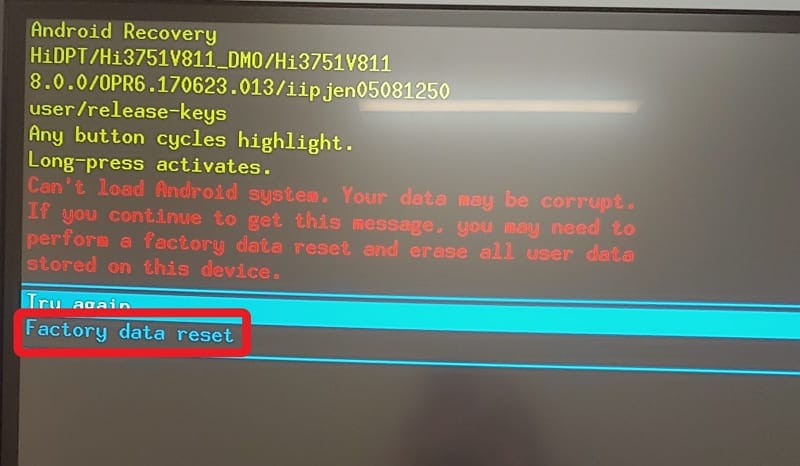
- Step 1. Those owning an Android device need to put it in Recovery Mode first. For that, use the combination of the “Power” and “Volume” keys to put the Oppo A18 device in Recovery Mode.
- Step 2. Once you boot into the Recovery Mode, use the Power and Volume buttons to scroll through the menu. Scroll down with the Volume buttons and select the “Wipe data/factory reset” option with the Power button.
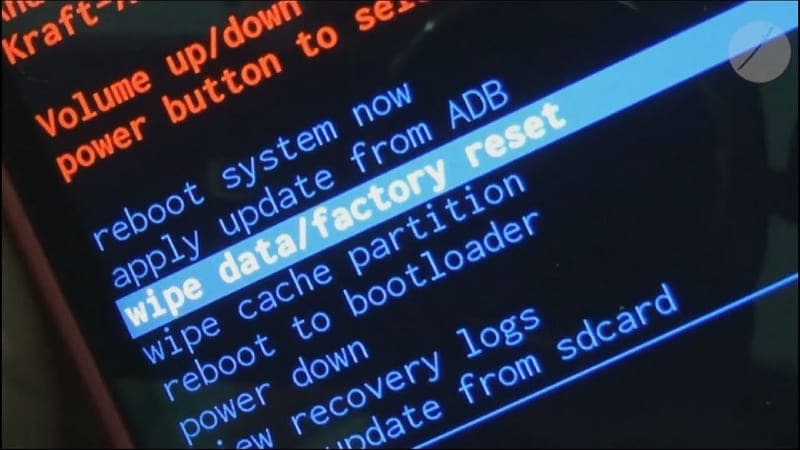
- Step 3. Select “Factory data reset” on the next screen and confirm that factory reset your Android device successfully. The device automatically gets out of Recovery Mode and starts normally after resetting.
iOS Devices
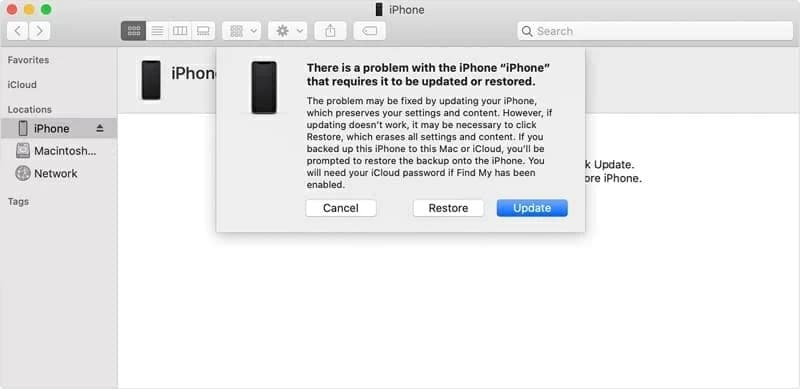
Step 1. You need to turn on Finder if you own a macOS Catalina or later device. Conversely, use iTunes if you have a macOS Mojave or earlier version or if you are using Windows. Connect your iPhone to the computer using the lightning cable and put it in Recovery Mode.
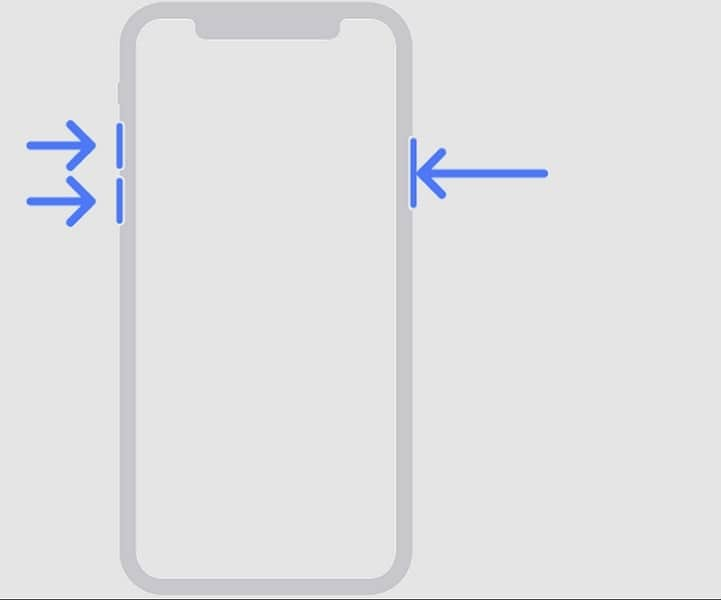
For iPhone X or Later Models: Press and release the “Volume Up” button, followed by the “Volume Down” button. Hold the “Side” button until the Recovery Mode screen appears.
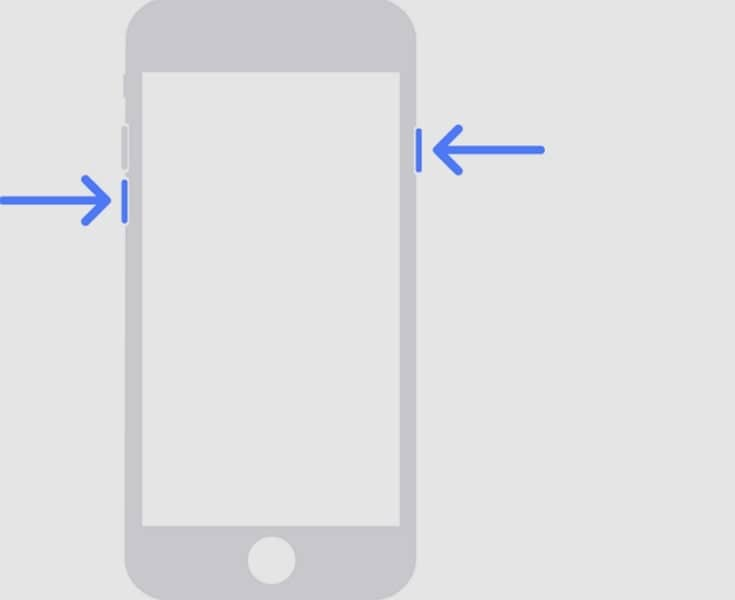
- For iPhone 7 Models: Hold the “Side” and “Volume Down” button until the Recovery Mode screen appears.
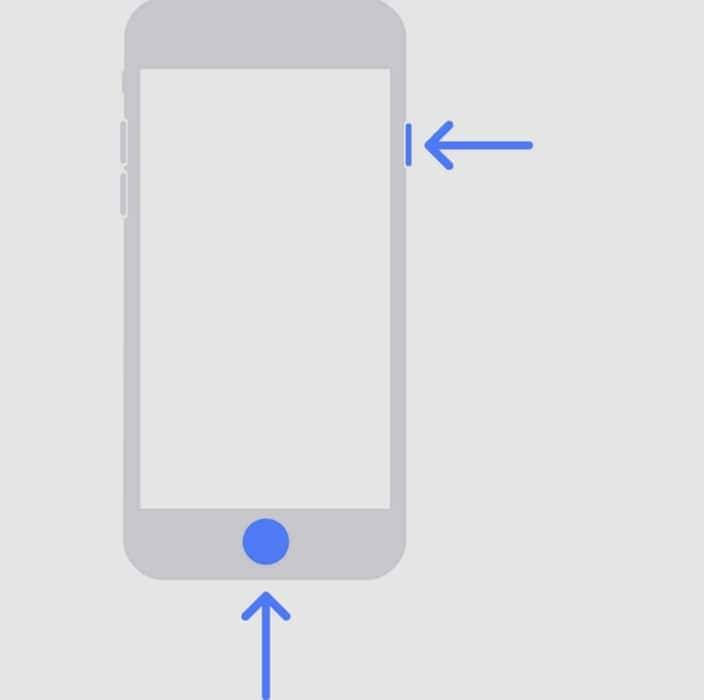
- For iPhone 6 and Earlier Models: Hold the “Side” and “Home” buttons simultaneously until the Recovery Mode screen appears.
- Step 2. The device automatically gets detected on Finder/iTunes, and a pop-up appears on the screen. Click “Restore” to reset your iOS device to factory settings.
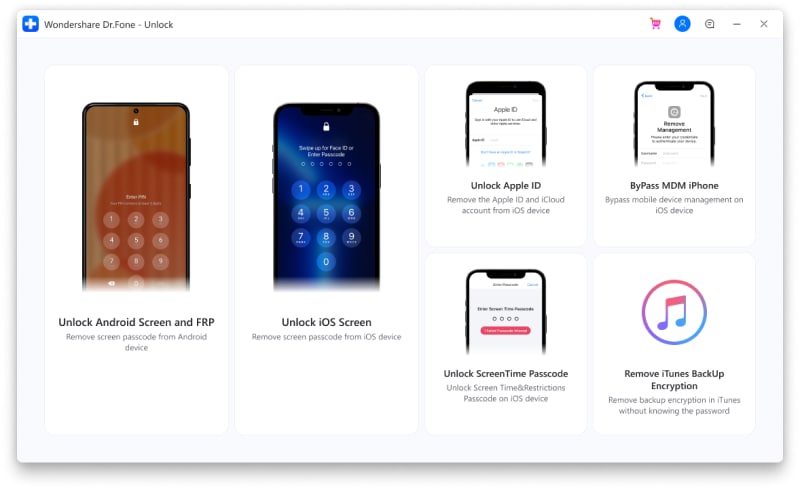
Part 5. Remove Gmail Account From Device Without Password: Using Wondershare Dr.Fone
While you seek some appropriate way to close a Gmail account from a device whose password you’ve forgotten, you might get into Wondershare Dr.Fone. This all-in-one service offers a unique Screen Unlock feature that helps you restore your device. If you have forgotten the lock screen password of your Android device, Dr.Fone – Screen Unlock (Android) makes it exceptionally easy to recover.
Key Features of Wondershare Dr.Fone
![]()
Dr.Fone - Screen Unlock (Android)
The Best UnlockJunky Alternative to Bypass FRP and Solve Your Screen Locks
- Remove all Android screen locks (PIN/pattern/fingerprints/face ID) in minutes.
- Bypass the FRP lock of Samsung without a PIN or Google account.
- Everyone can handle the lock screen without any tech knowledge.
- Provide specific removal solutions to promise good success rate.
4,008,671 people have downloaded it
Whether it is your latest Samsung or other Android smartphone, the process is easy to work with. You might look for more details about this unique tool, for which some important features are highlighted as follows:
- It removes all major types of screen locks from your Android devices.
- Provides support to the latest Android devices, along with all mainstream brands.
- You can recover your device with and without data loss, according to your discretion.
Steps To Remove Google Account While Removing Screen Lock
The following steps highlight the way to remove screen lock from your Android device, which would also cover removing the Google Account automatically:
- Step 1.Launch Screen Unlock Feature
To start with the process, launch Dr.Fone on your computer and navigate to the “Toolbox” section. Proceed to the “Screen Unlock” feature, which opens a new window. After selecting “Android” as your device type, select “Unlock Android Screen” from the available options.

- Step 2.Select Device Brand and Unlock Mechanism
As you direct into the next window, select the brand of your Android device. Continue to select “100% Remove Screen Lock” from the following window.

- Step 3. Follow the Instructions and Successfully Remove the Screen Lock
According to your selected device brand, Dr.Fone provides guidelines for entering the specific mode. Follow the on-screen instructions to start unlocking the screen of your device. If the process is successful, click “Done” to conclude using Dr.Fone – Screen Unlock.

Conclusion
This article has specifically provided you with some important details on how to delete a Gmail account with ease. The article explains everything from the methods of deleting it from the computer to removing it from the Oppo A18 device. Furthermore, it also serves as a guidance for those who have forgotten their device passwords. For that, they’ve provided an insight into Wondershare Dr.Fone – Screen Unlock and its unique functions.
How to Remove a Previously Synced Google Account from Your Oppo A18
The setting up process of a new Android phone requires you to add a Google account that saves all activities and data of the phone like search history, details of online shipping, play store purchases, and more. Once the account is set, it cannot be changed till you delete everything from your phone. Moreover, with the introduction of FRP lock, even a factory reset will not remove the synced Google account.
So, now what if you want to sell your phone or have purchased a second-hand device that is still associated with the previous owner’s Google account? No, worries as there are workarounds available that will help you remove your previously synced google account from your Android device.
Keep reading to know more in detail about how to bypass previously synced google accounts.
Heres a full guide on how to remove google account from android, click to know more!
Part 1: Remove Previously Synced Google Account from Android Phone Without Phone Reset
In this part, we will discuss the methods that can be used for removing the previously synced account from your Android phone without a phone reset.
Method 1: Removing Google Account using the Android Settings Menu
If you just plan to reset your phone, maybe because of the lag caused by the phone cache, and you know the inconvenience of Google FRP as a protection mechanism, then you can remove Google FRP through the Settings menu.
The steps for this method are listed below.
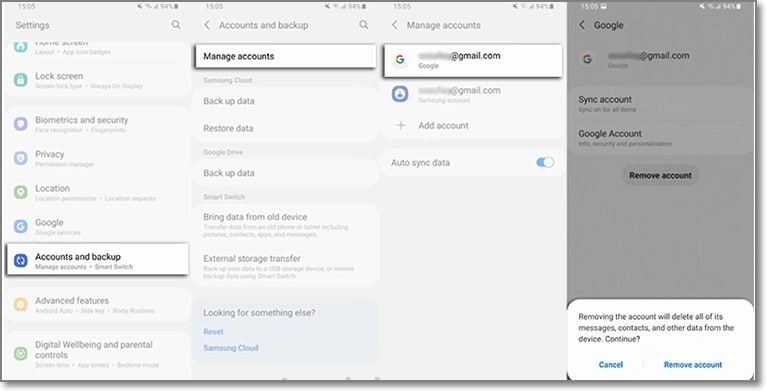
- Step 1: On your Android phone go to the Settings option and choose Accounts & Backup.
- Step 2: Select the Manage Accounts option now and the list of the associated Google Devices will appear.
- Step 3: Choose and click on the Google Account that you want to remove and a pop-up message will appear to inform you that all the account data will be deleted with this action.
To confirm the removal of the account, click on the Remove account button.
Method 2: Remove the Google account from the Android phone using the computer
There is another method using which you can remotely remove the Google account associated with your phone. The steps for the method are listed below.
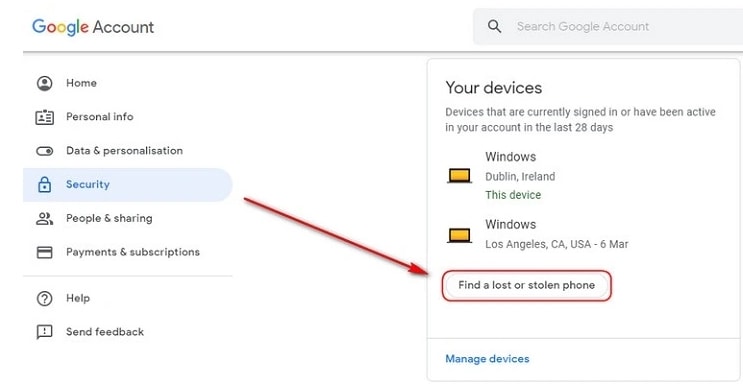
- Step 1: Using another device or a PC, sign in to your Google account that was previously synced on this device and choose the Security option.
- Step 2: Next scroll down and then tap on the Your devices option and choose to Manage devices.
- Step 3: You will now see the list of devices linked to your Google account. Next, tap on Find a lost or stolen phone and then select the Remove option present next to Account access.
- Step 4: You will be again asked if you want to delete the account. Select the Remove option.
- Step 5: The account will be removed successfully and the confirmation message will appear.
Note: This method will actually sign out you from the Google account and will not delete it permanently. To again get access to the account, a notification will appear on your phone to enter the password.

Part 2: How to Disable Factory Reset Protection to Bypass Google Account Verification After Factory Reset
The Factory Reset Protection (FRP) is a security feature for the Android device that allows factory reset only after the associated Google ID and password are entered correctly. With multiple accounts and passwords to remember there is quite a possibility that you may forget your Android phone Google account details and here the need to bypass Google account verification arises.
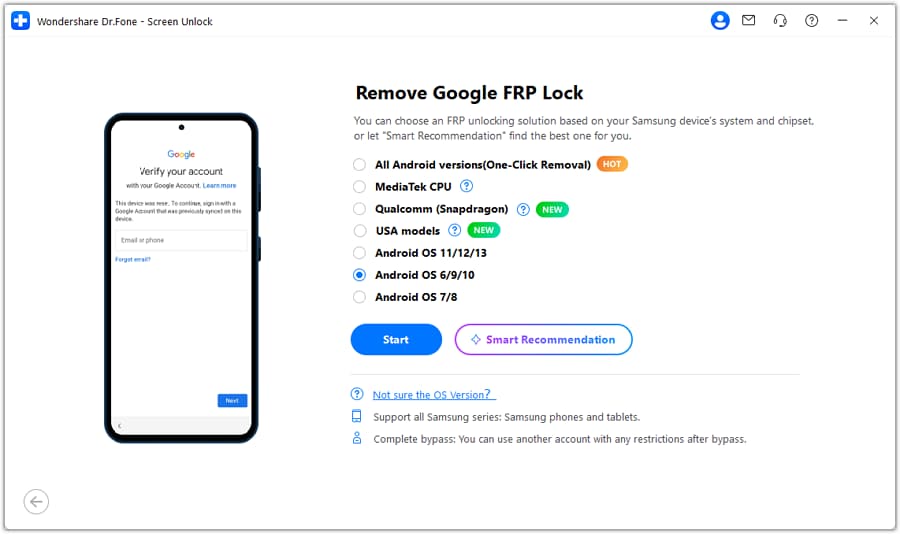
Though there are multiple tools available we recommend Dr. Fone - Screen Unlock (Android) as the best and the most reliable option. Using this excellent Windows and Mac-based software, FRP lock on all popular Android devices including Samsung, LG, HTC, and others. The tool is simple to use and requires no technology. There is also an option where you can unlock your device if you do not know the OS version.
![]()
Dr.Fone - Screen Unlock (Android)
Get into Locked Phones within Minutes
- 4 screen lock types are available: pattern, PIN, password & fingerprints.
- Easily remove the lock screen; No need to root your device.
- Everybody can handle it without any technical background.
- Provide specific removal solutions to promise good success rate
4,008,669 people have downloaded it
Steps to remove FRP lock using Dr. Fone-Screen Unlock (Android)
Step 1: Download, install and run the software on your system, and from the main interface choose the Screen Unlock option. Make sure that your phone is connected to WiFi.
Step 2: Next, choose Unlock Android Screen/FRP and then select the Remove Google FRP Lock option.
Step 3: Next, choose the OS version of your device from the given options, and then using a USB cable, connect your phone to your system.
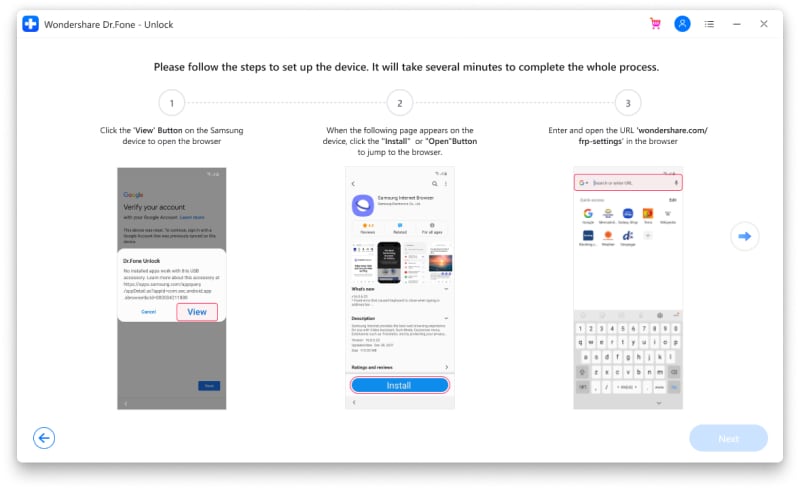
Step 4: After the Oppo A18 device is connected, the Oppo A18 device information will appear on the software for you to confirm and the notification for the same will be sent to your Android phone.
Step 5: Now follow the notifications for removing the FRP lock and in the browser enter drfonetoolkit.com.
Step 6: Next, click on the Android 6/9/10 button, choose Open Settings and select the PIN option to set a PIN to be used in the further steps.
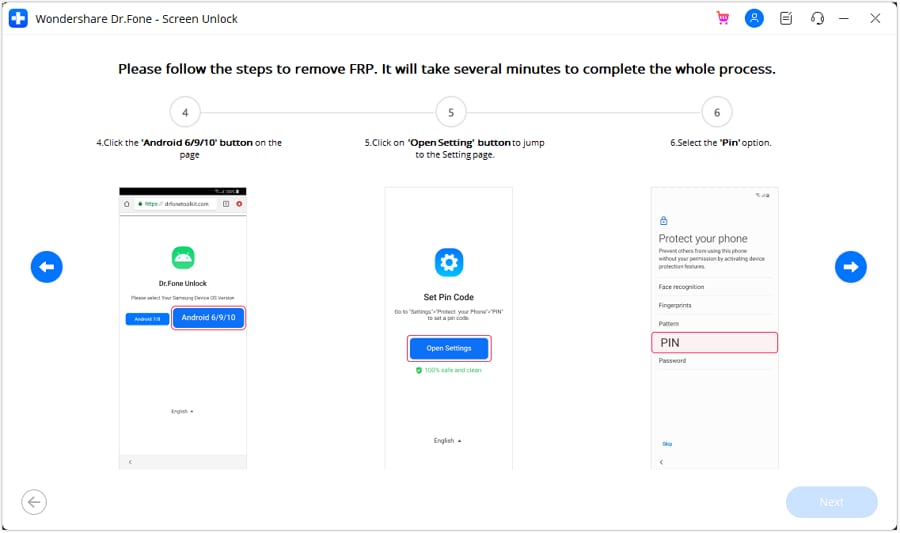
Step 7: Keep following the steps as they appear till you reach the Google Account Sign-In page. Here click on the Skip option that will successfully remove and bypass the Google Account.

The above given are the brief steps for the FRP bypass process. To learn about the entire process in detail, check Dr.Fone-Screen Unlock (Android) guide .
Part 3: Hire a Remote FRP Removal Service to Bypass ZTE/Motorola After Factory Reset
To bypass the FRP lock on your ZTE, Motorola, and Samsung device, there is also an online service called UnlockJunky.com that claims to remove the FRP lock and previously linked account on your Android device within 5-15 minutes. This is a paid service that also claims that if they are unable to remove the lock, they will refund the amount to their customers.
So, if you cannot sign in with a Google account that was previously synced, you can give this, method a try.
Step 1: Open the official service page Unlockjunky on your browser.
Step 2: Next, choose the Oppo A18 device’s brand, model, and unlock type from their respective drop-down menus. Click on Unlock Now button after entering the details.
Step 3: Now you need to initiate the order by providing the details asked and completing the payment.
Step 4: Next, the software needs to be downloaded and installed on your system, and using a USB cable, connect your phone to your computer.
Step 5: Connect with one of the support provider members through the live chat and they will help you remove the FRP lock on your Android phone.
With the steps above, you can remove the account previously synced on this device.

Limitations of using the Unlockjunky method:
- This is a paid service.
- Works only with Motorola, ZTE, and Samsung devices.
- There is no surety that the service will work for removing the FRP lock on your devices.
- If you have to remove the FRP lock from multiple devices, a separate payment for each device has to be done.

Conclusion
Above we have listed several ways to remove a previously synced Google account on your Android device. The best of all the listed solutions is Dr. Fone - Screen Unlock (Android) as it supports bypassing FRP lock on multiple Android devices in a hassle-free manner. Once the license is purchased, you can unlock as many numbers of devices as you want without any worries.
How To Unlock a Oppo A18 Easily?
The Oppo series has made a significant splash in the smartphone market. It captivated users with its blend of innovative features and sleek design. The Oppo A18 have recently been the go-to choice for people following the phone series. If you’re a proud owner of Oppo A18 , this guide is your go-to reference for unlocking the full potential of your device.
It will cover various ways toperform a Oppo A18 unlock, no matter the context of what you need unlocking for. This ensures you can enjoy every aspect of your shiny new Pixel to the fullest. Whether you’re a tech enthusiast or a casual user, these tips and tricks will help you master your Oppo device.
![]()
Part 1: Ways That Oppo Lets You Unlock Your Oppo A18
Oppo A18 are more than just smartphones; they are gateways to a personalized and secure user experience. To access the myriad of features these devices offer, Google provides several unlocking methods, ensuring both convenience and security. Here are these options:
- A Personal Identification Number (PIN) is a simple yet effective way to secure your phone. It’s a numeric code that you enter on the lock screen. Setting up a PIN is straightforward via the Oppo A18 device’s security settings, and unlocking your phone is as easy as tapping in the correct sequence of numbers.
- Similar to a PIN but potentially more secure due to the allowance of a longer combination of numbers and letters. A passcode is ideal for those who seek an extra layer of security. You set it up in the security settings and use it to unlock your phone just like a PIN but with the added complexity of alphanumeric characters.
- Face Unlock.Pixel’s Face Unlock uses advanced facial recognition software. It scans your face to grant access, offering a hands-free and quick way to unlock your Pixel. This feature can be activated in the security settings and requires a simple glance at your phone to unlock.
![]()
- Fingerprint Unlock. This method uses your unique fingerprint as a key. It’s fast, secure, and convenient. The Pixel 6a, 6, and 7 fingerprint scanners are actually under the display. Register your fingerprint in the settings, then touch the sensor to gain access.
- Pattern. If you prefer a more visual method, the pattern lock lets you draw a specific shape or pattern on the screen to unlock your phone. It’s a fun and interactive way to secure your device. Create your pattern in the security settings, and unlock your phone by replicating it on the lock screen.
In essence, each unlocking method offered by the Oppo A18 provides a blend of security and ease. Whichever unlocking method you prefer, Google ensures that accessing your phone is secure and convenient. All you need to do is set up your preferred method in the Oppo A18 device’s settings and use it to unlock your phone.
Part 2: What To Do if You Forgot Your Screen Unlock Method
Forgetting the screen unlock method on your Oppo A18 , whether it’s a PIN, passcode, pattern, or encountering face or fingerprint recognition issues, can be a frustrating experience. Fortunately, there are methods to regain access to your device. This section will show you your options, from third-party tools to other methods like Safe Mode and force resetting.
Learn different ways to unlock a Oppo A18, from forgotten screen locks here.
Method 1: Wondershare Dr.Fone
Wondershare Dr.Fone is a comprehensive software suite that manages various aspects of your mobile device. It’s especially renowned for its ability to address common smartphone issues, including forgotten screen unlocks.
Dr.Fone offers a range of features, including data recovery, data transfer between devices, backup and restore functions, and a screen unlock feature. The Screen Unlock feature of Dr.Fone stands out for its ability to bypass your Oppo’s screen lock without losing data. It supports PIN, pattern, password, fingerprint, and face lock.
To do this, perform the steps below:
- Step 1: Download and install Dr.Fone on your computer. Then, connect your Pixel phone to it with a cable.
Step 2: Go to Toolbox > Screen Unlock. Then, use a connector to connect your Pixel device to the PC.

- Step 3: Select Android on this page.

- Step 4: Choose Unlock Android Screen, and select your phone’s brand (Google) in the following brand list.
- Step 5: Now, choose Remove without Data Loss.
- Step 6: Ensure the correctness of your device details. Then, type in “000000” to proceed.

- Step 7: Follow on-screen instructions to put your device into download mode.

- Step 8: Click Done after the process has finished.
Tips: Is your Pixel locked accidently? Are you searching for a powerful tool? No worries as Dr.Fone is here to help you. Download it and start a seamless unlock experience!
Method 2: Entering Into Safe Mode
Safe Mode is a diagnostic mode in Android that can help bypass third-party lock screen apps. It’s useful if you’ve used a third-party app for your lock screen.
To do this, press the power button, then long-press on the Power off option. Tap OK when Reboot to safe mode option appears. In Safe Mode, third-party apps are disabled. Thus, you can now access your device if a third-party app is causing lock issues.
Method 3: Force Resetting a Device/Flashing a New ROM
Force resetting or flashing a new ROM can be considered a last resort. They involve erasing all data on your device or installing a new operating system.
- Force resetting your device. To force reset your Oppo, press and hold the Power and Volume Down buttons simultaneously to enter recovery mode. Use the volume buttons to navigate to Wipe data/factory resetand select it with the power button. This will get rid of existing password locks.
- Flashing a new ROM. This is more complex and typically requires downloading a new firmware and flashing tool. It’s only recommended for advanced users or as a last resort.
Remember, while these methods can effectively unlock your device, they also come with risks. Always back up your data regularly, and use these methods responsibly, considering their potential to erase your data or affect your device’s warranty.
Bonus: How To Perform a SIM Unlock on Oppo
Unlocking the SIM on your Oppo, particularly the Oppo A18 , opens up a world of flexibility, especially for those who frequently travel or wish to switch carriers. This process can be accomplished for free through your carrier, provided certain conditions are met. Dive into the steps and considerations for performing a SIM unlock on your Oppo.
Understanding the Prerequisites
Before proceeding with the SIM unlock, ensure you’re in good standing with your carrier. This means:
- No outstanding bills.
- Your contract for the phone has expired.
- The device has been in your possession for at least 60-90 days.
Different carriers have varying requirements for a SIM unlock, so your first move should be to contact them for specific details.
Parental Control Software
### Steps for SIM Unlock Through Your CarrierHere are the steps to SIM unlock your Oppo A18,These generally involve the following steps but are still subject to the official instructions of your carrier:
![]()
- Step 1: Open the Phone app and dial *#06# on your Oppo. This will display your phone’s IMEI number. Note this number down for future reference.
- Step 2: Call your carrier and request a SIM unlock code. You’ll likely need to provide your Oppo’s IMEI number.
- Step 3: If you meet your carrier’s requirements, they will email you the SIM unlock code within 2-5 days.
- Step 4: Once you receive the code, replace your current SIM with one from a different carrier. When prompted, enter the SIM unlock code you received via email.
Alternative Method: Android SIM Unlock
If your carrier cannot unlock your Oppo A18 ’s SIM, or if you prefer a quicker solution, consider using network unlocking services. This may be websites like UnlockBase, Mobile Unlocks, etc.
This generally involves the following steps:
- Step 1: Like the previous method, retrieve your IMEI number by dialing *#06# on your Pixel.
- Step 2: Go to the Android SIM unlock provider’s website and enter your device’s IMEI number.
- Step 3: Follow through with the checkout process, providing payment and contact information.
- Step 4: Once the payment is processed, you’ll receive the unlock code via SMS or email. Insert a SIM from a different carrier into your Pixel, then enter the received unlock code when prompted.
By following these steps, you can successfully unlock the SIM of your Oppo device, ensuring you can enjoy your phone with the carrier of your choice, wherever your travels may take you.
Important Considerations
Remember, unlocking the SIM doesn’t absolve you from your carrier contract. You’re still obligated to make timely payments as per your agreement. The primary advantage of unlocking your SIM is the freedom to use your Oppo A18 with any carrier’s SIM card, offering greater flexibility and control over your mobile experience. Thus, it is encouraged not to do anything illegal to avoid future complications.
Conclusion
This article explored various methods to unlock Oppo A18,It delved into standard unlocking features like PIN, passcode, face and fingerprint recognition, pattern unlock, and how to handle situations where you forget your screen unlock method. It also highlighted that learning to unlock your screen, especially on Oppo phones, is crucial to ensure continuous access to your device.
Wondershare Dr.Fone is a reliable tool for those challenging moments when you forget your passcode. It offers a straightforward solution for screen unlocking and ensures you keep your phone functional and handy at all times.
- Title: Delete Gmail Account With/Without Password On Oppo A18
- Author: Peter
- Created at : 2024-08-02 12:40:22
- Updated at : 2024-08-03 12:40:22
- Link: https://android-unlock.techidaily.com/delete-gmail-account-withwithout-password-on-oppo-a18-by-drfone-android/
- License: This work is licensed under CC BY-NC-SA 4.0.