
A Complete Guide To OEM Unlocking on Lava Storm 5G
A Complete Guide To OEM Unlocking on Lava Storm 5G
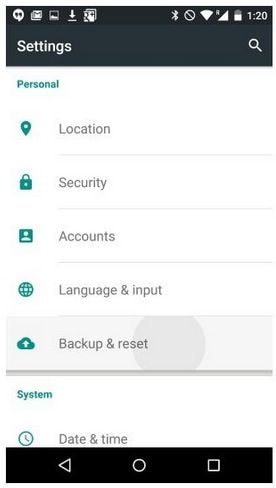
Android, known worldwide as a major player in phone operating systems, stands out for its flexibility and open-source nature. This allows users to customize their devices extensively. However, despite this openness, certain features and capabilities can still be locked or restricted, either by Google or the Lava Storm 5G device manufacturer.
For those looking to truly unleash the full potential of their Android device, an OEM unlock is an essential step. This article will delve into the process of OEM unlocking on Android, guiding you through its benefits and how to safely perform it.
OEM lock might sound like technical jargon to many. However, it’s a key concept for those who wish to dive deeper into Android customization. OEM stands for Original Equipment Manufacturer. Unlocking in this context refers to removing restrictions made by the manufacturer on the Lava Storm 5G device.
This process allows you to gain deeper access to the Lava Storm 5G device’s software. Thus, OEM unlocking is often required for customizing or modifying the system at a more advanced level.
Why Enable OEM Unlock?
The primary reason to enable OEM unlocking is to gain the ability to root your device or install custom firmware, also known as ROMs. Rooting is the Android equivalent of jailbreaking. It allows users to access and modify the Lava Storm 5G device’s software at the deepest level.
This can enable the installation of apps and software that require more permissions than what is typically available. On the other hand, custom ROMs can change your device’s interface. They can also add features not available in the stock version of Android.
Pros and Cons of OEM Unlocking
Here are some great things you can get when you allow OEM unlock.
- The most significant advantage is the ability to customize your device far beyond what’s possible with standard settings.
- Root access. It allows for rooting the phone enabling advanced features and apps.
- Custom ROMs. Users can install different versions of Android or entirely new operating systems.
On the other hand, here are some cons that you must consider before performing the process on your phone:
- Security risks. Root access can make your device more vulnerable to malware and hacking.
- Void warranty. OEM unlocking often voids the manufacturer’s warranty.
- Potential for bricking. Incorrect procedures can render the Lava Storm 5G device unusable, known as ‘bricking’.
Understanding the Risks
It’s crucial to understand that OEM unlocking is not without its risks. It does open the door to several customizations and tweaks. However, it can also compromise the security of your device. There’s always a chance of bricking your phone, especially if the unlocking process isn’t followed correctly or an unstable custom ROM is installed.
Additionally, most manufacturers will void your warranty once you unlock the bootloader. This leaves you without support in case something goes wrong. So, in the next sections, you’ll be guided through the steps of OEM unlocking. You’ll also learn how to do it safely, ensuring you make the most out of your Android device.
Part 2: How To Enable OEM Unlock on Your Android Phone
Enabling OEM unlock can feel like stepping into uncharted territory. Still, it’s relatively straightforward if you follow the right steps. Before you start, it’s important to remember that the exact process can vary slightly depending on your device’s brand and model. However, the general steps are usually similar across most Android devices.
- Step 1: Before proceeding, ensure you back up all important data. Enabling OEM unlock may require a factory reset, which erases all data on the Lava Storm 5G device.
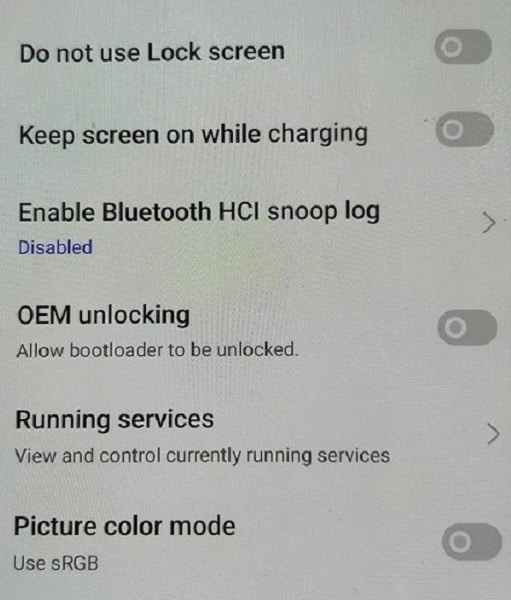
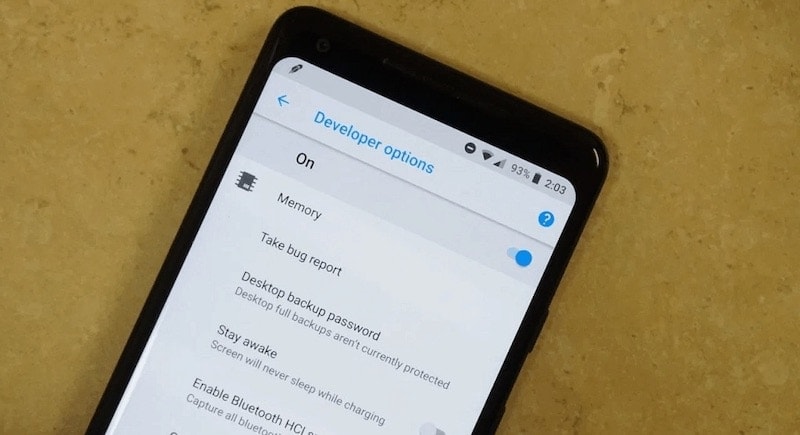
- Step 2: Go to your phone’s Settings > About Phone. Then, tap on the Build number seven times. You should see a message that says you’re now a developer.
- Step 3: Find and select Developer options on Settings. Then, tap OEM unlocking. You might need to enter a PIN or password.
Here are some common links where you might find the needed PIN or password:
After these steps, your device’s bootloader is now unlocked, and you can proceed with rooting or installing custom ROMs. Remember that this is a significant change to your device’s system, and it should be done cautiously and ideally only if you’re comfortable with potential risks.
Part 3: What Can You Do After OEM Unlock?
Unlocking your phone’s OEM opens up a world of possibilities. It allows you to customize your device beyond what’s available in its factory settings. This newfound freedom, however, comes with its own set of responsibilities and risks. Here’s what you can do after having your phone OEM unlocked.

Root Your Device
Rooting is akin to having the master key to your device’s software. It allows you to gain superuser access, enabling modifications and access to system files that were previously restricted. With rooting, you can:
- Remove pre-installed apps or bloatware.
- Customize system settings and UI elements.
- Enhance performance or battery life through underclocking or overclocking the CPU.
Flash a Custom ROM
A custom ROM is a new operating system you can install on your device. This is one of the most popular reasons for OEM unlocking. Custom ROMs offer:
- The latest Android updates, even for older devices, are no longer supported by manufacturers.
- New features and customization options that aren’t available in the stock ROM.
- Potential performance improvements and unique user interfaces.
Enjoy High Customization
With an OEM unlocked device, the sky’s the limit regarding customization. You can:
- Install custom kernels for better performance and battery life.
- Use powerful apps that require root access for advanced device management.
- Customize everything from the boot animation to the layout of your UI.
However, it’s crucial to proceed with caution. Rooting and installing custom ROMs can void your warranty and, if not done correctly, can turn your device into an expensive paperweight (a state often referred to as “bricking”). Always use reliable sources for your custom ROMs and root-access apps.
Bonus: How To Unlock Your Android Screen When You Forgot Password
Forgetting the password to your Android phone can be a stressful experience. It locks you out of your device. It cuts your access to personal data, contacts, and essential apps. However, aside from OEM unlocking, learning the skill of screen unlocking is incredibly useful in such situations. It’s not just about regaining access. It’s about harnessing control over your device during forgetfulness or emergency.
Wondershare Dr. Fone’s Screen Unlock (Android) will save you in these situations. It’s designed to unlock your phone without requiring a factory reset. It saves your data from being erased. This feature supports unlocking patterns, PINs, passwords, and fingerprints, offering a comprehensive solution for regaining access to your device.
![]()
Dr.Fone - Screen Unlock (Android)
The Best UnlockJunky Alternative to Bypass FRP and Solve Your Screen Locks
- Remove all Android screen locks (PIN/pattern/fingerprints/face ID) in minutes.
- Bypass the FRP lock of Samsung without a PIN or Google account.
- Everyone can handle the lock screen without any tech knowledge.
- Provide specific removal solutions to promise good success rate.
4,008,671 people have downloaded it
How To Perform Screen Unlock With Dr.Fone
The process is straightforward. It involves connecting your device to a computer and running the Dr.Fone software. Then, you’ll follow simple on-screen instructions. Learn how to do those below:
- Step 1: Go to Toolbox > Screen Unlock. Connect your Android device with your PC.

- Step 2: Select Android on this page.

- Step 3: Select Unlock Android Screen.

- Step 4: Select your device brand.

- Step 5: Click Remove without Data Loss.

- Step 6: After confirming device details, type “000000” to execute the operation.

- Step 7: Follow the on-screen instructions for putting your device into download mode. Then, wait for the process to finish.

- Step 8: Once complete, click Done. If your device still isn’t accessible, click Try again.

Conclusion
In wrapping up, you’ve explored the ins and outs of “what is OEM unlock” in the Android world. It’s a key to opening up a trove of customizability on your Android device. It lets you tweak and tailor your phone to your heart’s content. But remember, with great power comes great responsibility.
Diving into OEM
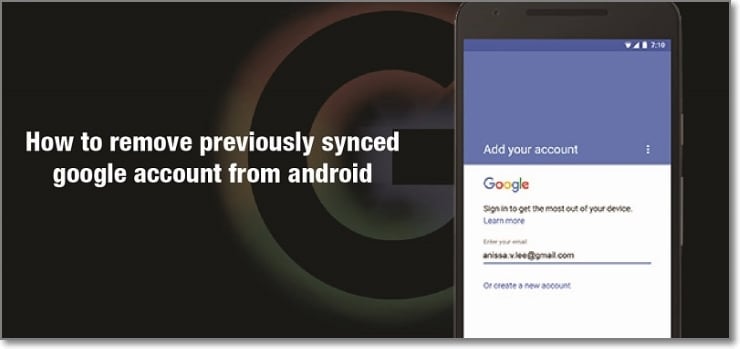
How to Remove a Previously Synced Google Account from Your Lava Storm 5G
The setting up process of a new Android phone requires you to add a Google account that saves all activities and data of the phone like search history, details of online shipping, play store purchases, and more. Once the account is set, it cannot be changed till you delete everything from your phone. Moreover, with the introduction of FRP lock, even a factory reset will not remove the synced Google account.
So, now what if you want to sell your phone or have purchased a second-hand device that is still associated with the previous owner’s Google account? No, worries as there are workarounds available that will help you remove your previously synced google account from your Android device.
Keep reading to know more in detail about how to bypass previously synced google accounts.
Heres a full guide on how to remove google account from android, click to know more!
Part 1: Remove Previously Synced Google Account from Android Phone Without Phone Reset
In this part, we will discuss the methods that can be used for removing the previously synced account from your Android phone without a phone reset.
Method 1: Removing Google Account using the Android Settings Menu
If you just plan to reset your phone, maybe because of the lag caused by the phone cache, and you know the inconvenience of Google FRP as a protection mechanism, then you can remove Google FRP through the Settings menu.
The steps for this method are listed below.
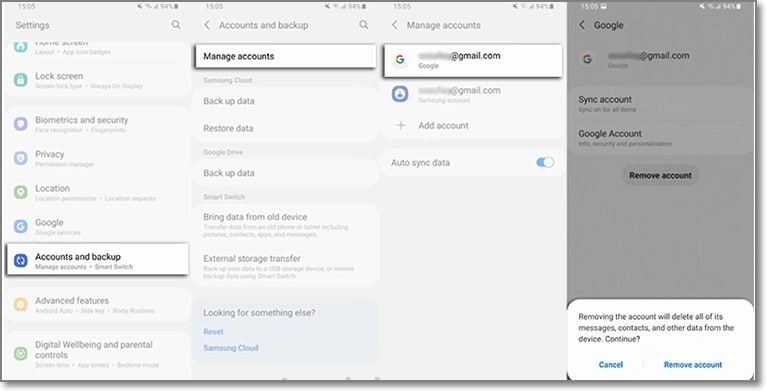
- Step 1: On your Android phone go to the Settings option and choose Accounts & Backup.
- Step 2: Select the Manage Accounts option now and the list of the associated Google Devices will appear.
- Step 3: Choose and click on the Google Account that you want to remove and a pop-up message will appear to inform you that all the account data will be deleted with this action.
To confirm the removal of the account, click on the Remove account button.
Method 2: Remove the Google account from the Android phone using the computer
There is another method using which you can remotely remove the Google account associated with your phone. The steps for the method are listed below.
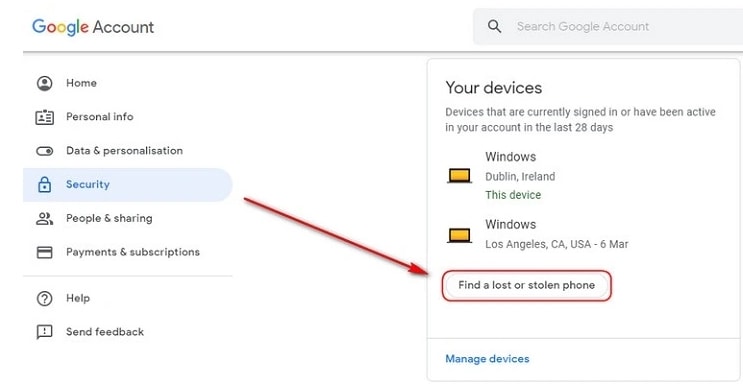
- Step 1: Using another device or a PC, sign in to your Google account that was previously synced on this device and choose the Security option.
- Step 2: Next scroll down and then tap on the Your devices option and choose to Manage devices.
- Step 3: You will now see the list of devices linked to your Google account. Next, tap on Find a lost or stolen phone and then select the Remove option present next to Account access.
- Step 4: You will be again asked if you want to delete the account. Select the Remove option.
- Step 5: The account will be removed successfully and the confirmation message will appear.
Note: This method will actually sign out you from the Google account and will not delete it permanently. To again get access to the account, a notification will appear on your phone to enter the password.
Part 2: How to Disable Factory Reset Protection to Bypass Google Account Verification After Factory Reset
The Factory Reset Protection (FRP) is a security feature for the Android device that allows factory reset only after the associated Google ID and password are entered correctly. With multiple accounts and passwords to remember there is quite a possibility that you may forget your Android phone Google account details and here the need to bypass Google account verification arises.
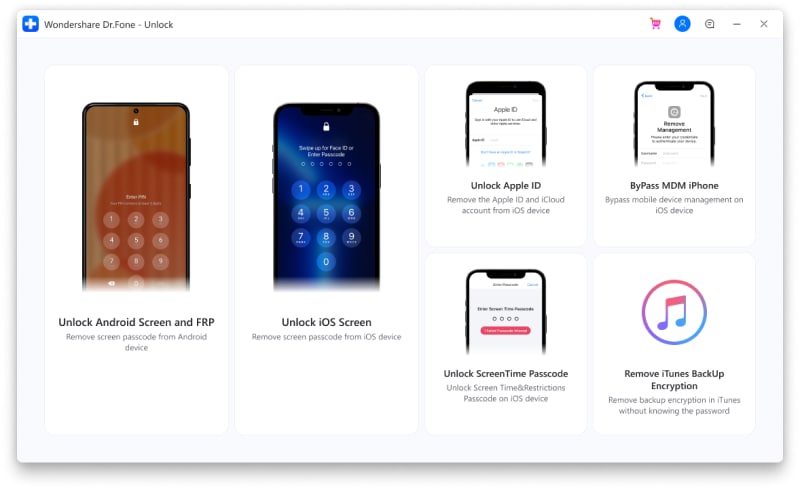
Though there are multiple tools available we recommend Dr. Fone - Screen Unlock (Android) as the best and the most reliable option. Using this excellent Windows and Mac-based software, FRP lock on all popular Android devices including Samsung, LG, HTC, and others. The tool is simple to use and requires no technology. There is also an option where you can unlock your device if you do not know the OS version.
![]()
Dr.Fone - Screen Unlock (Android)
Get into Locked Phones within Minutes
- 4 screen lock types are available: pattern, PIN, password & fingerprints.
- Easily remove the lock screen; No need to root your device.
- Everybody can handle it without any technical background.
- Provide specific removal solutions to promise good success rate
4,008,669 people have downloaded it
Steps to remove FRP lock using Dr. Fone-Screen Unlock (Android)
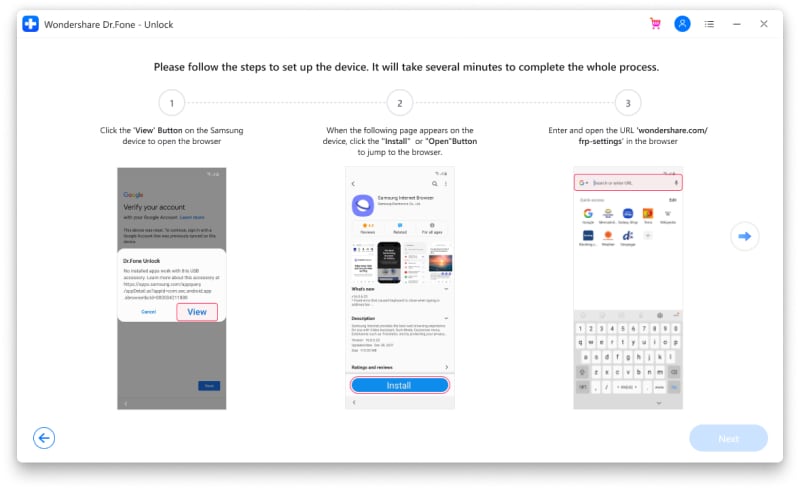
Step 1: Download, install and run the software on your system, and from the main interface choose the Screen Unlock option. Make sure that your phone is connected to WiFi.
Step 2: Next, choose Unlock Android Screen/FRP and then select the Remove Google FRP Lock option.
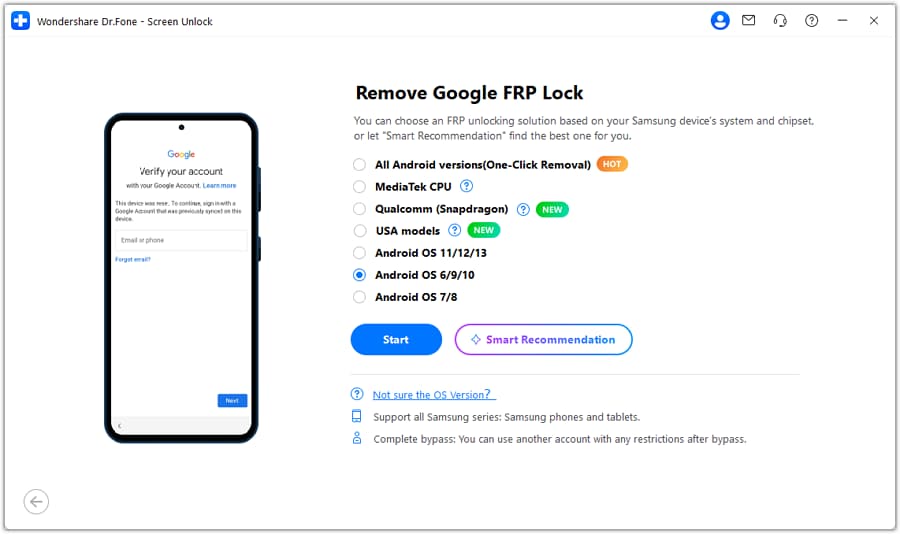
Step 3: Next, choose the OS version of your device from the given options, and then using a USB cable, connect your phone to your system.
Step 4: After the Lava Storm 5G device is connected, the Lava Storm 5G device information will appear on the software for you to confirm and the notification for the same will be sent to your Android phone.
Step 5: Now follow the notifications for removing the FRP lock and in the browser enter drfonetoolkit.com.
Step 6: Next, click on the Android 6/9/10 button, choose Open Settings and select the PIN option to set a PIN to be used in the further steps.
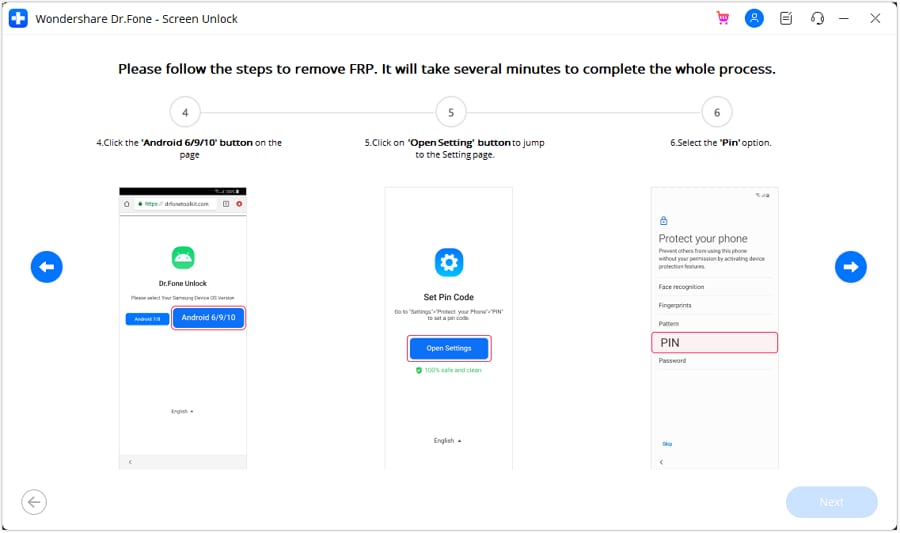
Step 7: Keep following the steps as they appear till you reach the Google Account Sign-In page. Here click on the Skip option that will successfully remove and bypass the Google Account.

The above given are the brief steps for the FRP bypass process. To learn about the entire process in detail, check Dr.Fone-Screen Unlock (Android) guide .
Part 3: Hire a Remote FRP Removal Service to Bypass ZTE/Motorola After Factory Reset
To bypass the FRP lock on your ZTE, Motorola, and Samsung device, there is also an online service called UnlockJunky.com that claims to remove the FRP lock and previously linked account on your Android device within 5-15 minutes. This is a paid service that also claims that if they are unable to remove the lock, they will refund the amount to their customers.
So, if you cannot sign in with a Google account that was previously synced, you can give this, method a try.
Step 1: Open the official service page Unlockjunky on your browser.
Step 2: Next, choose the Lava Storm 5G device’s brand, model, and unlock type from their respective drop-down menus. Click on Unlock Now button after entering the details.
Step 3: Now you need to initiate the order by providing the details asked and completing the payment.
Step 4: Next, the software needs to be downloaded and installed on your system, and using a USB cable, connect your phone to your computer.
Step 5: Connect with one of the support provider members through the live chat and they will help you remove the FRP lock on your Android phone.
With the steps above, you can remove the account previously synced on this device.

Limitations of using the Unlockjunky method:
- This is a paid service.
- Works only with Motorola, ZTE, and Samsung devices.
- There is no surety that the service will work for removing the FRP lock on your devices.
- If you have to remove the FRP lock from multiple devices, a separate payment for each device has to be done.
Conclusion
Above we have listed several ways to remove a previously synced Google account on your Android device. The best of all the listed solutions is Dr. Fone - Screen Unlock (Android) as it supports bypassing FRP lock on multiple Android devices in a hassle-free manner. Once the license is purchased, you can unlock as many numbers of devices as you want without any worries.
How to Unlock Lava Storm 5G Phone without PIN
Being locked out of your device just because you forgot your lock screen pin can be so horrible. When this happens, most people tend to think that this is the end of everything. That isn’t true. You can always unlock your android screen no matter how many times you forget your screen lock pin. This article points out how to unlock your android screen lock if it happens that you forgot Android PIN.
Part 1.How to Unlock your Lava Storm 5G PIN Using Dr.Fone - Screen Unlock (Android)
If your android lock screen is locked because you have forgotten the pin, you will, of course, think of finding the best android phone unlocking software . Dr.Fone is the best android lock screen removal that you can use. Within five minutes, you can use this android lock screen removal to remove up to four types of android screen lock types which are: PIN, Pattern, Password, and Fingerprints.
With Dr.Fone - Screen Unlock (Android) , you also can unlock your screen without any data loss. Using this lock removal is very easy as it doesn’t require any technical knowledge. Anyone who knows how to use an android device can use it. This app is used to unlock Samsung Galaxy S, Note, Series and much more.
Dr.Fone - Screen Unlock (Android)
Remove 4 Types of Android Screen Lock without Data Loss
- It can remove 4 screen lock types - pattern, PIN, password & fingerprints.
- Only remove the lock screen, no data loss at all.
- No tech knowledge asked, everybody can handle it.
- Work for Samsung Galaxy S/Note/Tab series, and LG G2/G3/G4, etc.
4,669,934 people have downloaded it
How to Use Dr.Fone - Screen Unlock (Android)
Note:You can also use these tool to bypass other phone’s screen including Huawei, Xiaomi,etc., but it will wipe all your data after unlocking.
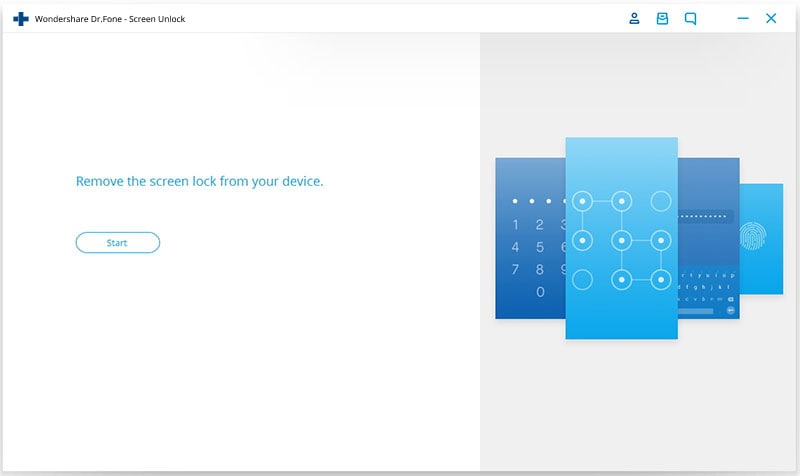
Step 1: Download and install Dr.Fone, the android lock screen removal on your device. Launch the program and click “Screen Unlock”.
Step 2: On the interface that appears, click “Start”, and then connect your Lava Storm 5G deviceto your PC using a USB cable.
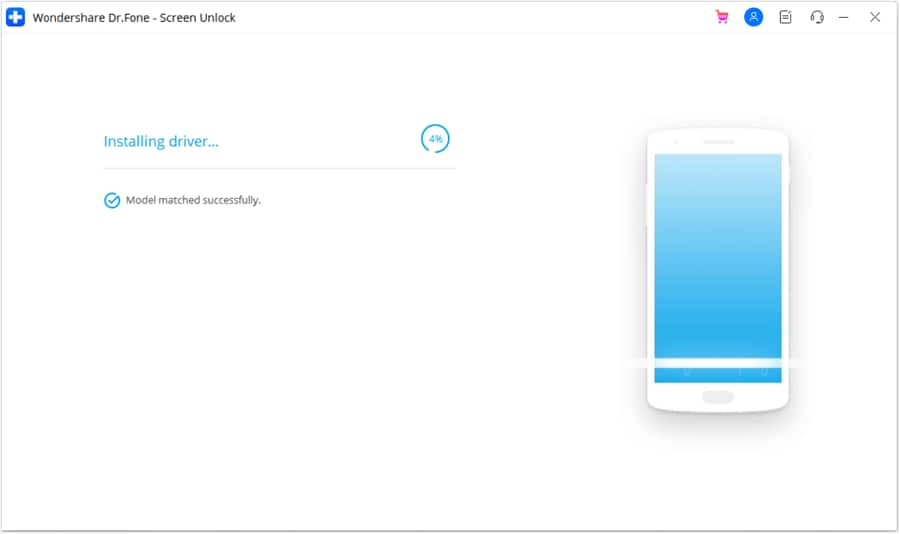
Step 3. Select your phone’s model in the list provided. Type “000000” on the blank box provide and then click the “Confirm” button.Then follow the guide provided to enter download Mode. You can also Power off the android device, and then press Power, Home and Volume Down button simultaneously and then press the Volume Up in order to enter download mode.
Step 4. The program will then download recovery package automatically. Be patient until the process is complete. After that you can now remove the lock pin.
Well done! you have now removed the distressing pin on your phone. Next time put a pin that you can easily remember.
Part 2.How To Enable Your Android Screen Lock PIN
The security of your device is one of the most important things that you should consider. Setting up or enabling your android screen lock PIN will ensure the safety of your personal information and data. Enabling a Screen lock PIN on your Lava Storm 5G deviceis very simple. You need no technical knowledge in order to do so. It will take you less than a minute to complete the simple process.
So how do you set up your android screen lock PIN? Here is a step-by-step guide on how to set the lock screen PIN on your android device.
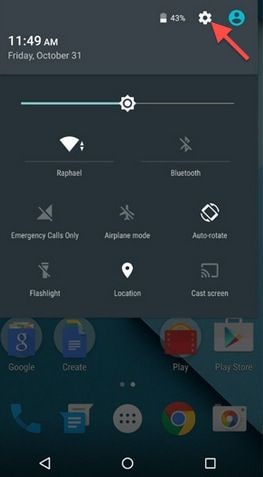
Step 1. Open “Settings” on your Phone

On your android device, open Settings. You can find the settings app in the app; drawer. You can also tap the cog icon on the notification mode and click Settings.
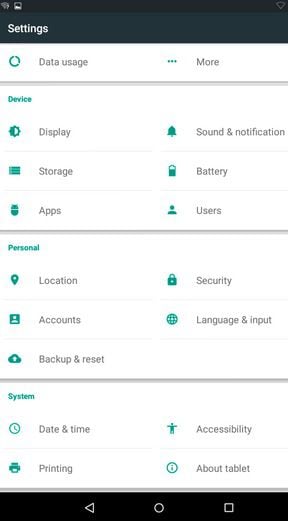
Step 2: Select the “Security” tab under “Personal”
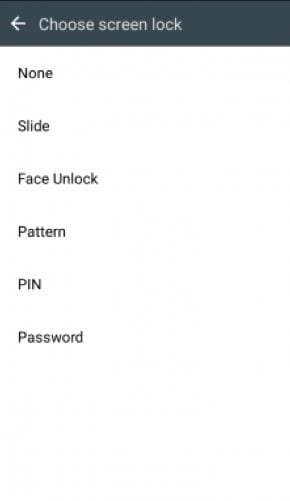
Step 3: Once you have clicked on “Security”, Go to “Screen Lock.” You will be provided with lock screen option such as None, Swipe, Pattern. PIN, and Password.
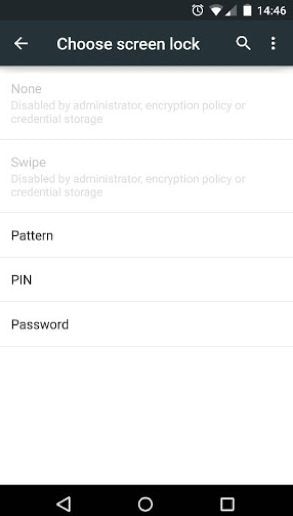
Step 4. Click on “PIN” option. You will be prompted to enter preferred 4-didgit PIN number. You will then be required o key in the same 4 digits to confirm your security PIN. Click “OK” and you will have enabled your Android screen lock PIN.

Good job. You will have to enter this PIN whenever your phone sleeps or when you reboot your phone.
Part 3. How to Disable Your Android Screen Lock PIN
In most occasions, in fact, 99.9%, the first thing that you will see when you power on your device or want to call, receive a call, or want to read a message. The availability of lock screen is to ensure the security and privacy of your personal data such as text, photos, and much more. However, the presence of the lock screen PIN will cause some delay in the actions that you want to take, but not so much. The delay is of course for a few second. The Problem is if you are prone to forgetting the screen lock PIN. This may necessitate the removal of the PIN or disable it in that case. If privacy and security of your device data are not anything that bothers you, then there is no need to waste some of your time in entering the locks screen pin every time you want to access your android device. Disable the Screen lock Pin. The steps are so simple and will not consume more than one minute to do so. Below is a step-by-step guide on how to disable your android screen lock PIN.
Step 1. On your android device, click to open the “Settings” app.
Step 2. In the interface that opens, go to “Security”
Step 3. You can then click on “Screen Lock” and select “None” to disable the screen lock PIN.
You will be prompted to enter the current PIN in order to disable it. Key in the PIN and you will have successfully disabled the Lock screen PIN. When you power off and the power on your android device, you will easily access your phone without any need for security PIN. Similarly, anyone can use your phone if they can gain access to it as it doesn’t have any screen lock.
Enabling screen lock on your Android is the smartest thing to do especially if you value your own privacy. On the other hand, it is a nightmare if you forget screen lock and you don’t know how to go about it. But at this moment, at least you have known a perfect way that you can remove screen lock without losing data on your Android phone.
Also read:
- [New] 2024 Approved Starting From Scratch Best Game Editing Programs for Newbies
- [New] In 2024, ScreenFlow for Mac Review
- 2024 Approved The Finest Cams to Document Snow Sports
- All About It Understanding Google's Podcast Service for 2024
- Best Samsung Galaxy XCover 6 Pro Tactical Edition Pattern Lock Removal Tools Remove Android Pattern Lock Without Losing Data
- Beyond the Basics Non-Inshot PC Video Tools
- Cutting Edge Cinematography with LG's Innovative 31MU97-B Display for 2024
- Fake Android Location without Rooting For Your Honor 90 | Dr.fone
- Forgot Pattern Lock? Heres How You Can Unlock Samsung Galaxy S23 FE Pattern Lock Screen
- How to Change Lock Screen Wallpaper on Samsung Galaxy A25 5G
- How To Track IMEI Number Of Samsung Galaxy A05s Through Google Earth?
- How to Unlock a Network Locked Samsung Galaxy M14 4G Phone?
- In 2024, How to Show Wi-Fi Password on Samsung Galaxy M54 5G
- In 2024, How to Unlock Samsung Galaxy Z Fold 5 Phone without Any Data Loss
- Resolving the Error: 'Cannot Load M3U8 Streams' In Google Chrome for Windows Users
- Top 15 Apps To Hack WiFi Password On Samsung Galaxy F54 5G
- Top 15 Apps To Hack WiFi Password On Samsung Galaxy M54 5G
- Transform Your Interaction With Technology Using OpenAI's Latest AI Marvel: The GPT-4 Model
- Unveiling the Top 5 Innovative Tools to Generate Advanced AI Dialogue Starters
- Title: A Complete Guide To OEM Unlocking on Lava Storm 5G
- Author: Peter
- Created at : 2025-02-28 11:00:45
- Updated at : 2025-03-03 01:44:52
- Link: https://android-unlock.techidaily.com/a-complete-guide-to-oem-unlocking-on-lava-storm-5g-by-drfone-android/
- License: This work is licensed under CC BY-NC-SA 4.0.